'%3e%3ccircle%20id='Ellipse_59'%20data-name='Ellipse%2059'%20cx='3'%20cy='3'%20r='3'%20transform='translate(11%208.786)'%20fill='none'%20stroke='%23f7941d'%20stroke-linecap='round'%20stroke-linejoin='round'%20stroke-width='2'/%3e%3cpath%20id='Path_82'%20data-name='Path%2082'%20d='M14,2A10,10,0,0,0,4,12a8.048,8.048,0,0,0,1.875,5.625L14,27l8.125-9.375A8.048,8.048,0,0,0,24,12,10,10,0,0,0,14,2'%20transform='translate(0%200)'%20fill='none'%20stroke='%23f7941d'%20stroke-linecap='round'%20stroke-linejoin='round'%20stroke-width='2'/%3e%3c/g%3e%3c/svg%3e)


How to Measure Plantation Shutters
Get the right measurement for every window
Getting Started
We have all the information and instructions you need to measure for your plantation shutter kits right here.
Follow along with our videos or see our written instructions below.
Before you start, have you?
Let’s make sure you’re all set:

Reviewed the product specifications for design options?
Decided on your panel layout for each window?
Read Mike's measuring tips?
Downloaded your Shutters Check Measure Worksheet
You’ll Need

A metal tape measure or laser meter

A pen and paper (or our worksheet)

1–2 people and about 5–10 minutes
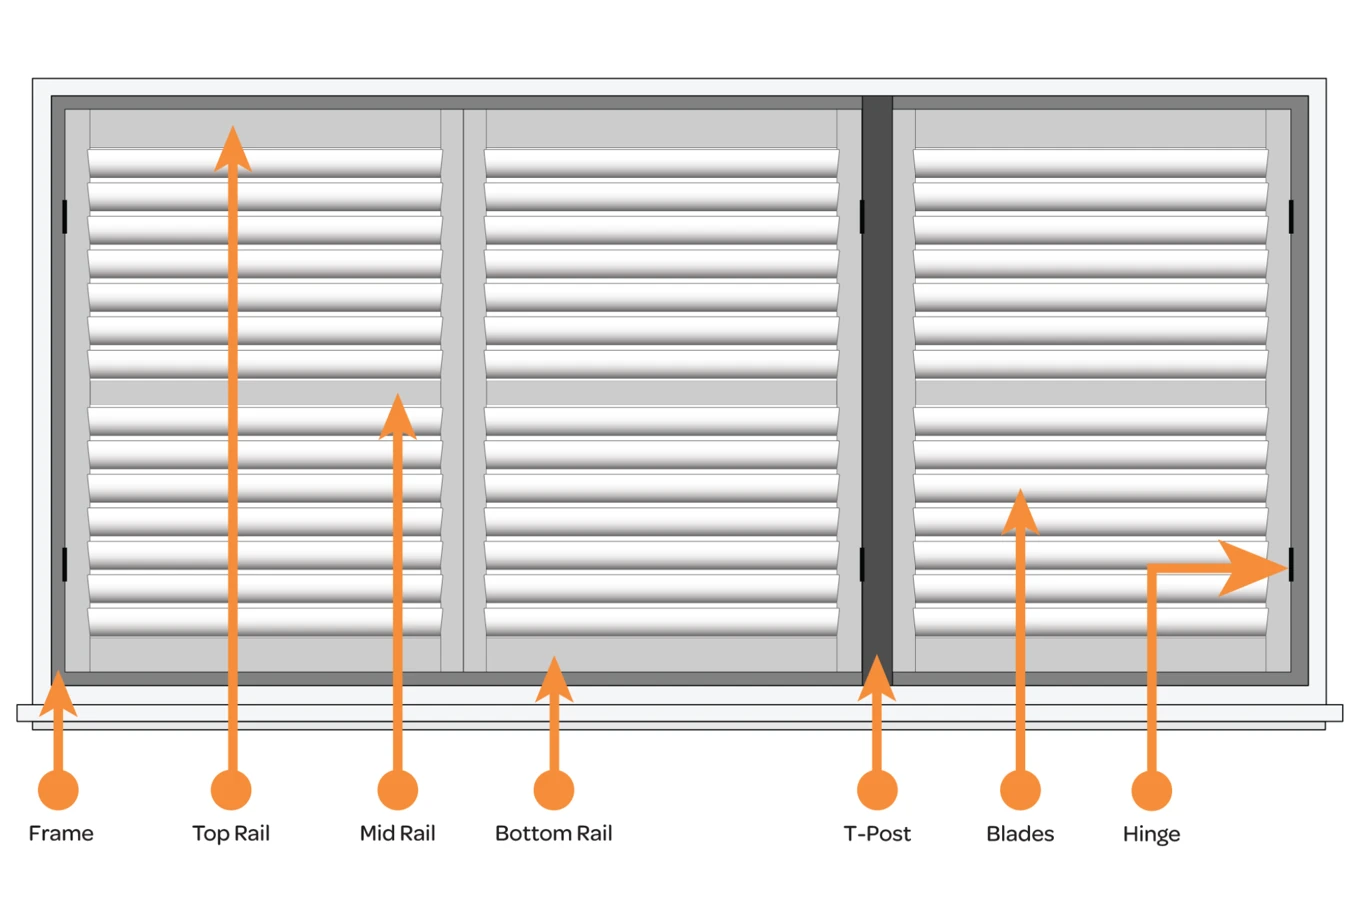
Plantation Shutter Components Overview
To ensure a successful installation of your plantation shutters it’s important to understand all of the components and the exact dimensions of all of these components.
Used in conjunction with your check measure worksheet and our panel layout chart, the dimension components will ensure that you get the best possible result when measuring for your plantation shutters.
Download our Shutter Component Dimensions
The blades of our shutters are reinforced with an aluminium core to ensure this durable material won't warp, crack, peel or fade.
Plantation Shutters dimensions - Minimums & Maximums
To ensure you always get a great result, we have minimum and maximum dimensions for our plantation shutters, depending on your selected panel layout.
* Please note: Maximum widths will vary based on the Panel layout selected
View our Plantation Shutter panel layouts here
Width (mm)
Drop (mm)
Minimum Panel width:
U Channel & Direct Mount 200 mm
L Frame & Z Frame 250mm
Minimum drop:
300 mm
Maximum width: 5700* mm
Maximum drop:
2400 mm
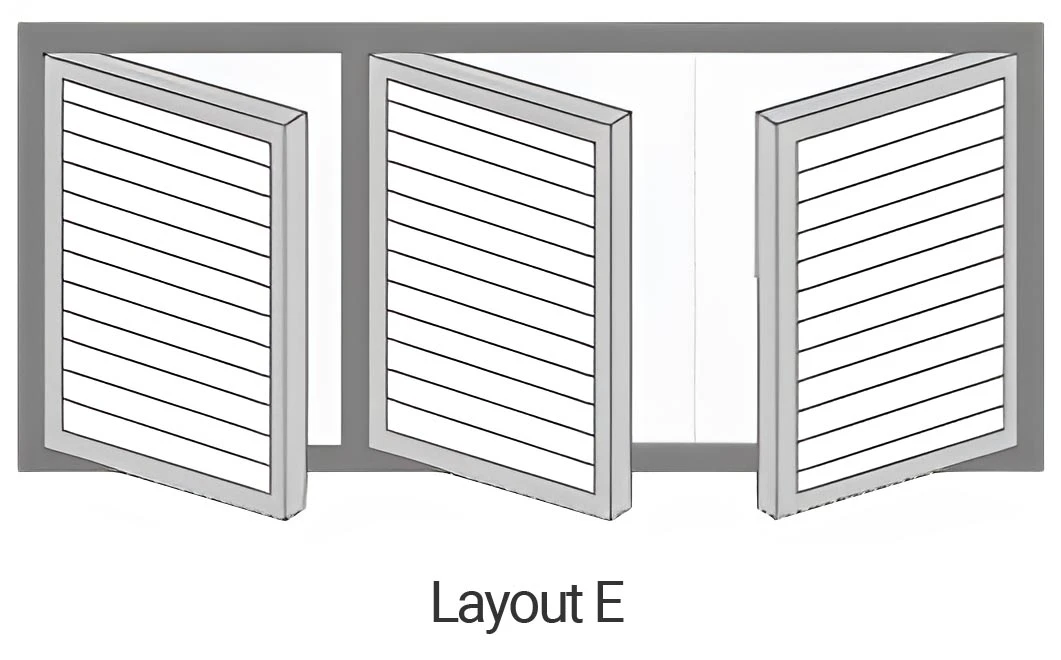
Plantation Shutter Layout Chart
Depending upon the size of your windows, there are a number of panel layouts to choose from. Michael has 2 simple rules to follow when deciding which panel layout will best suit your windows.
- ✓
Less is more
Aesthetically pleasing, it is preferable to have fewer panels rather than risk overcrowding your windows. Too many panels will end up blocking your light and view. - ✓
You must follow the window
Select a layout that will complement the flow of your windows. Consider where the mullions are placed.
Refer to the Plantation Shutter Layout Chart to view your options.
Used in conjunction with your measure worksheet the panel layout charts will help you decide on the following:
- •
Which layout options are available based on the overall width of your window
- •
How many panels per window - refer to rule 1
- •
Which layout will best suit the flow of your windows - refer to rule 2
Step-by-Step: Measuring for Shutters
1
Choose Your Mounting Style
Inside Mount Shutters
Inside mount shutters sit neatly within your window recess, creating a clean, streamlined look that’s flush with the wall or architrave — perfect for a modern finish.
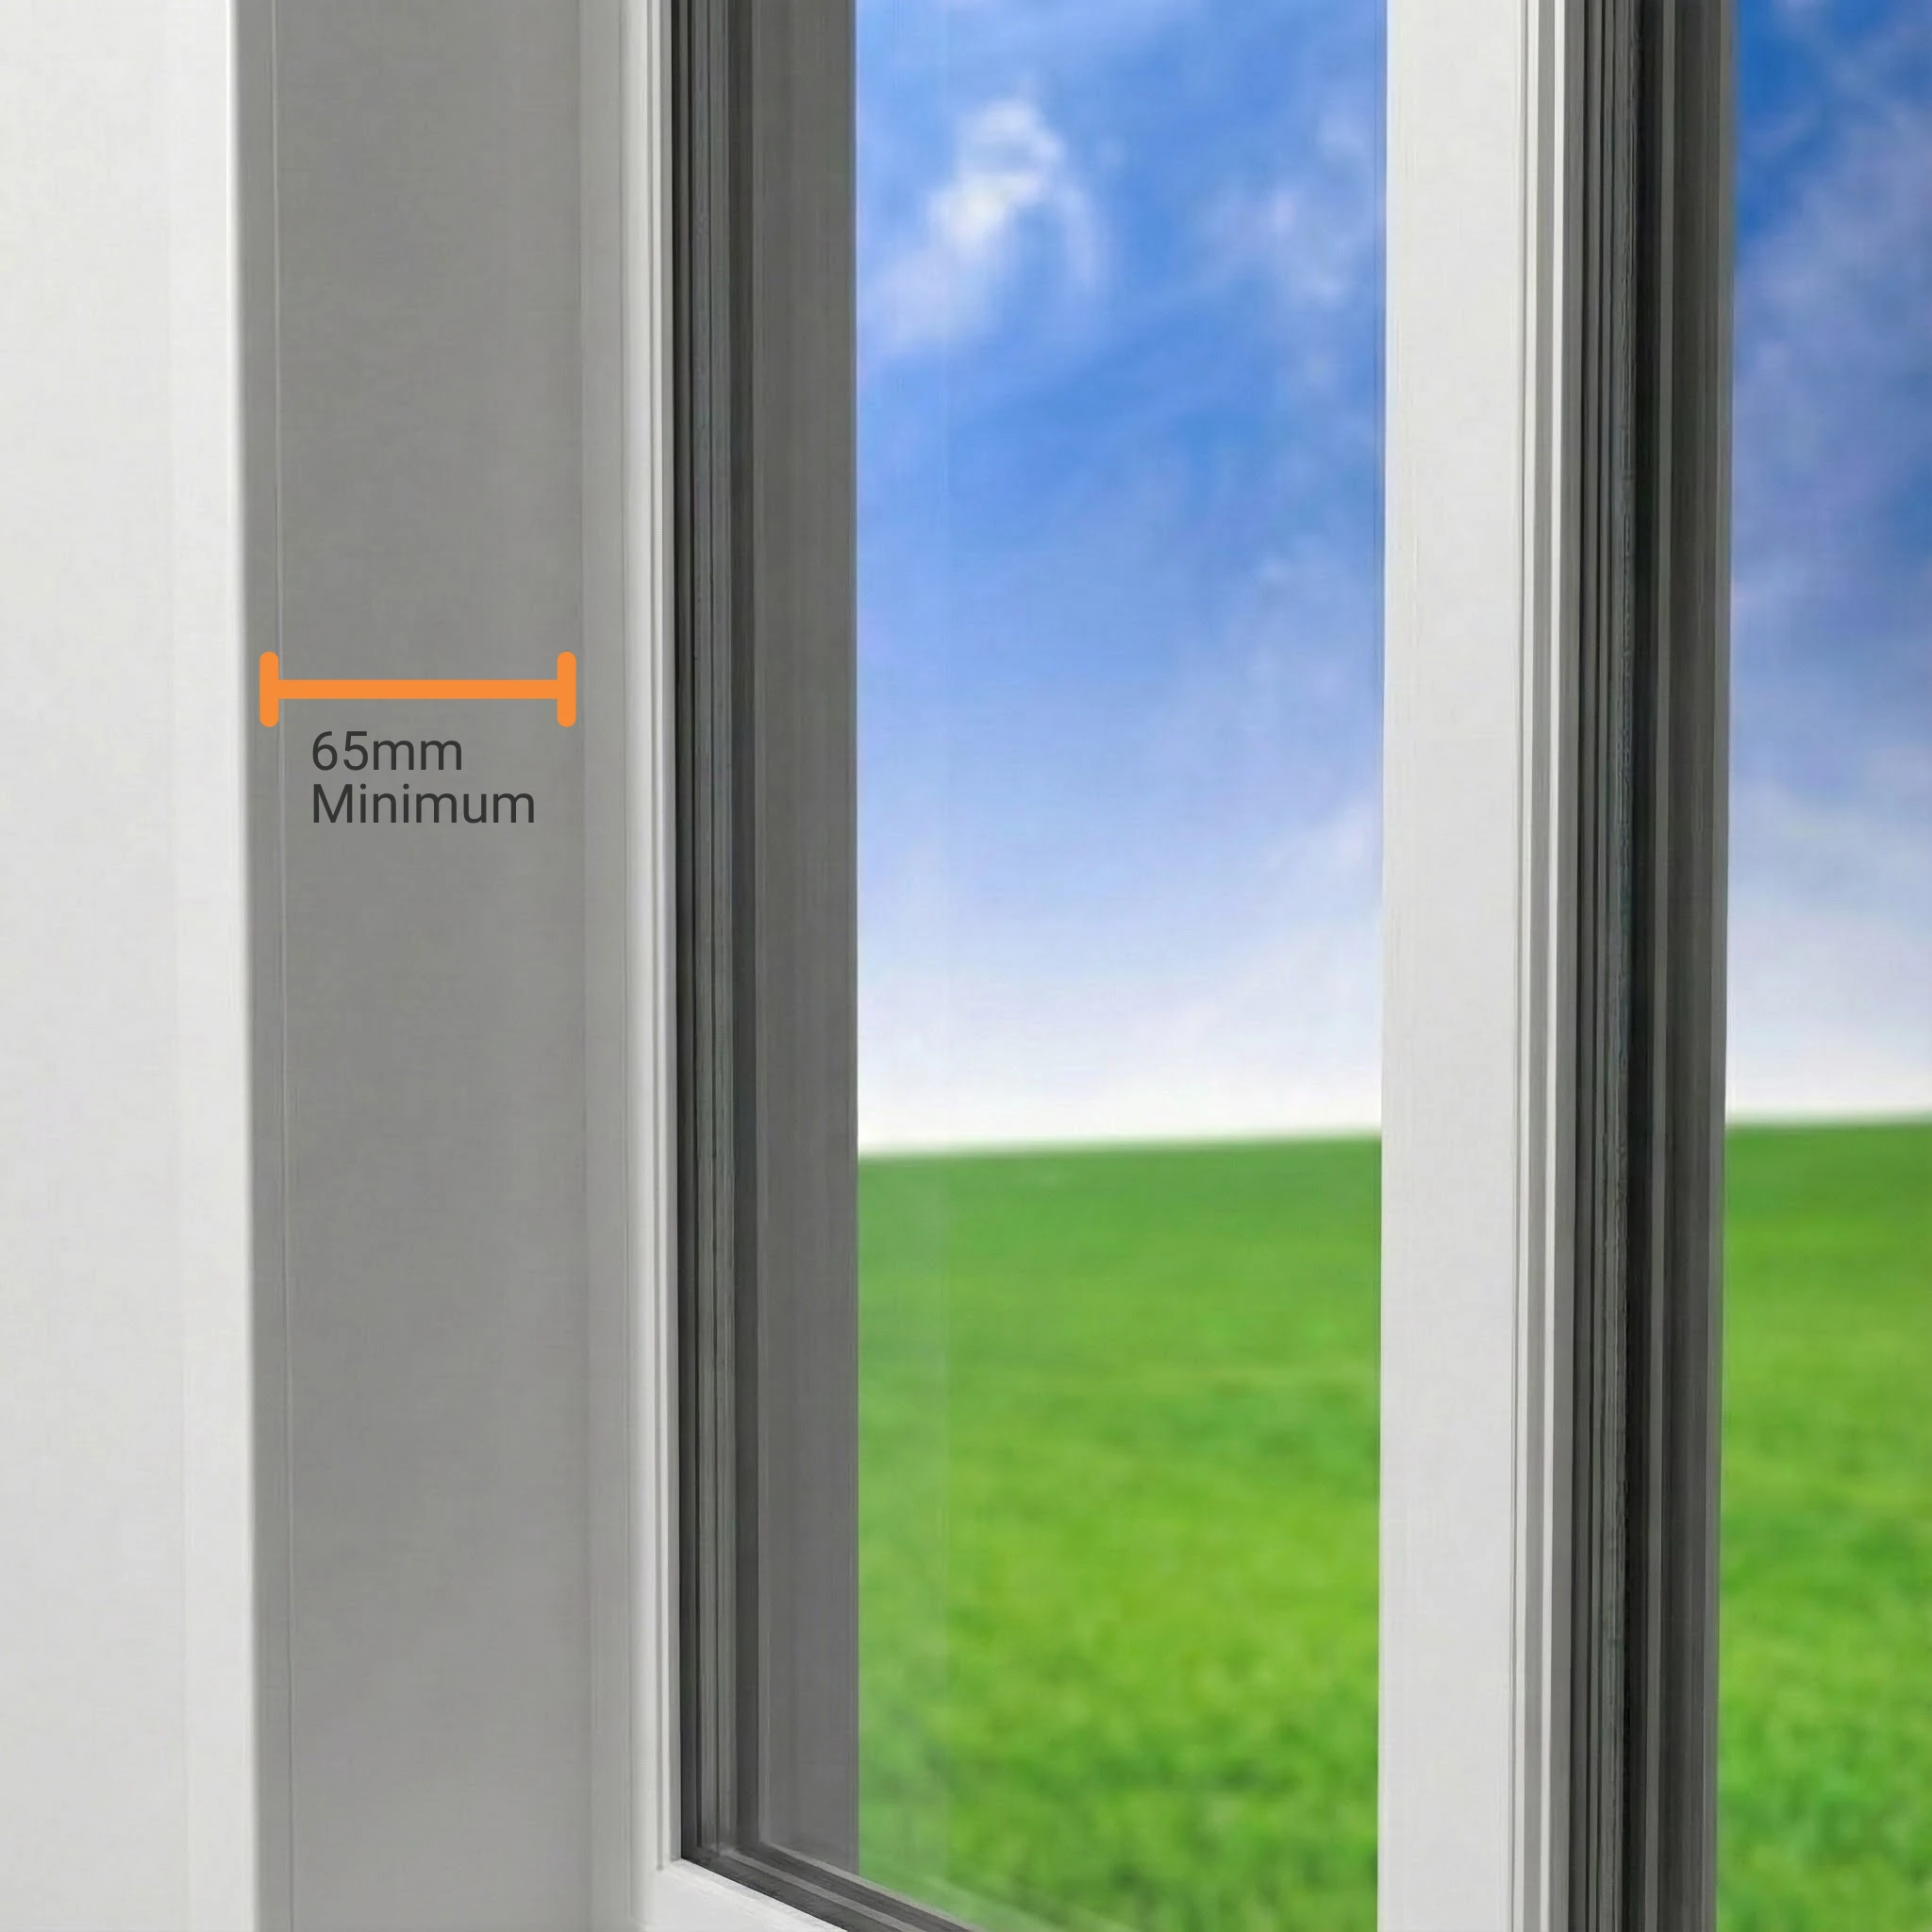
Check Your Depth
Before you start measuring, check that your window recess has enough depth. You’ll need at least 65mm to install the shutter frame correctly.
Look out for any obstructions like window winders, handles, or locks that might interfere with the fit. If there’s something in the way at the bottom of the window, we recommend using a 3-sided frame instead of a 4-sided frame to ensure the best result.
2
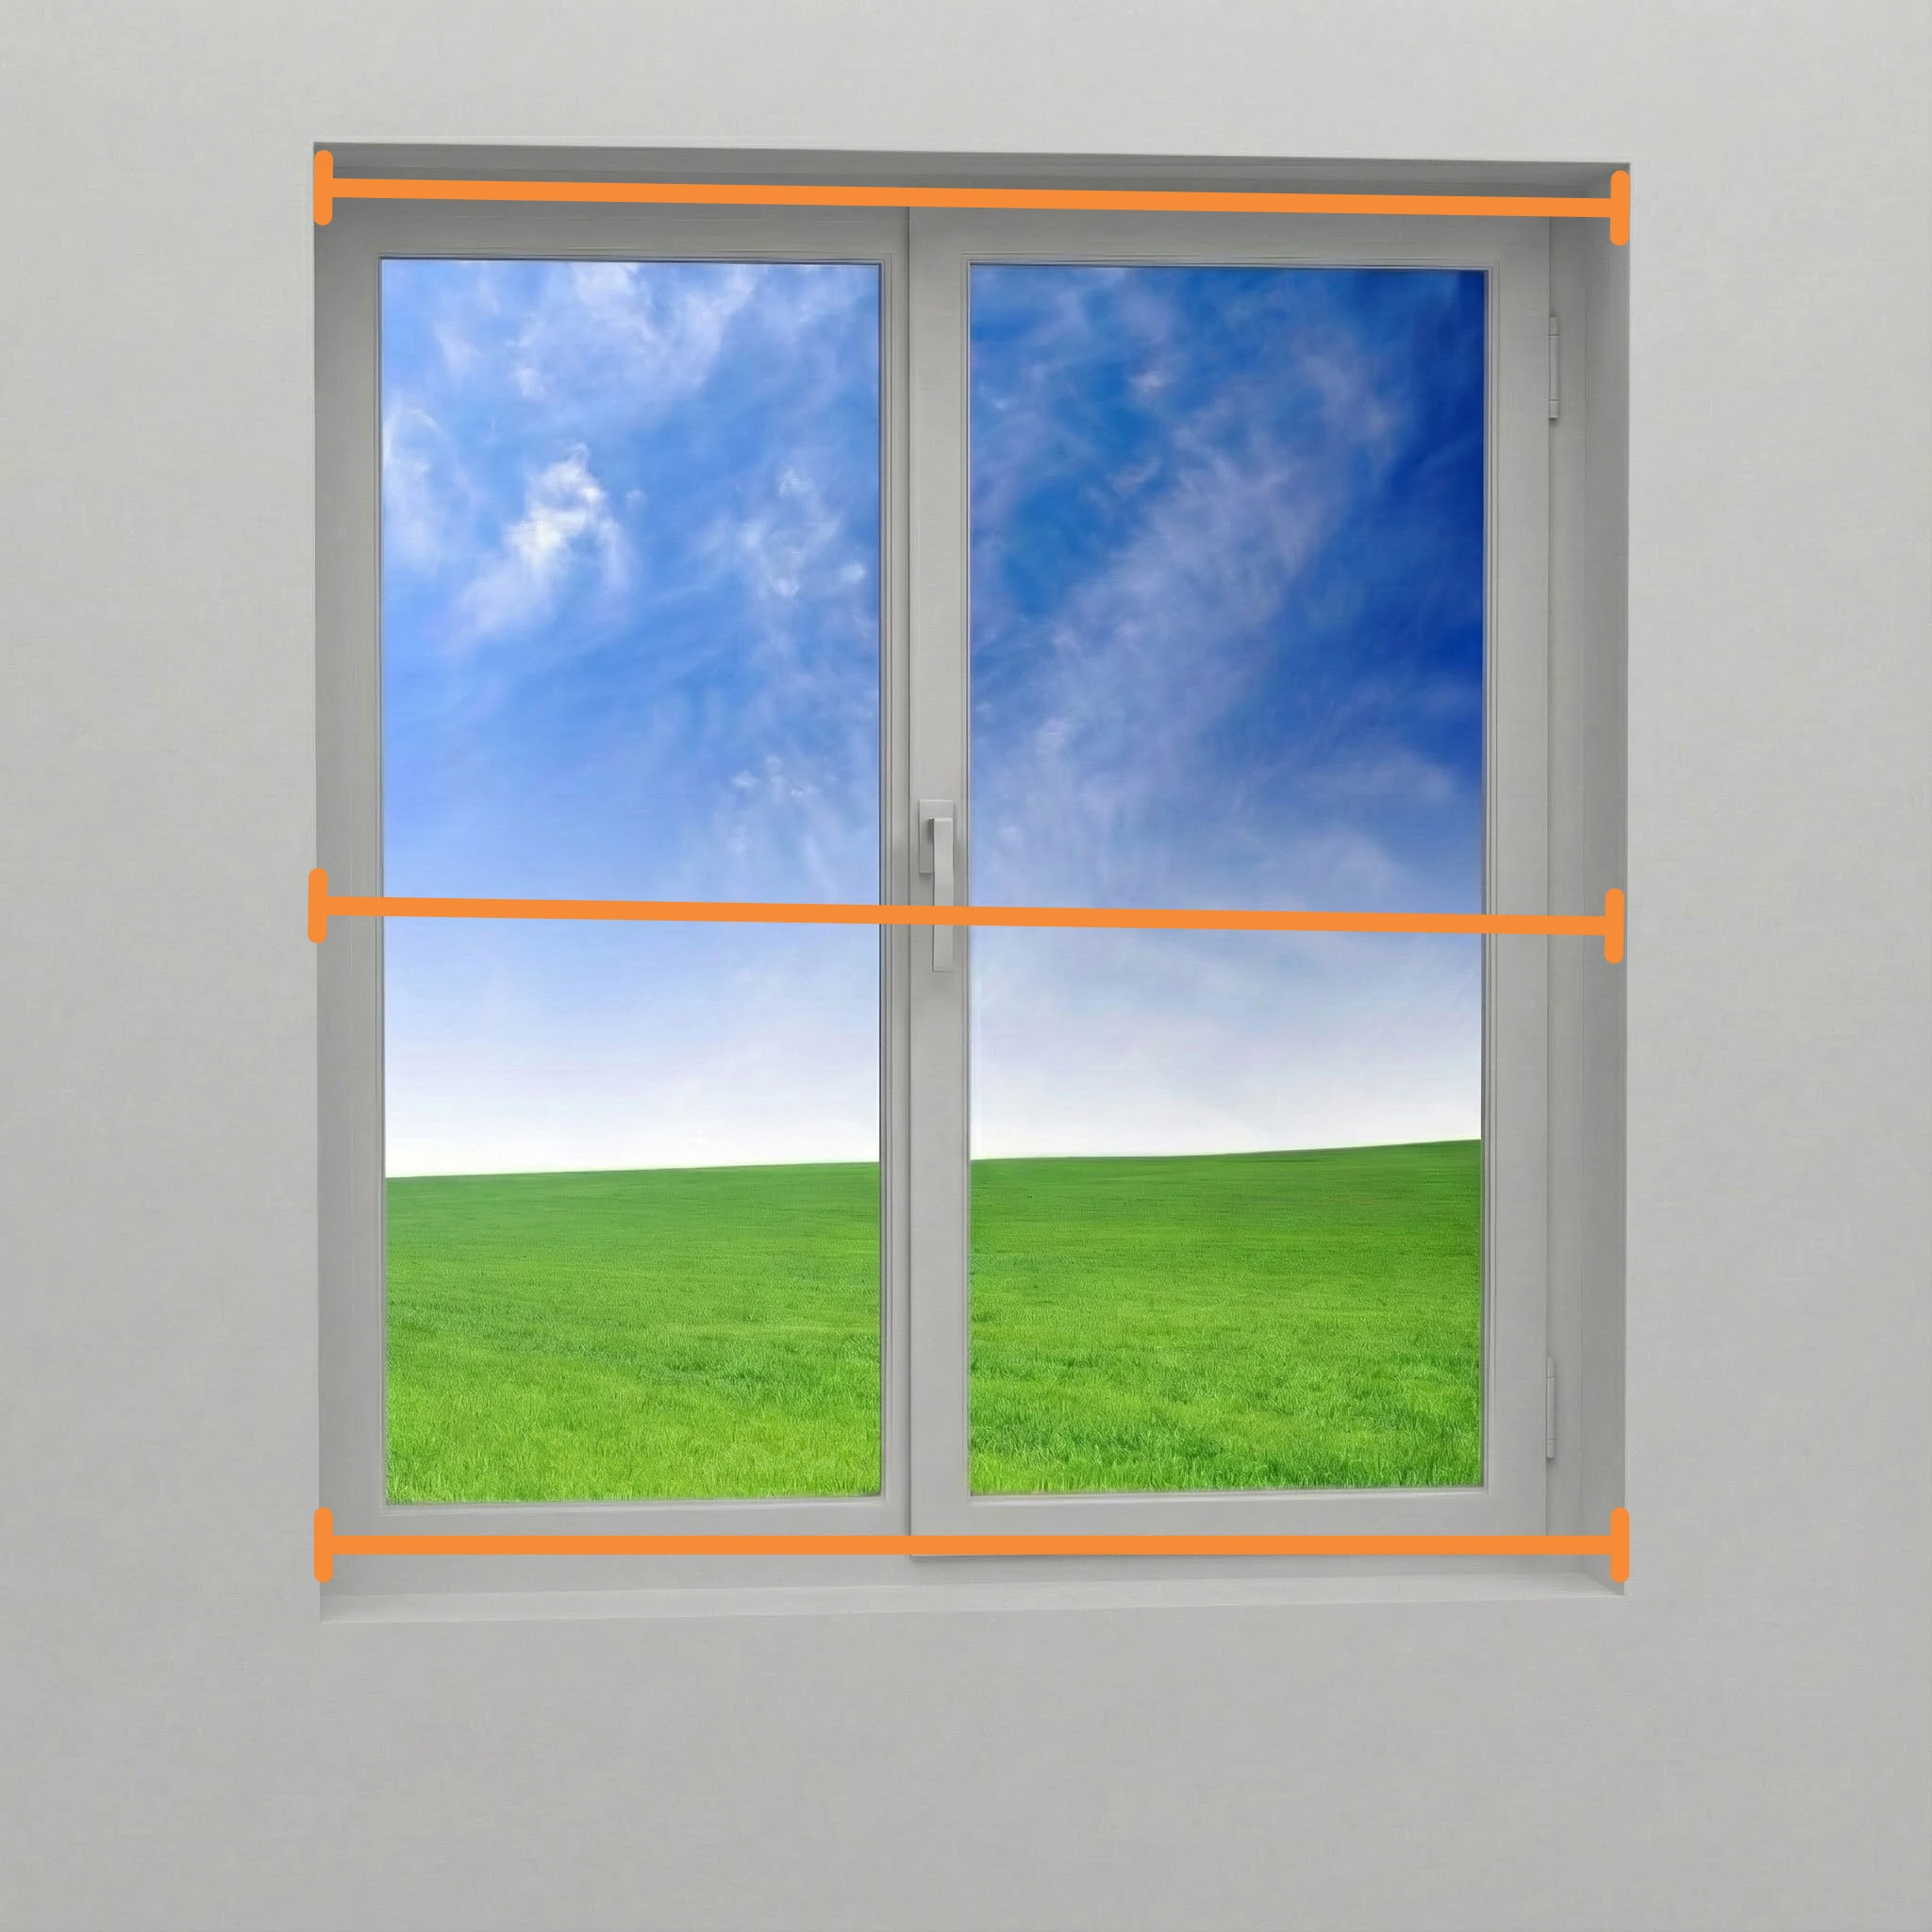
Measure the Width
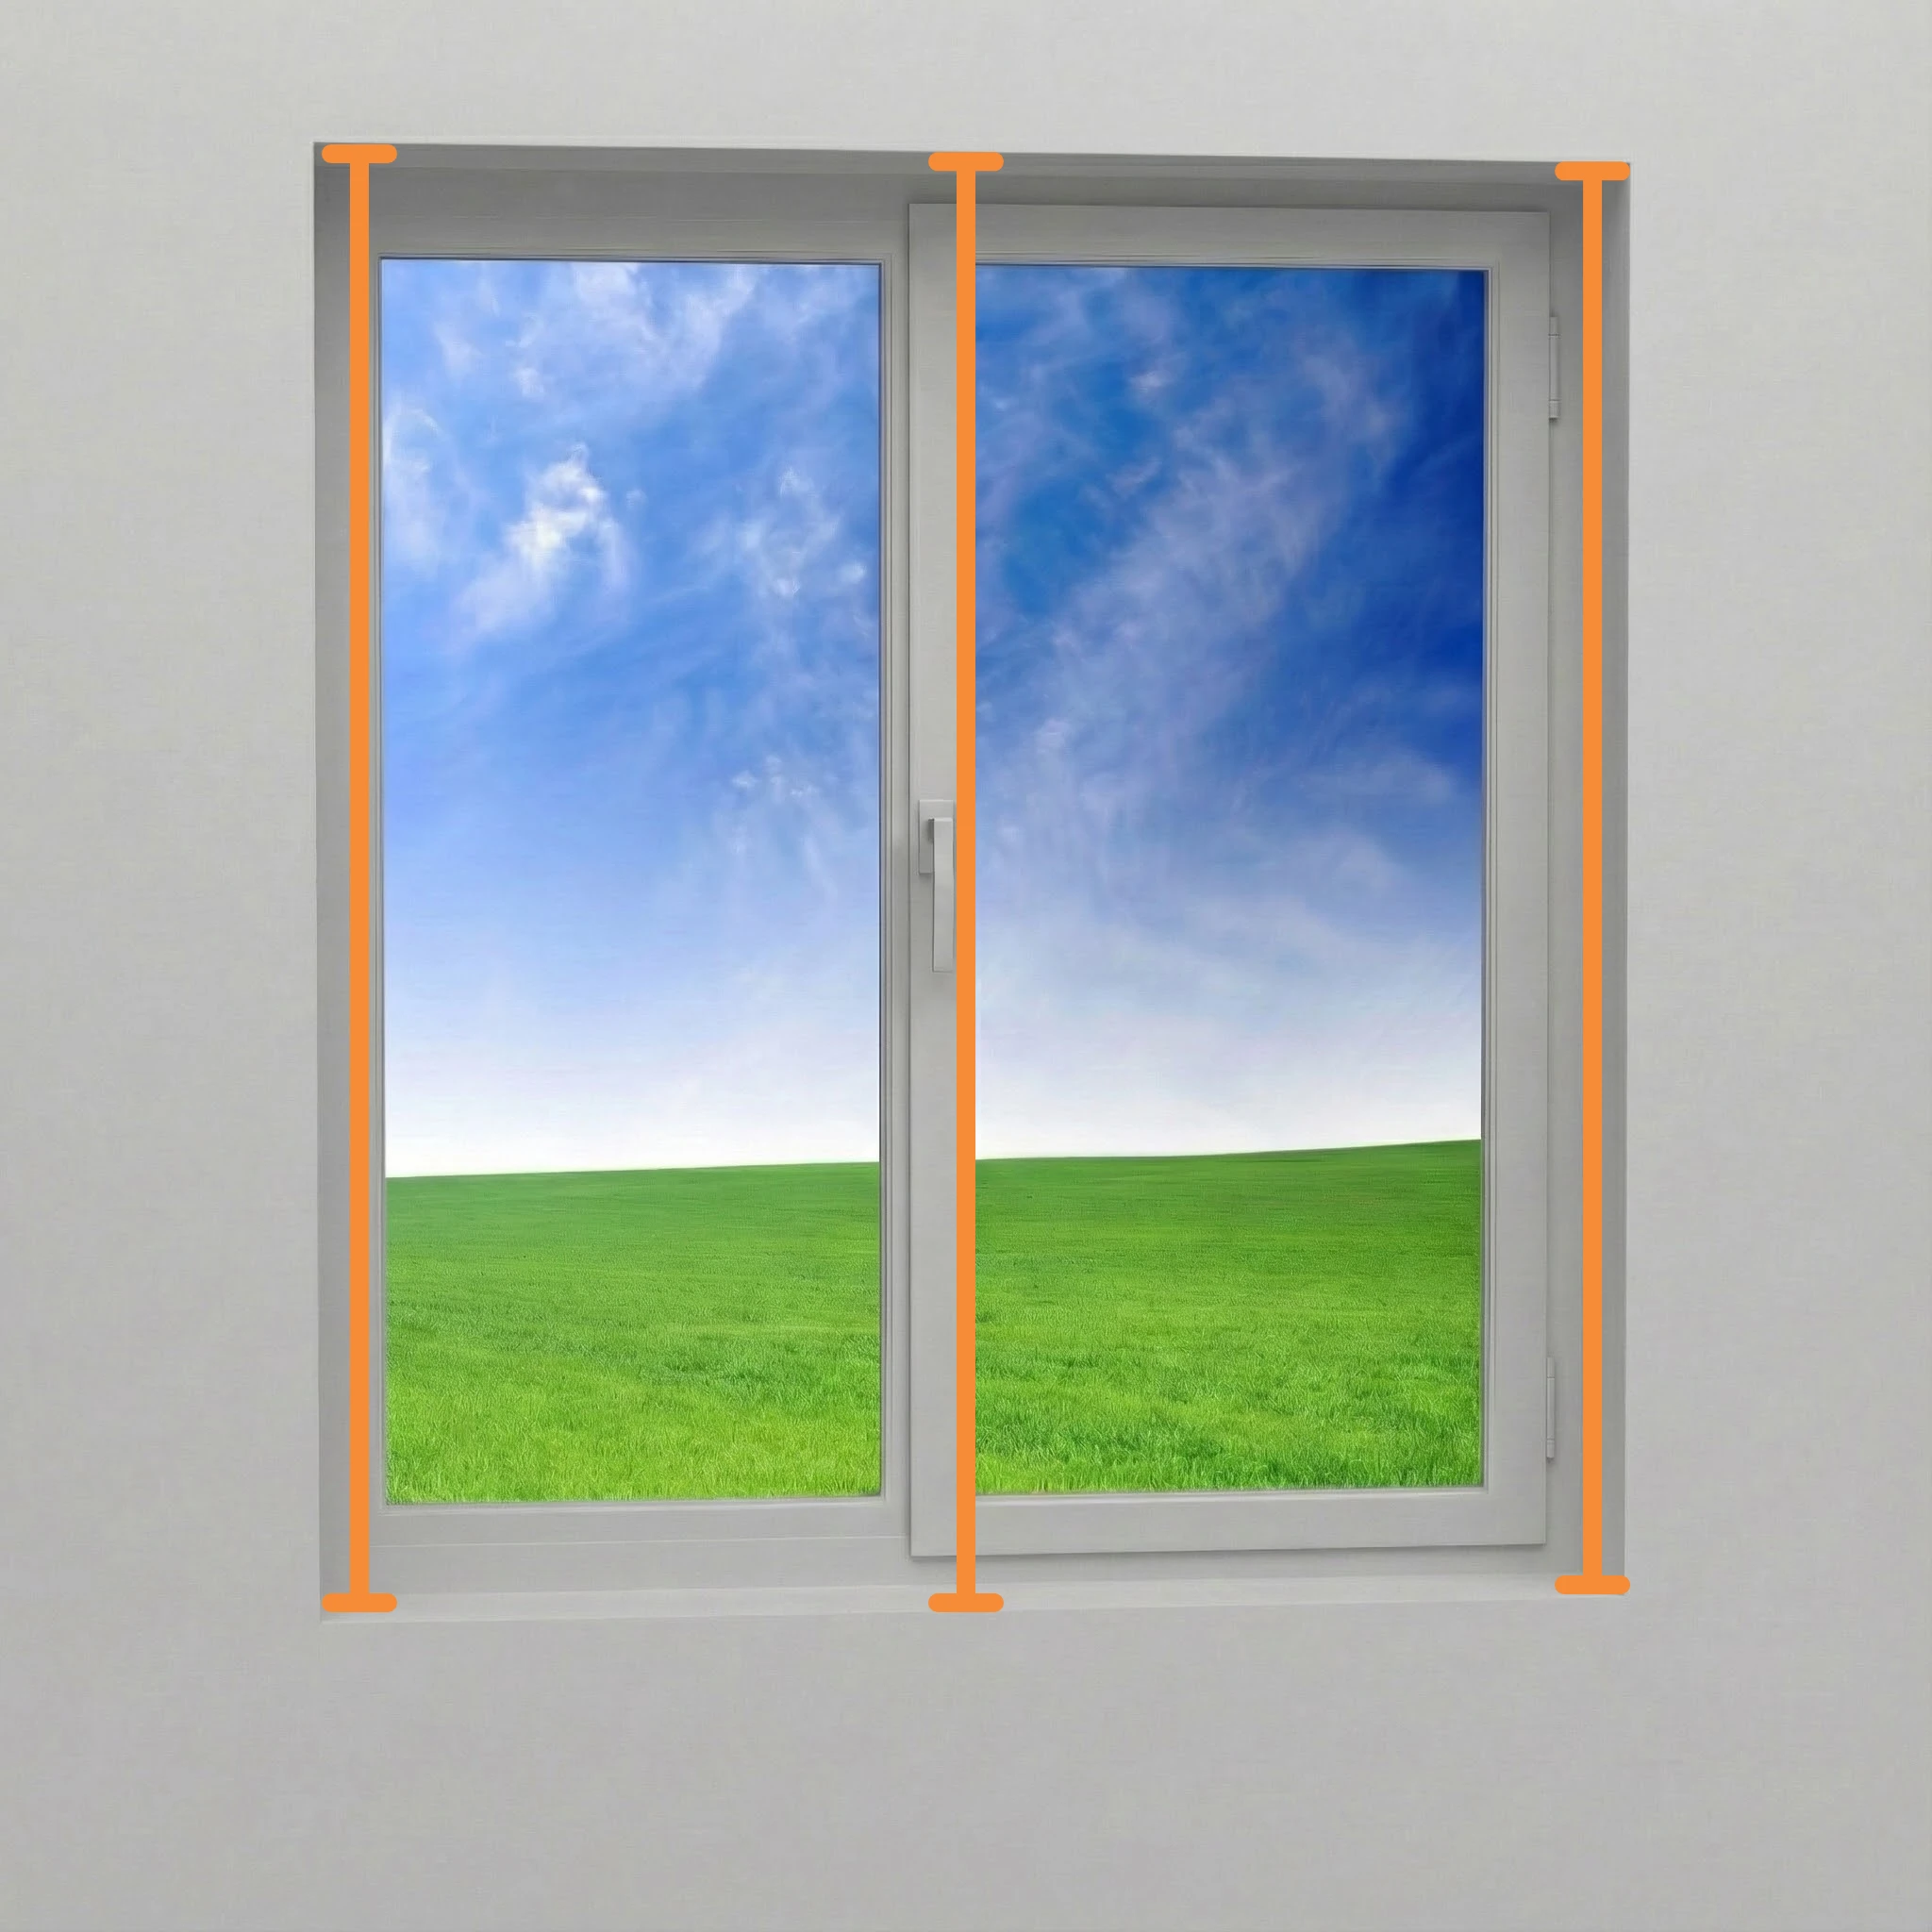
Inside Mount:
Measure the internal width of your window recess in three places: top, middle, and bottom. Record the smallest measurement in millimetres — this is the width you'll use when placing your order.
3
Measure the Drop
Inside Mount:
Measure the drop (height) of the window recess in three places: left side, centre, and right side. Use the smallest of the three measurements for your order.
4
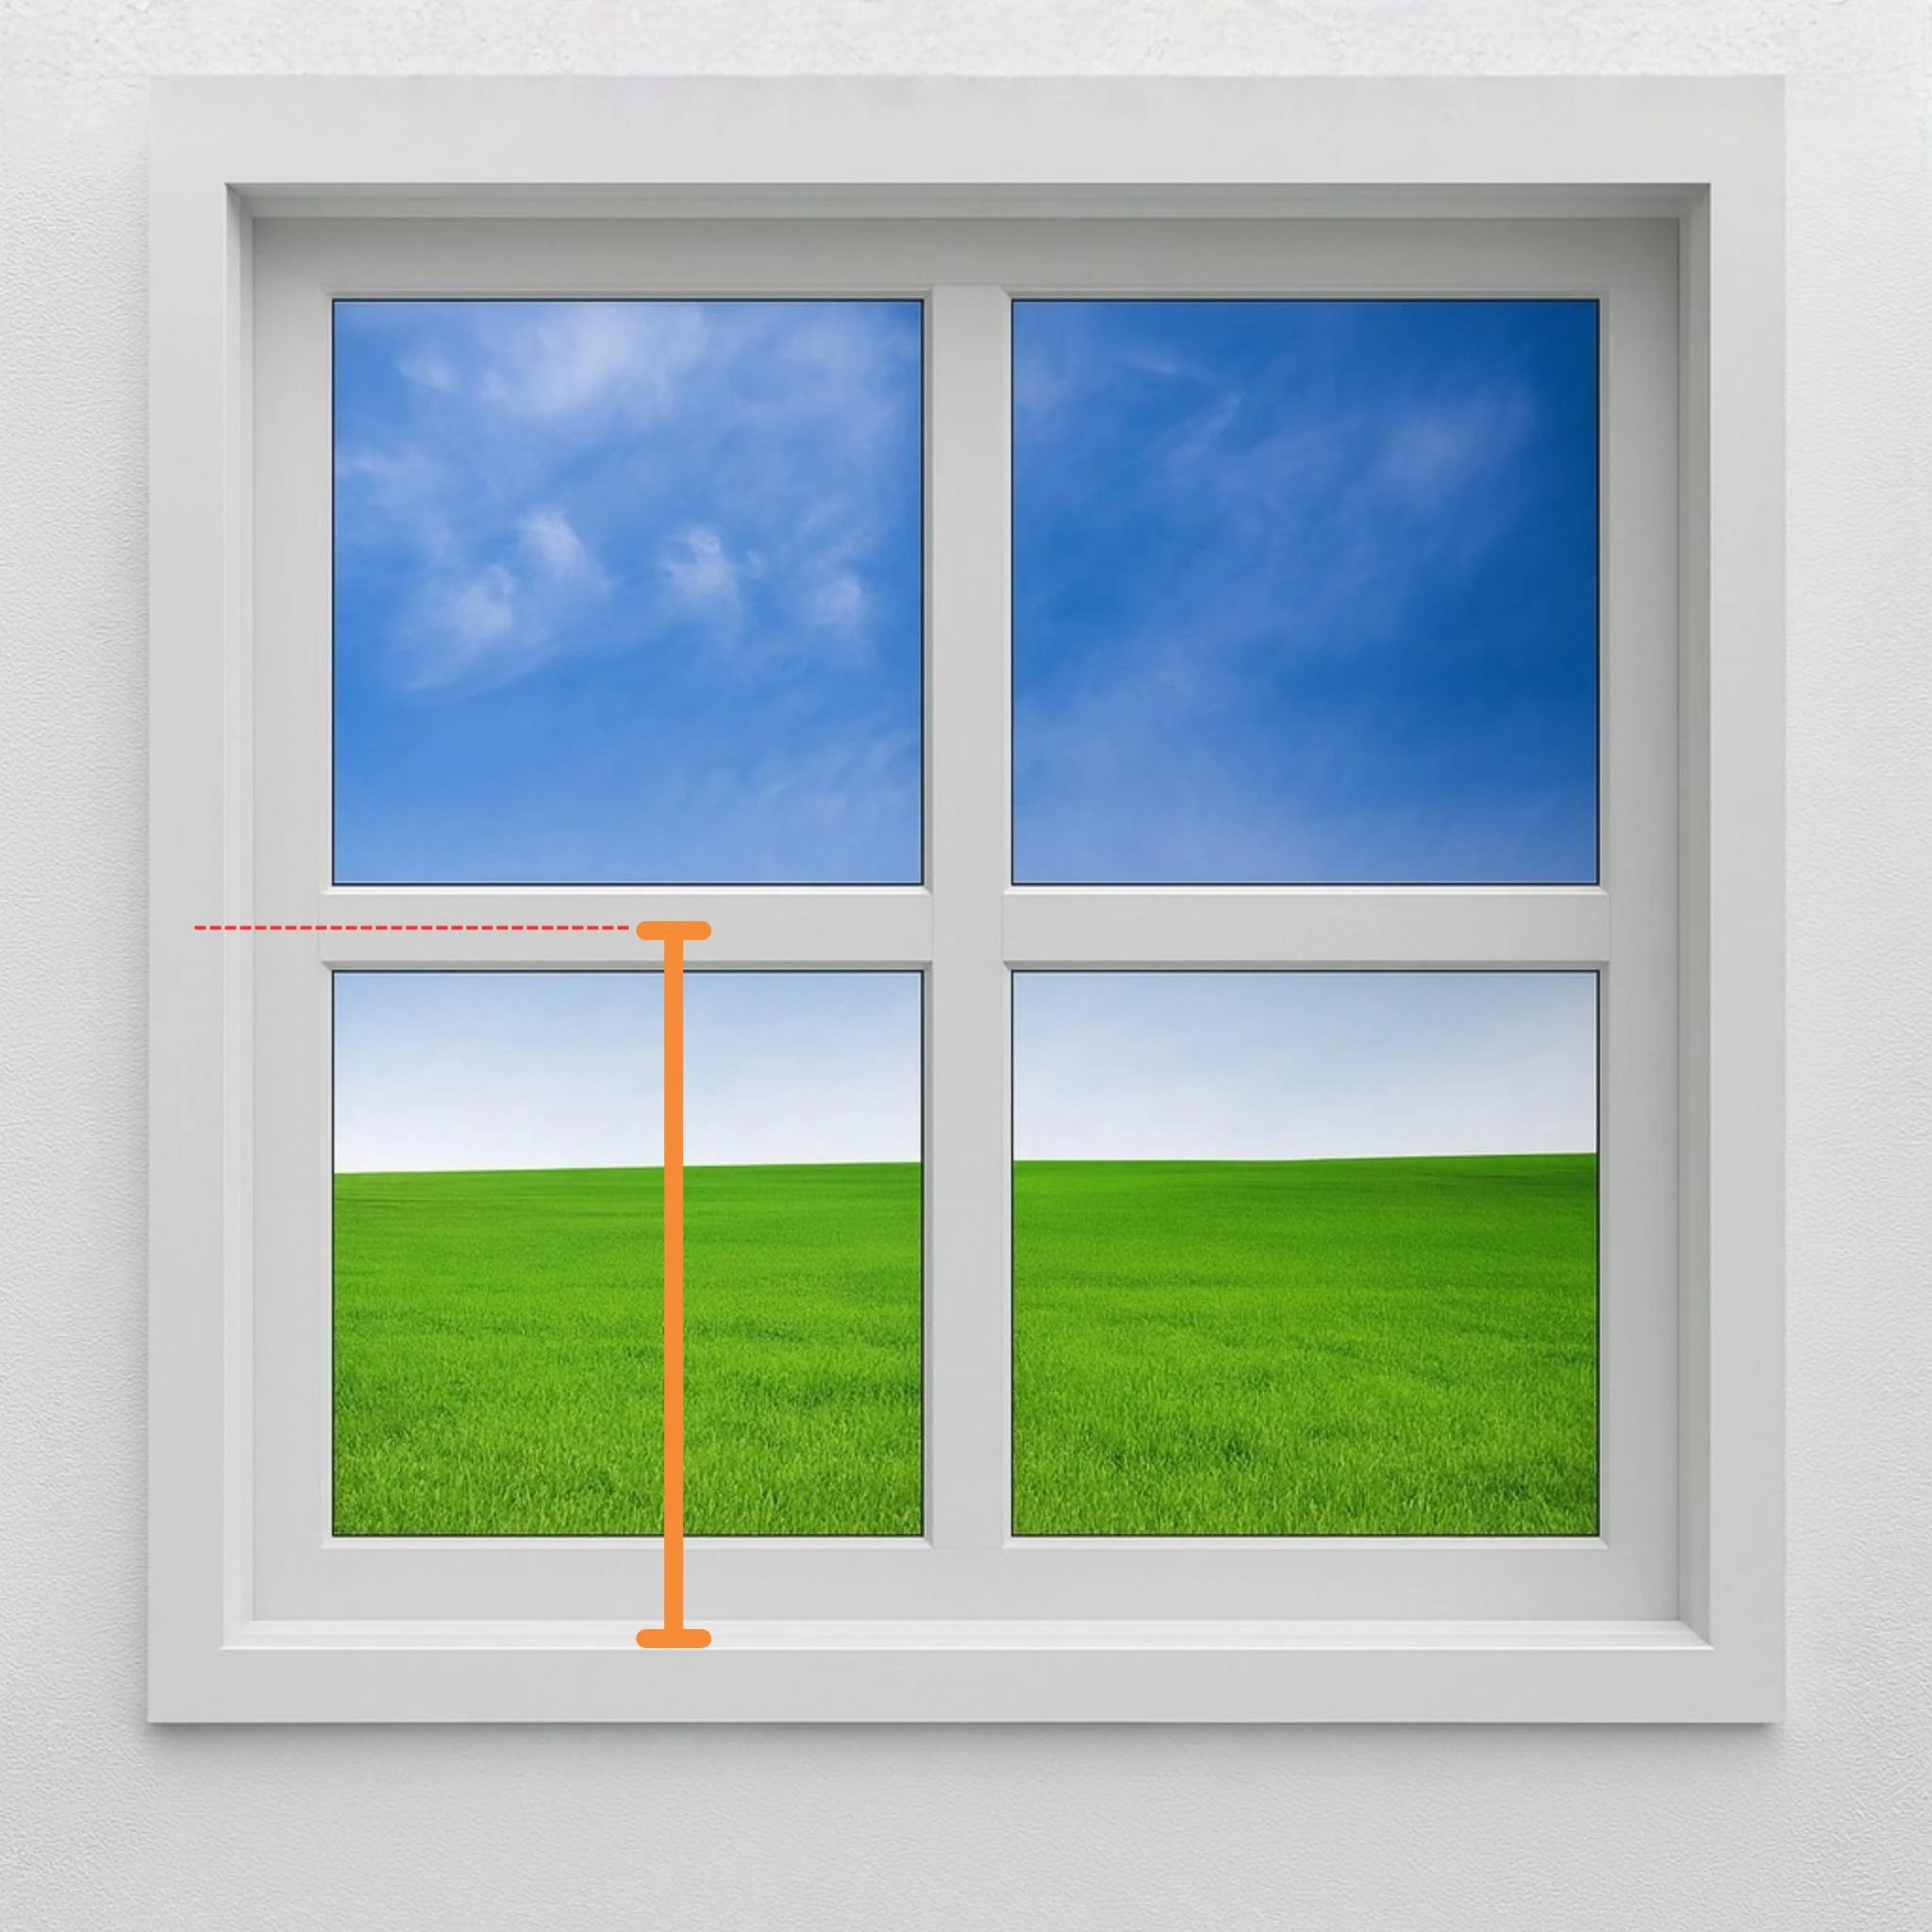
Measure for a Mid Rail (if required)
A mid rail is a horizontal support that adds strength to your shutters and improves light control. Mid rails are approximately 76mm high.
For shutters over 1600mm in height, a mid rail is required. For shorter drops, it’s optional but can still be added for style or function.
To measure, take a vertical measurement from the bottom of the window to the centre point where you’d like the mid rail placed.
5
Measure for T-Posts (if needed)
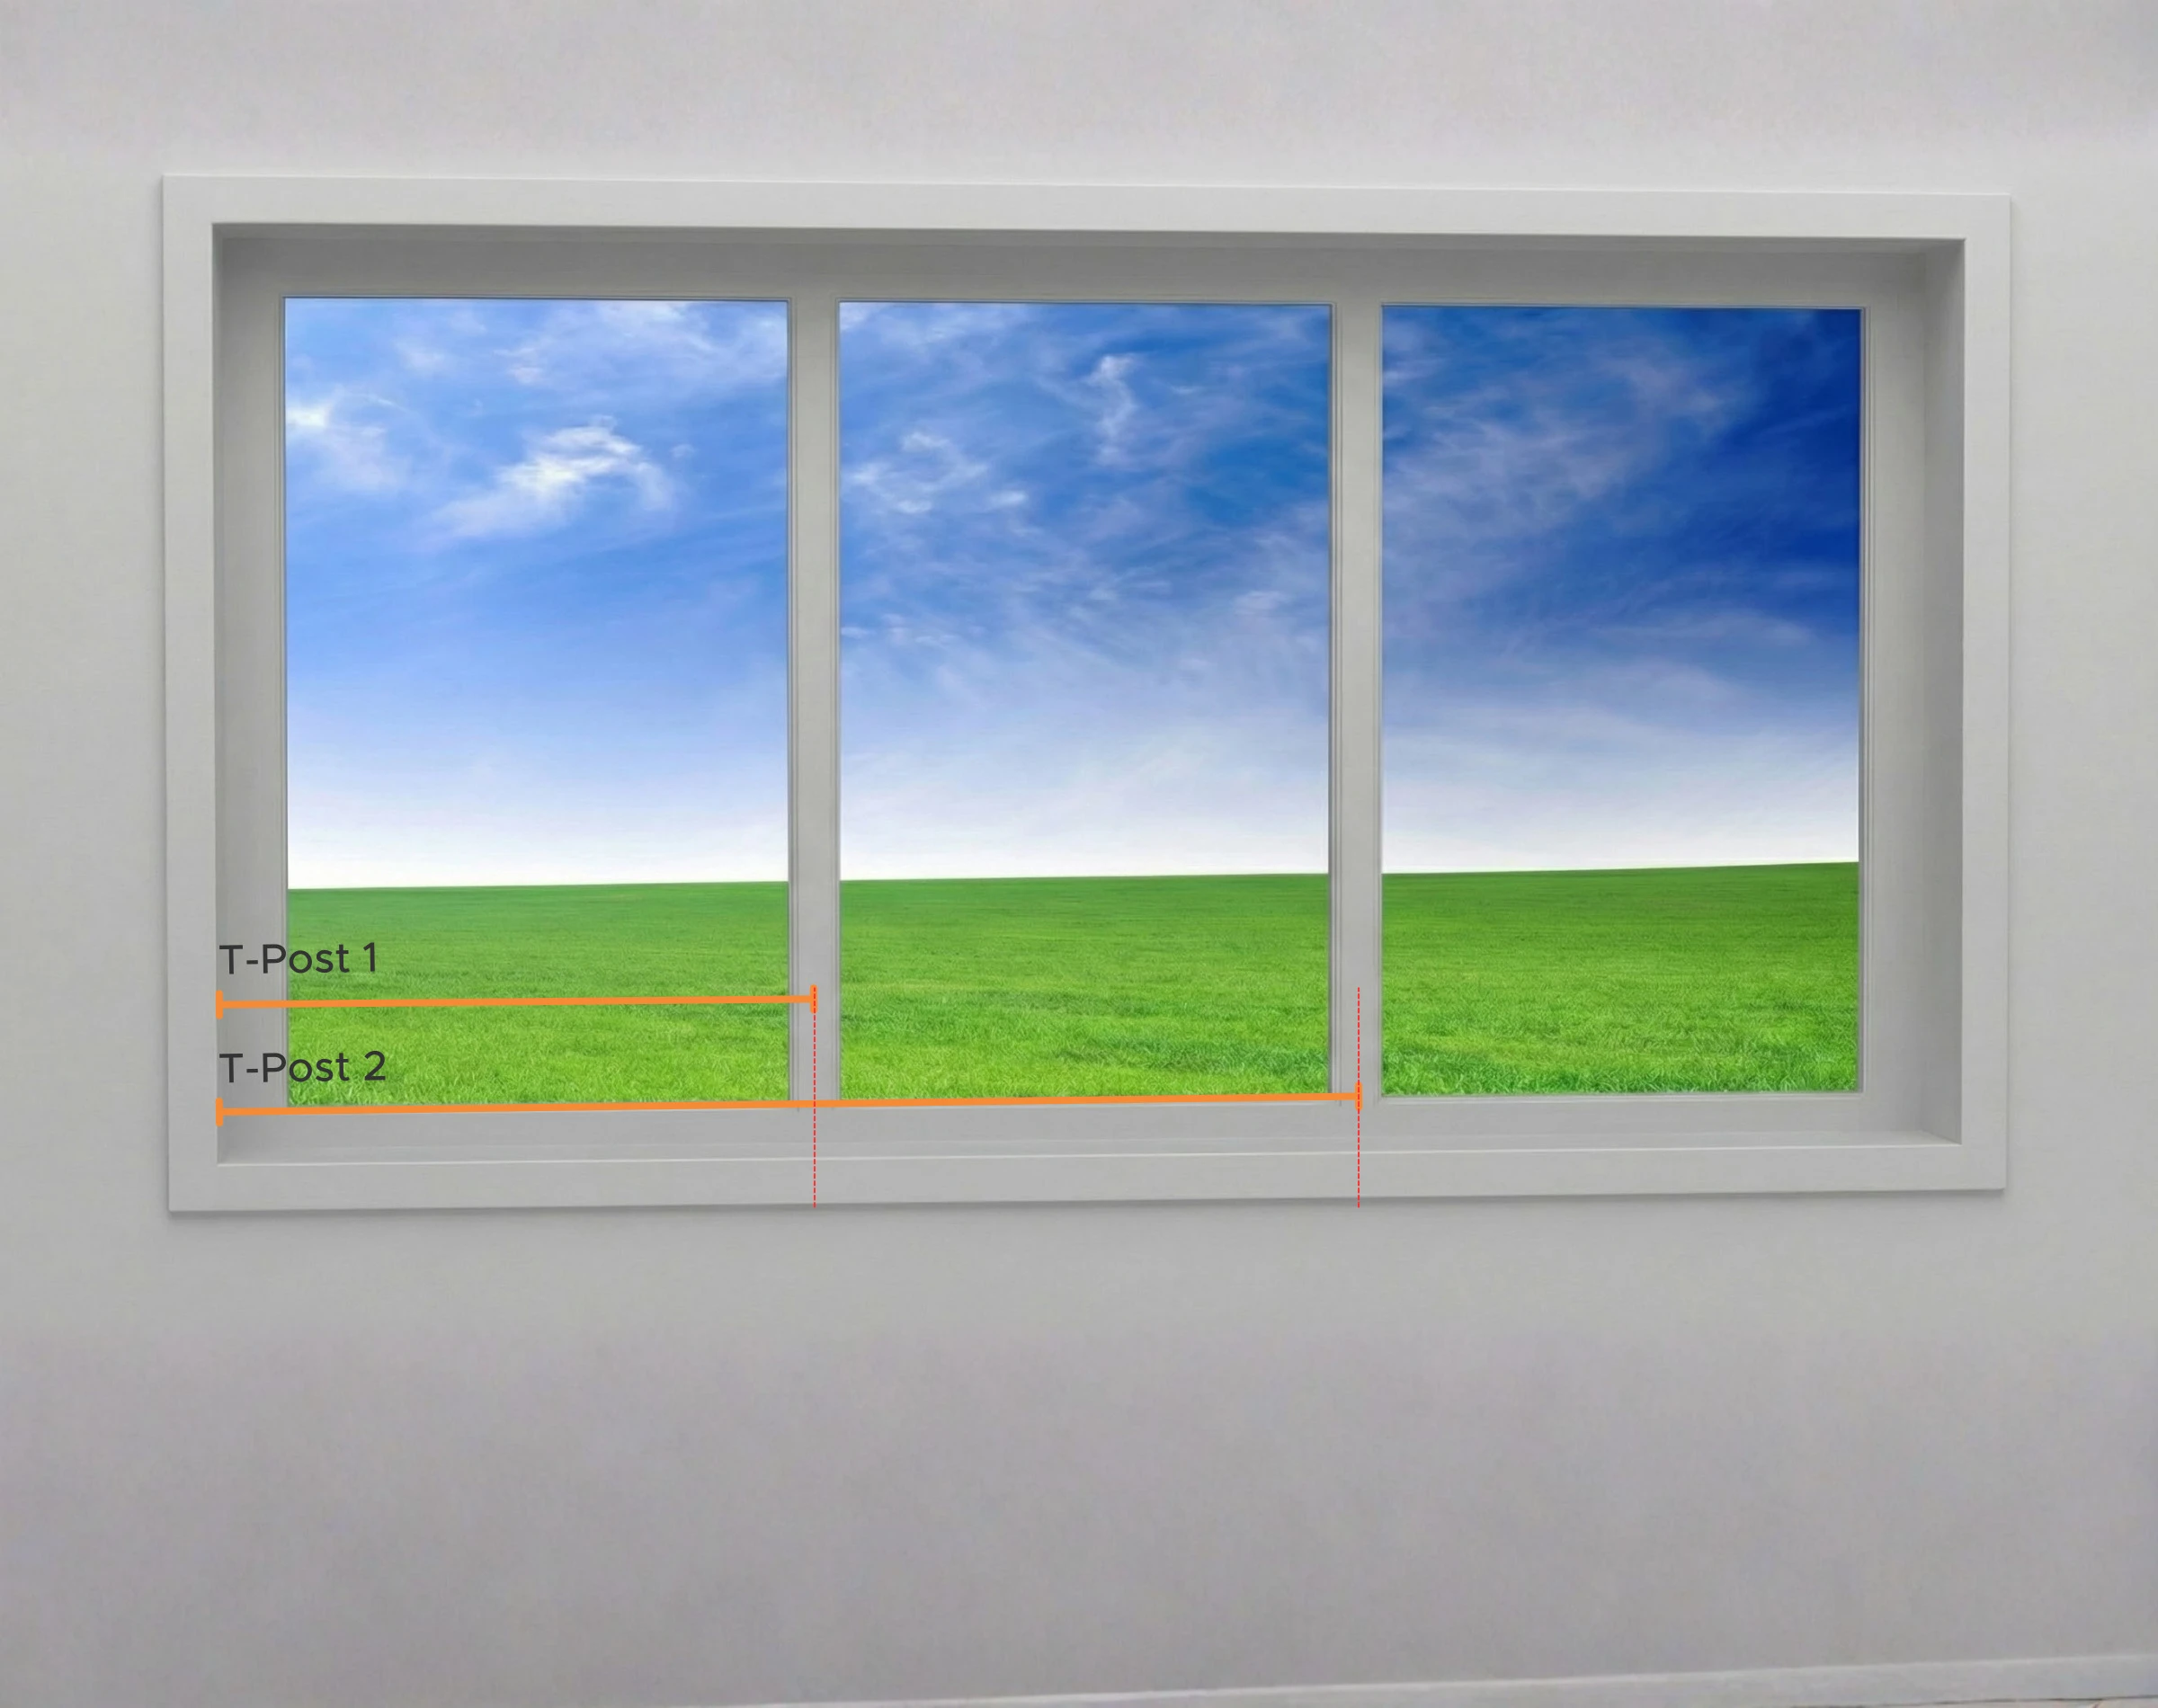
T-posts are vertical dividers that split your shutters into multiple hinged panels. They provide stability, support for hinge screws, and help keep panels aligned.
To measure for T-posts, start at the inside left edge of the window frame and measure to the centre of where each T-post should be positioned. If you’re adding more than one, always measure from the same starting point — the inside left edge.
For example:

Left edge to the centre of T-post 1
Left edge to the centre of T-post 2
6
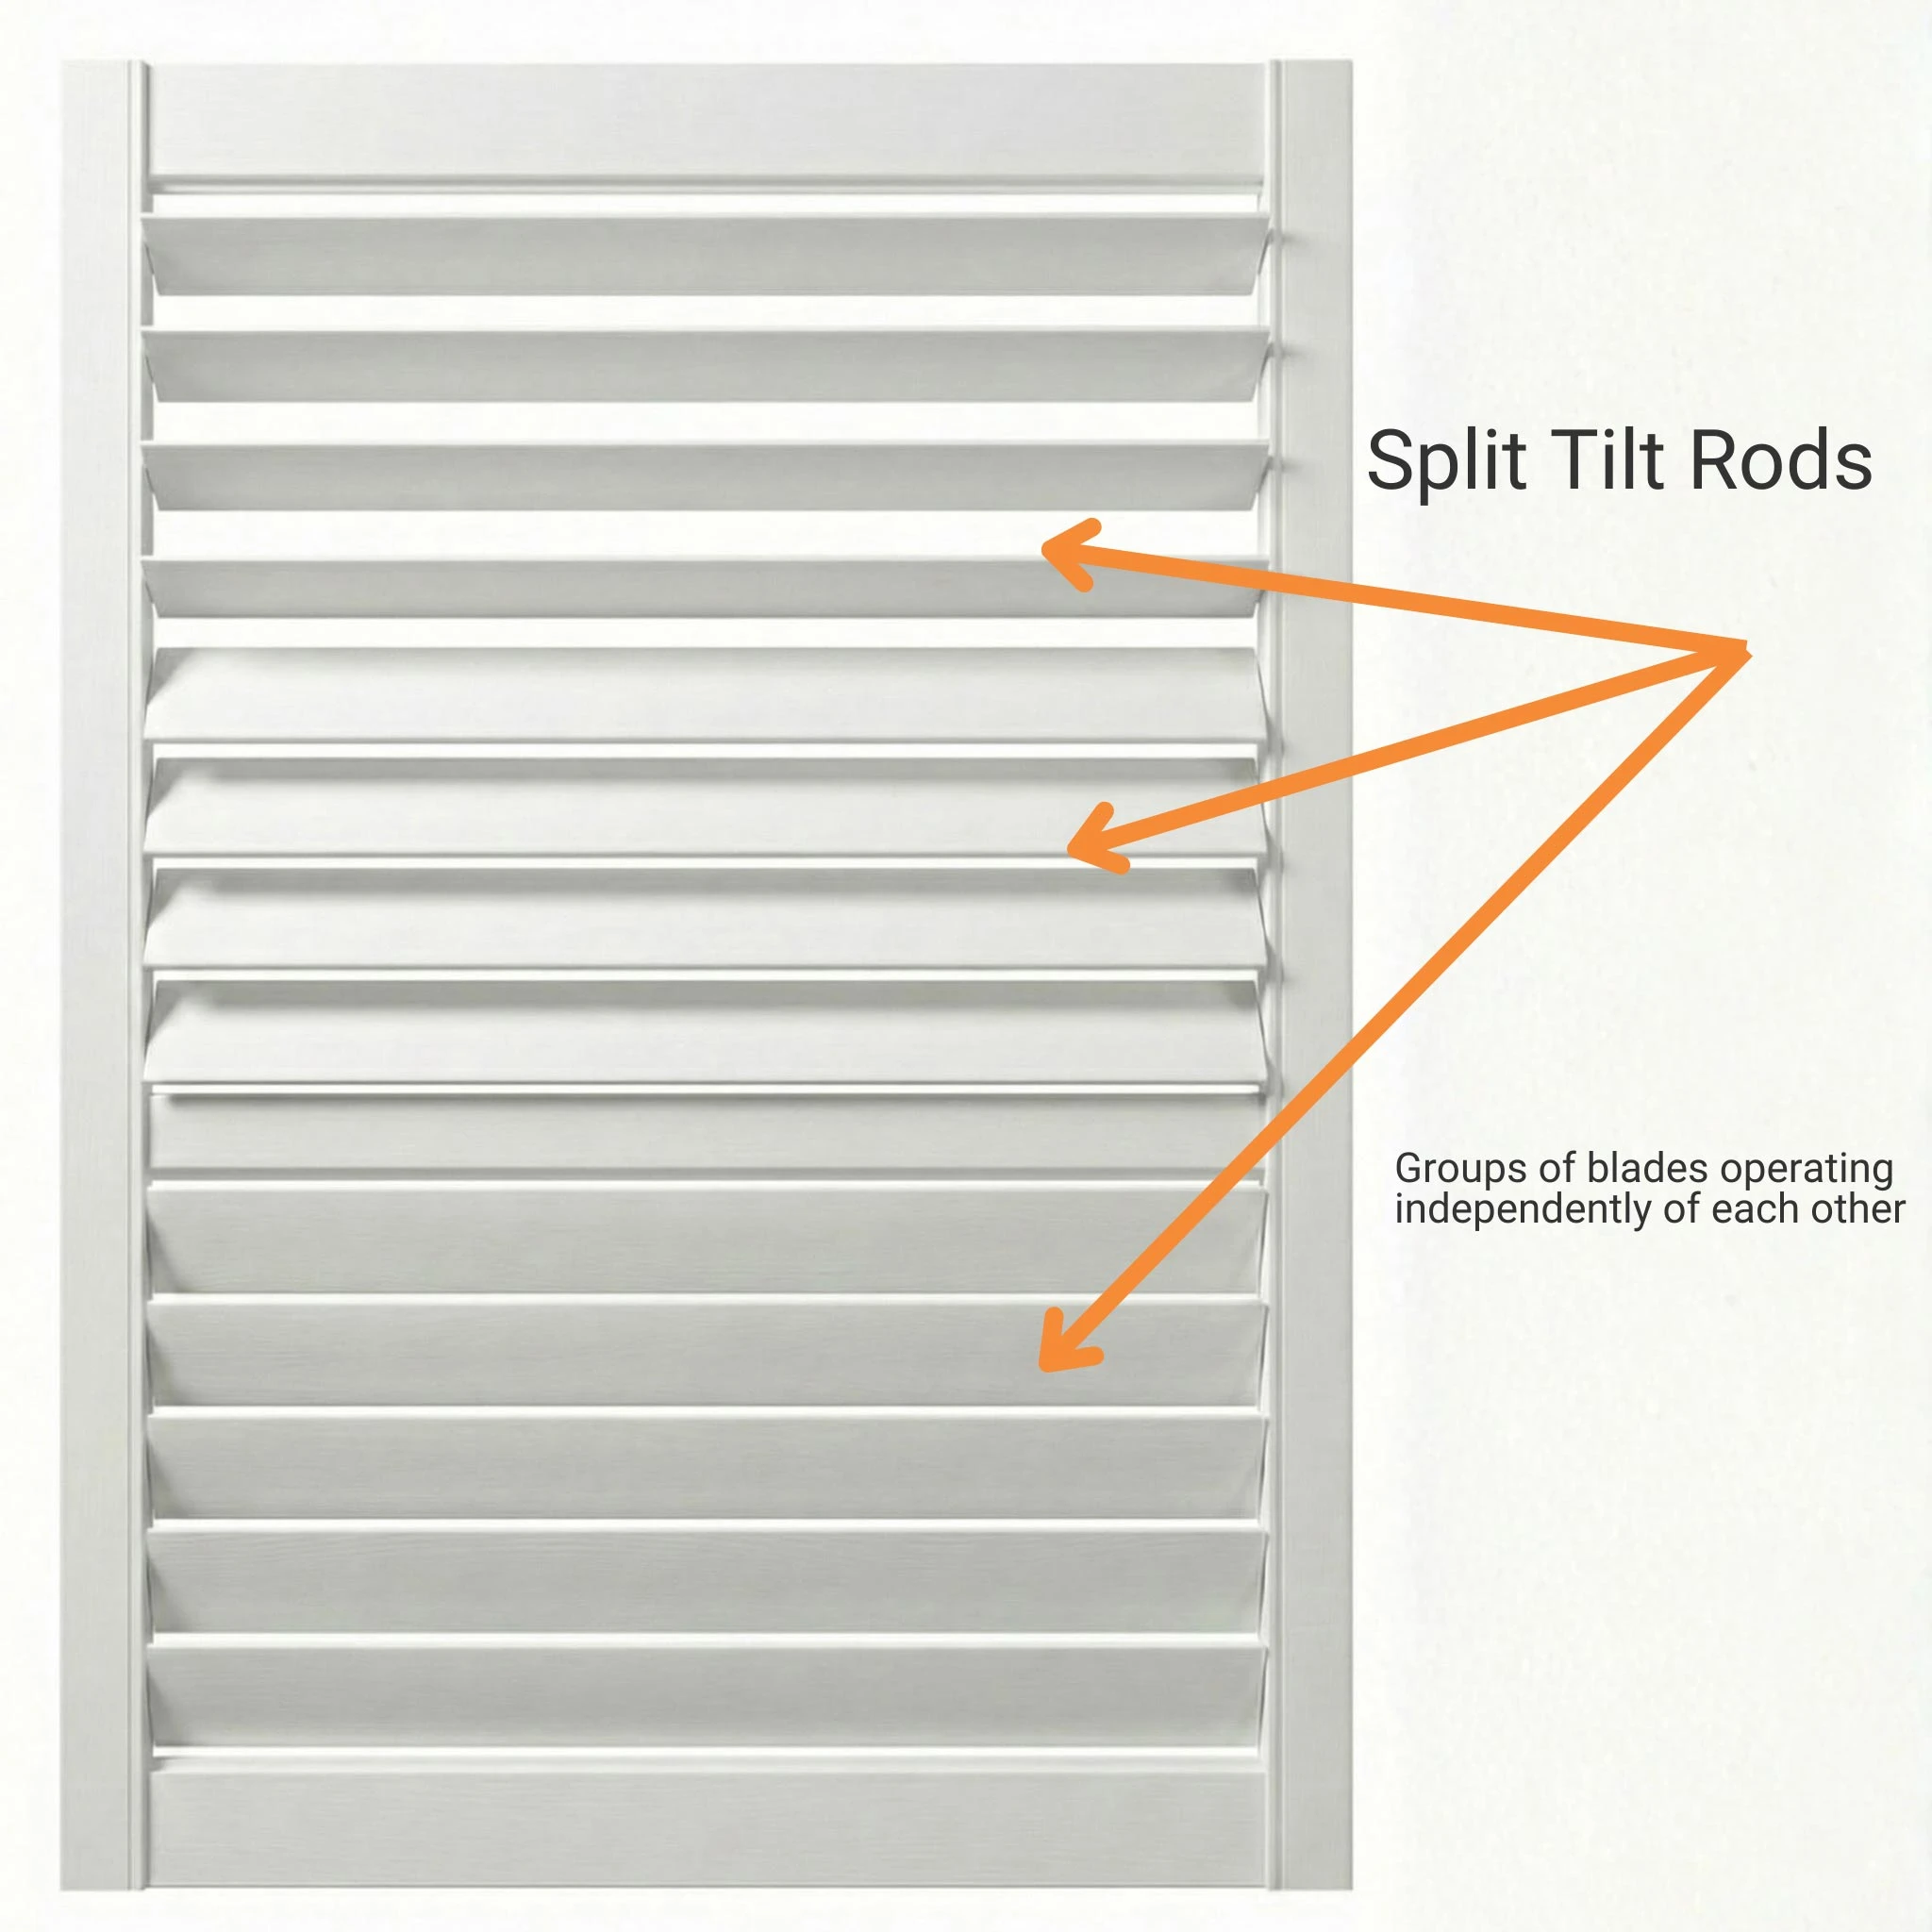
What is a Split Tilt Rod?
Every plantation shutter comes with a tilt rod, allowing you to open and close all blades together to control light and privacy with ease.
In some cases, your shutter will include a split tilt rod. This divides the blades into sections that move independently — helping ensure smooth operation and giving you more flexible control.
Each tilt rod can operate up to 12 blades. To maintain quality and long-lasting performance, a split tilt rod is required and automatically included in your order when:
Your overall shutter drop is over 1200mm, or
Any section of blades (above or below a mid rail) exceeds 1200mm
7
Choosing Between a 3 or 4-Sided Frame
When ordering, you can choose either a 3-sided or 4-sided frame depending on your window layout.
3-sided frame: Ideal when there are obstructions at the bottom of the window like winders or security locks. This frame runs along the top, left, and right sides.
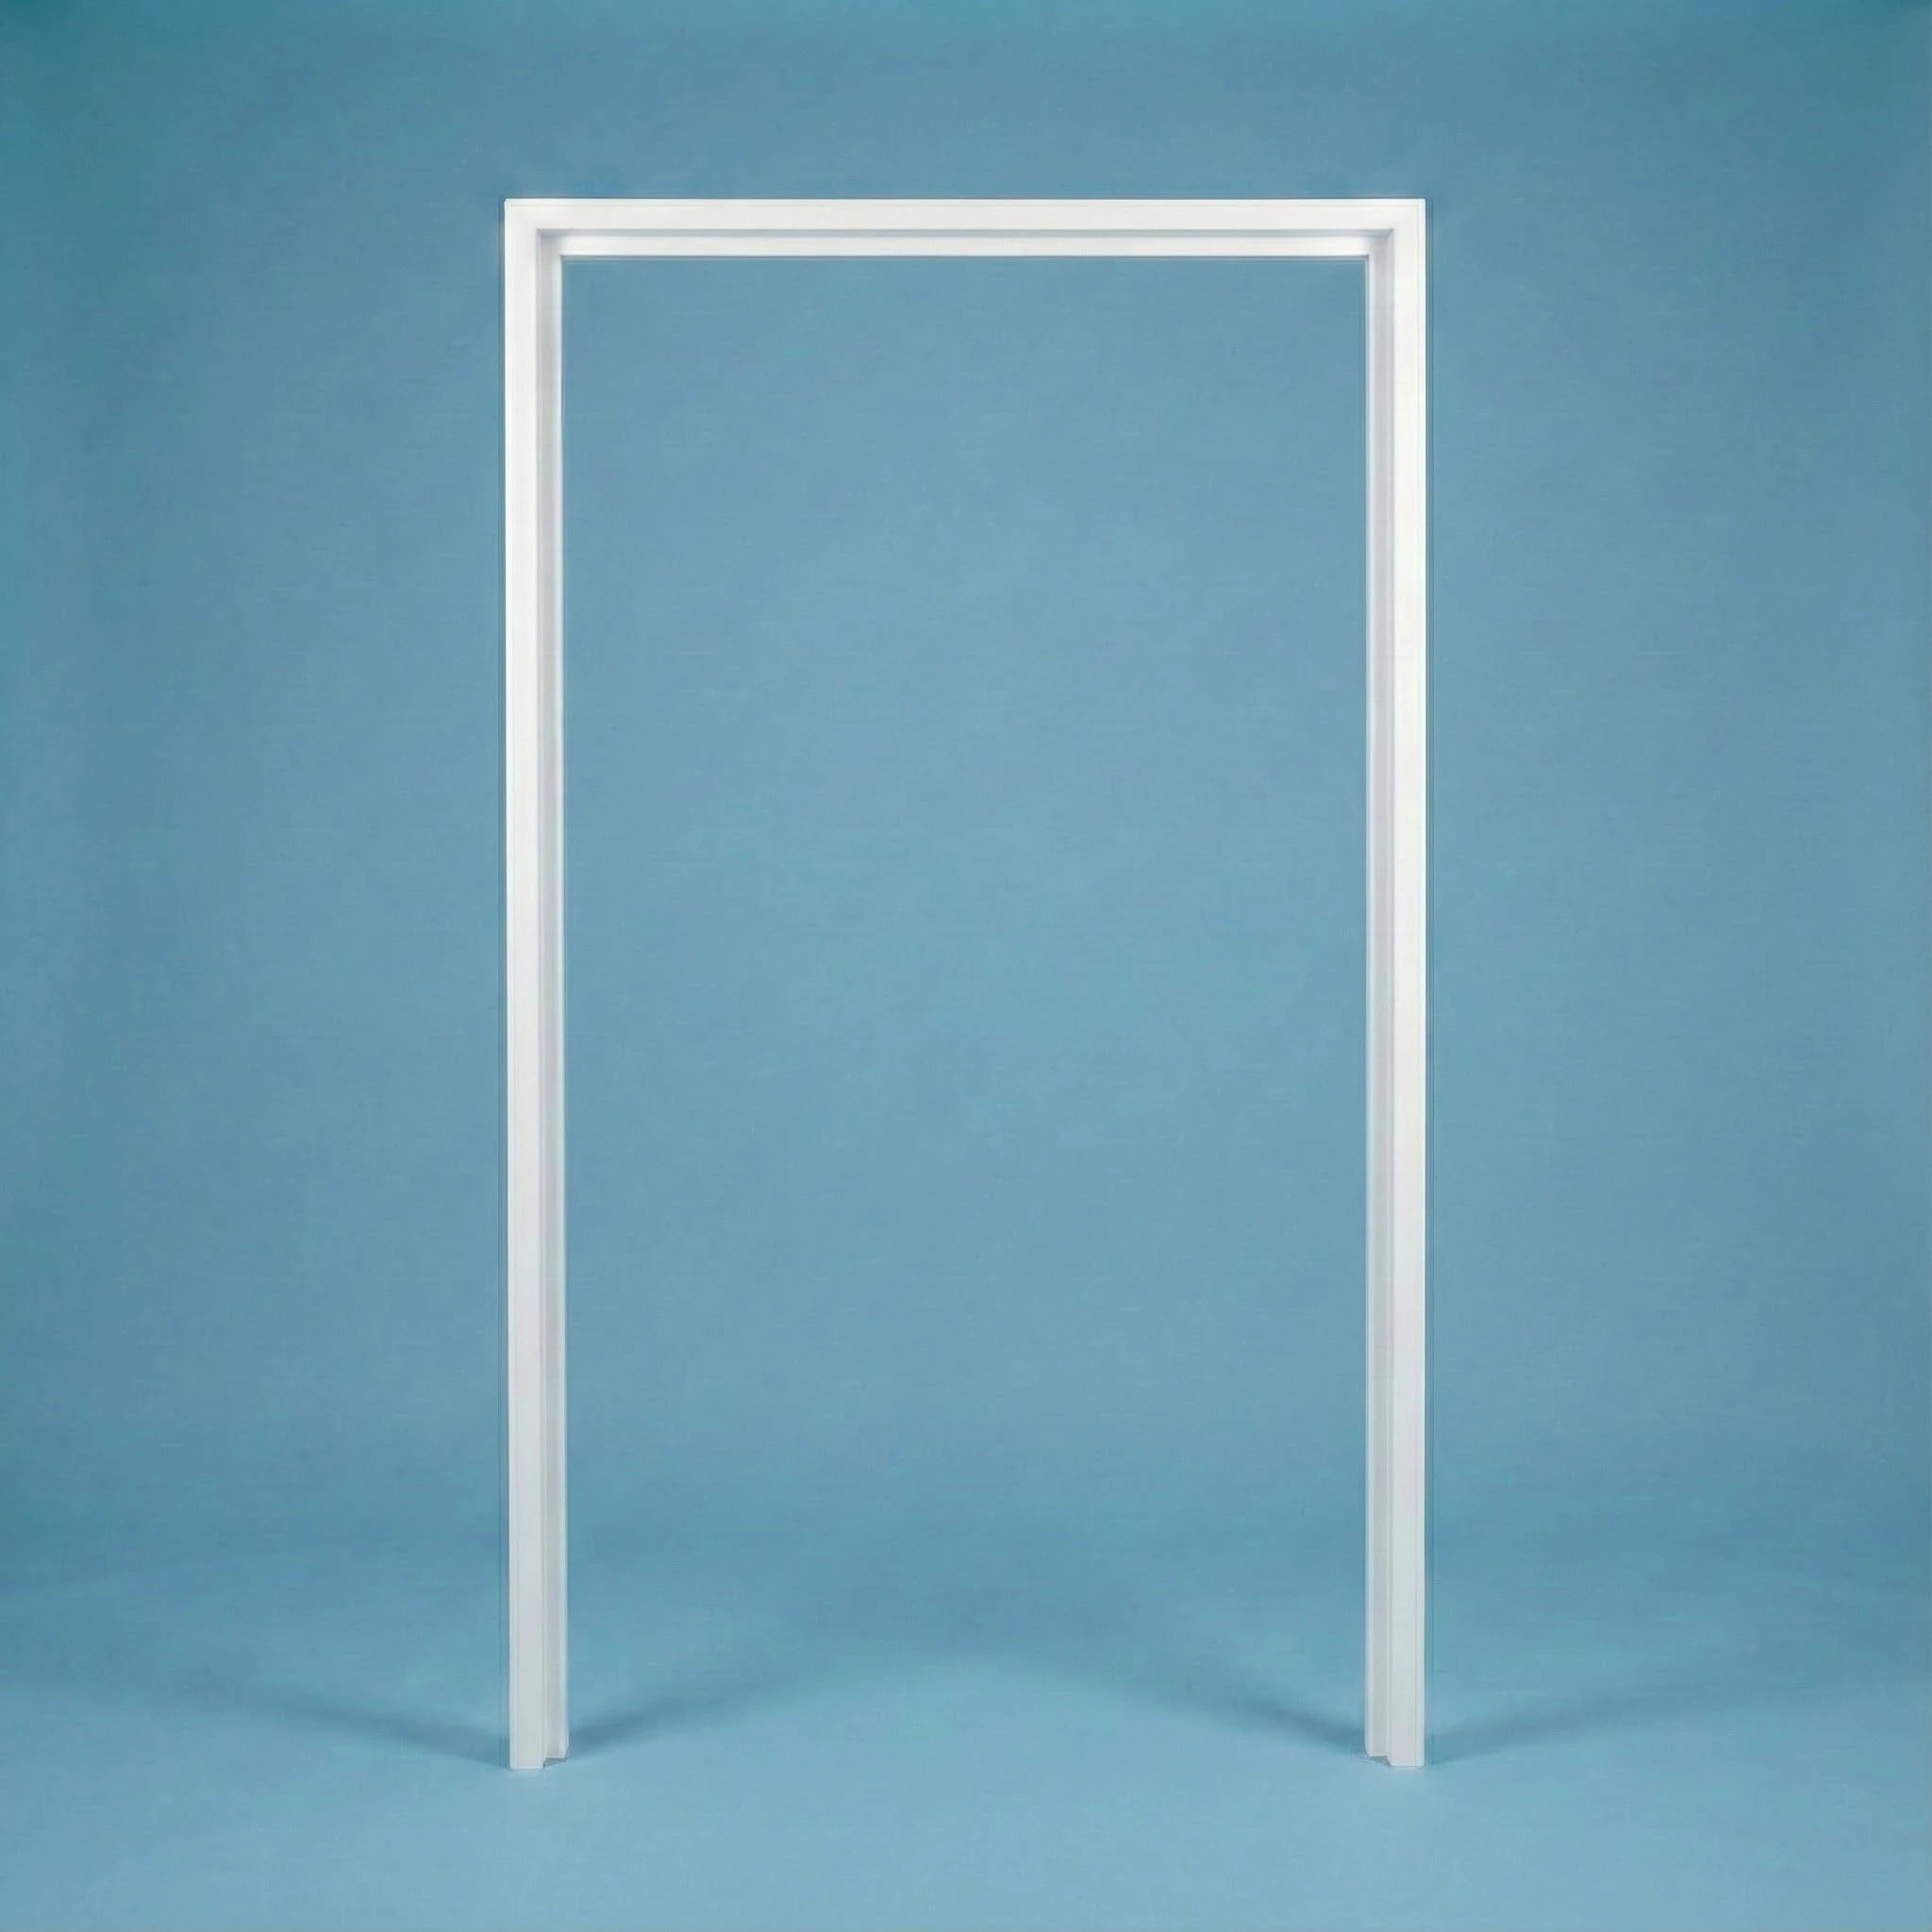
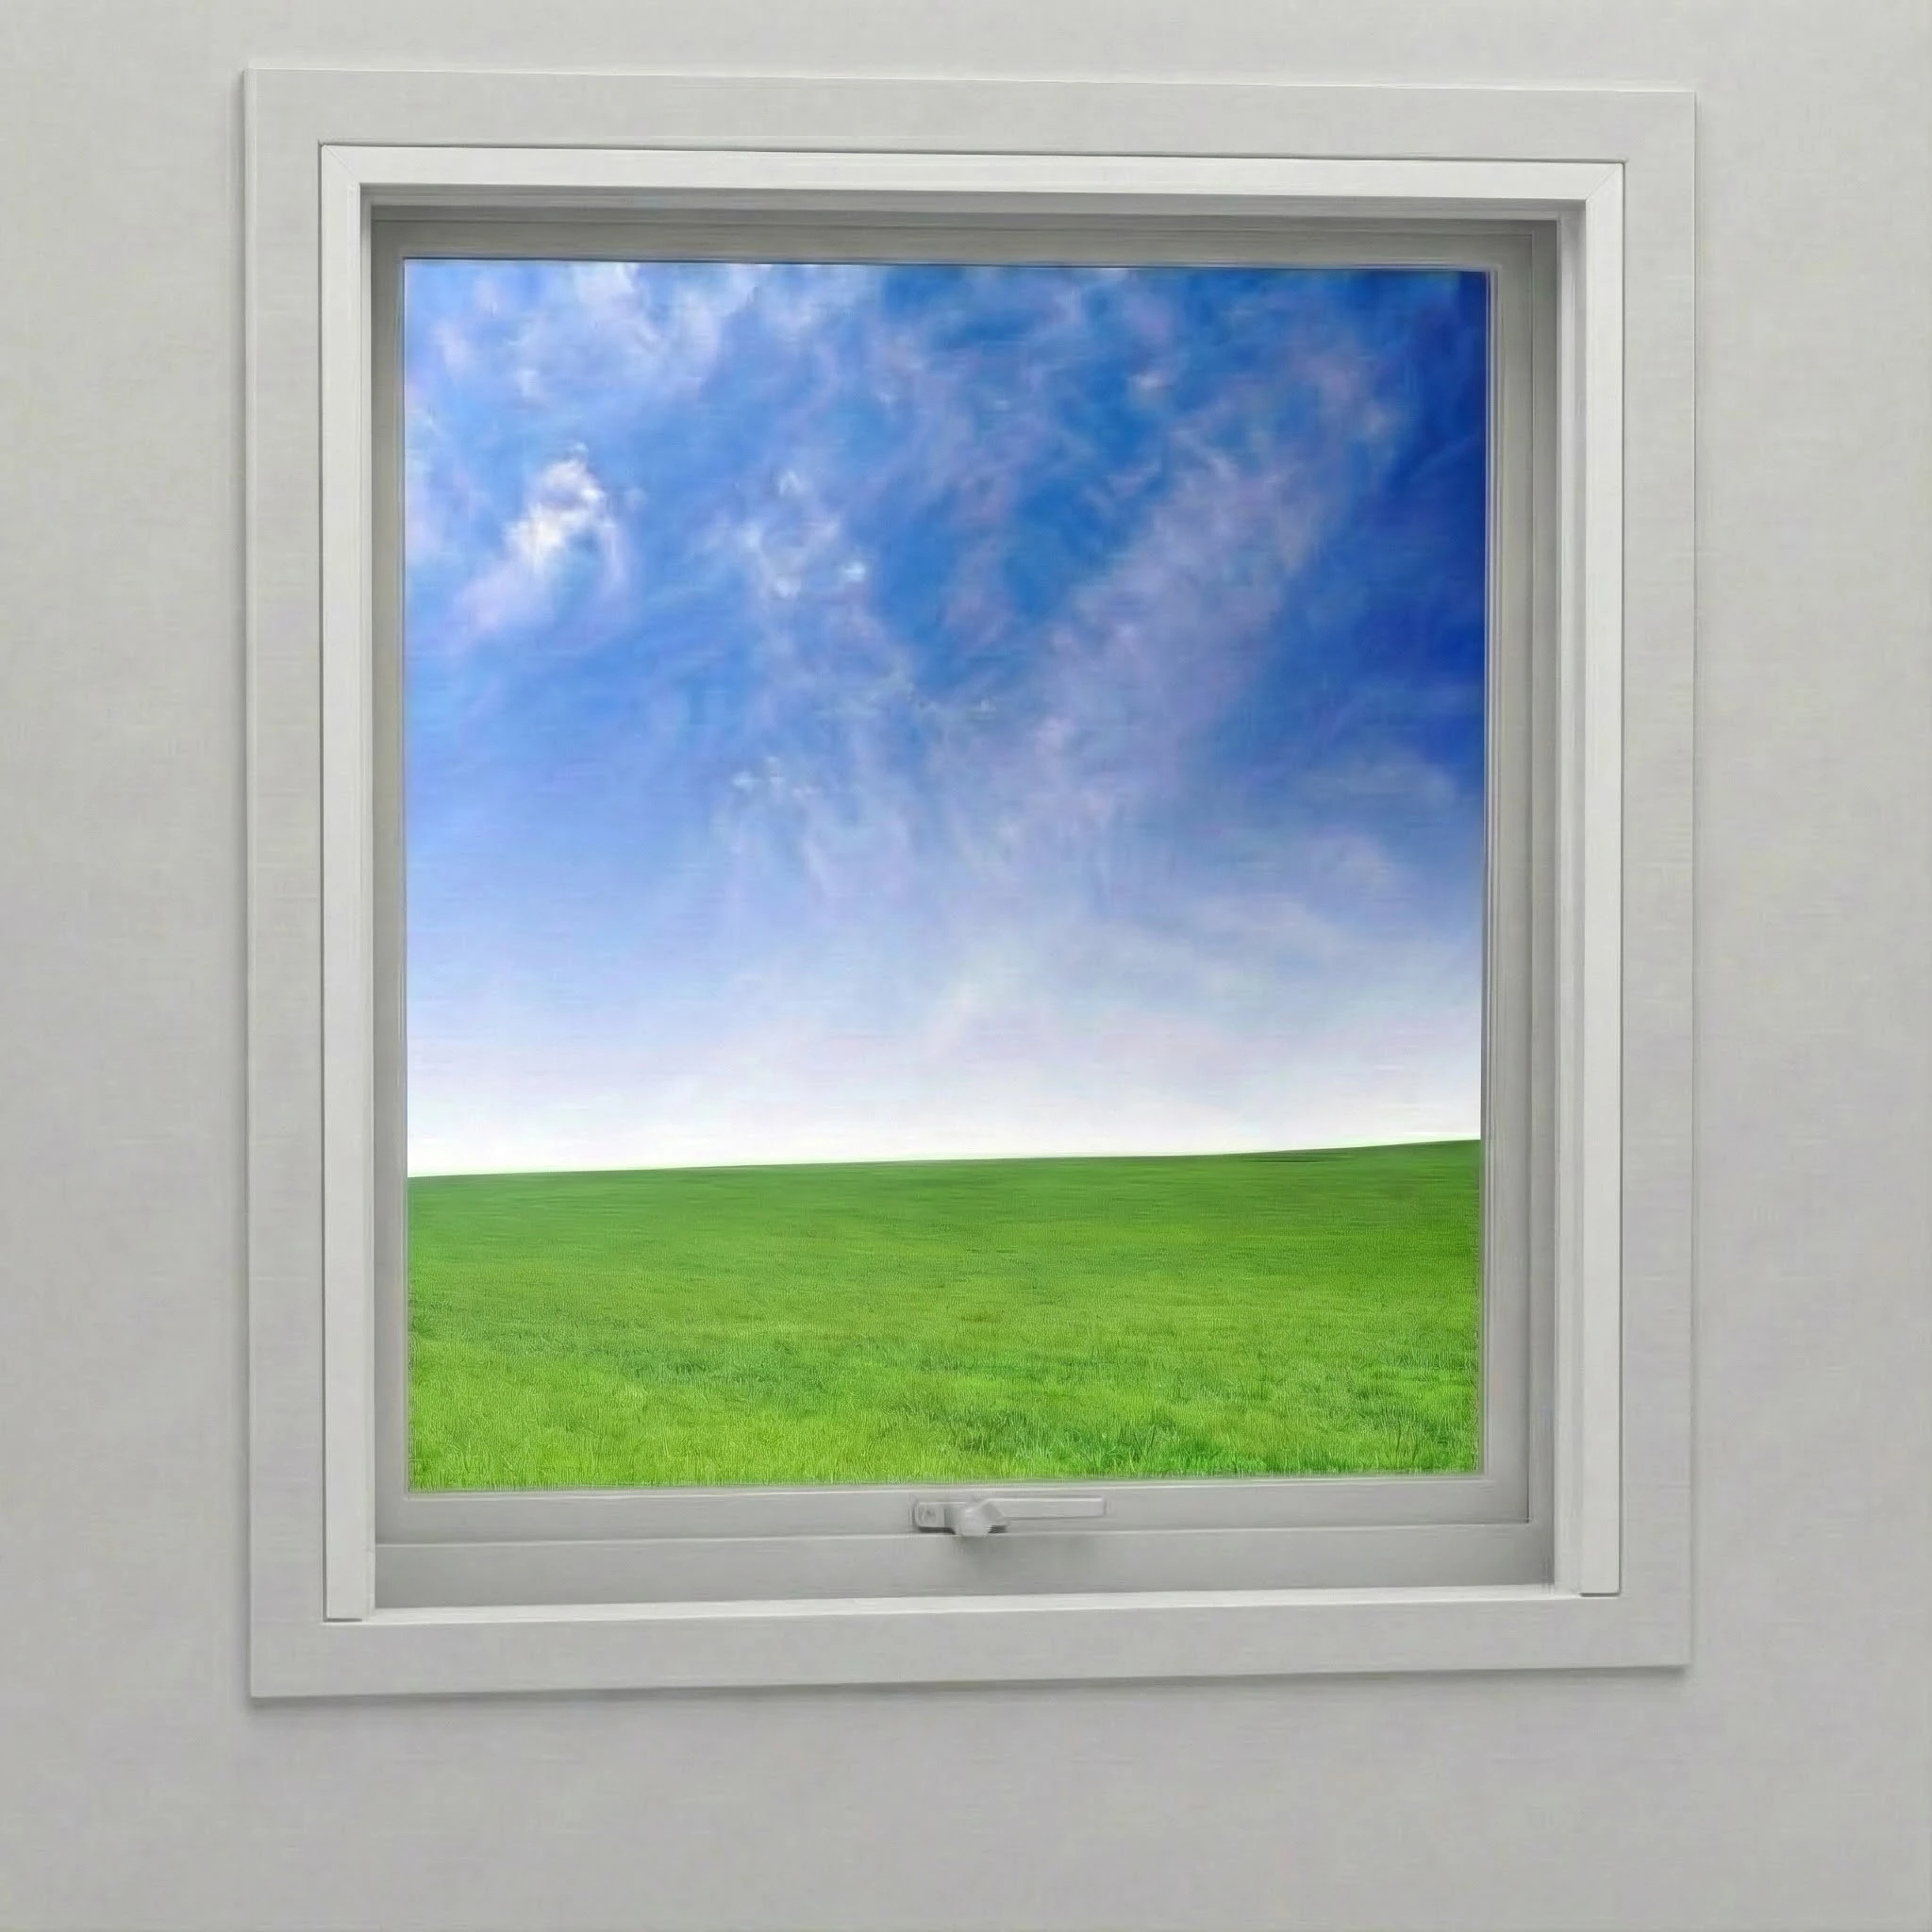
3 Sided Frame: Best when the window has an obstruction like a latch or winder
4-sided frame: Best for windows with no bottom obstructions. It surrounds the window on all four sides, giving a clean, enclosed look.
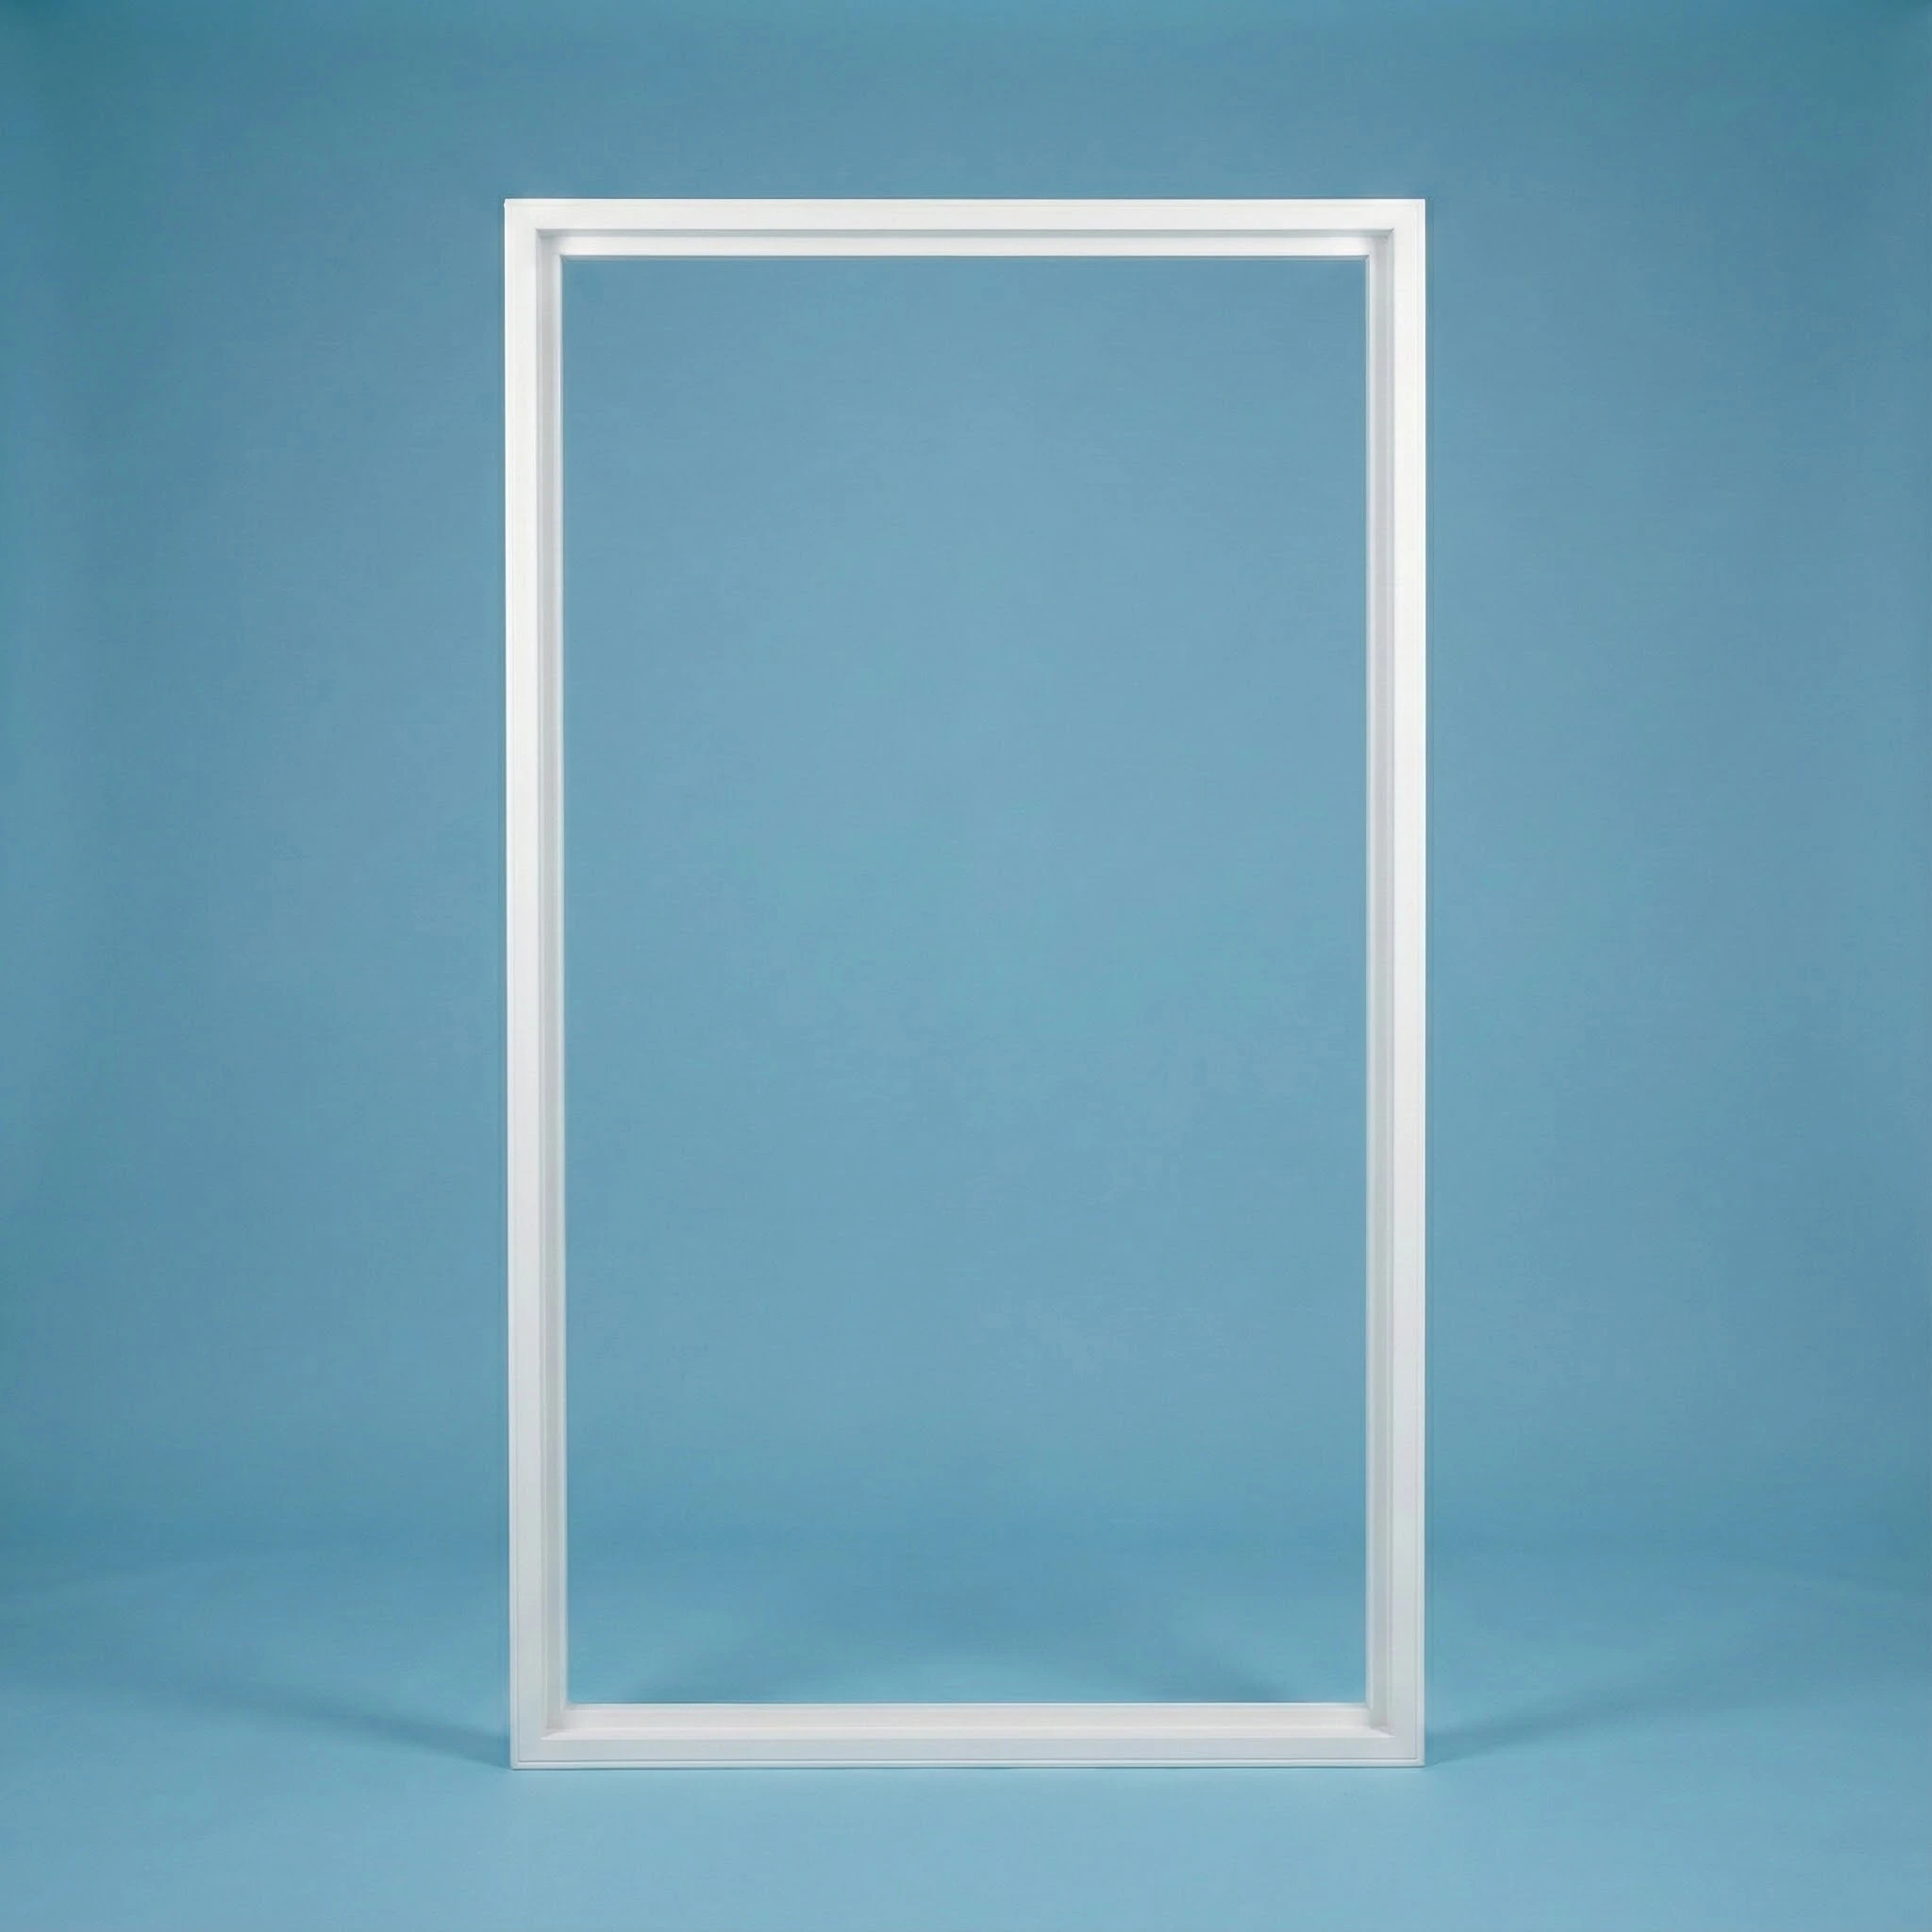

4-sided frame: Best for windows with no bottom obstructions
Choosing the Right Frame Type
We offer several frame types to suit different windows and installation needs.
Z Frame
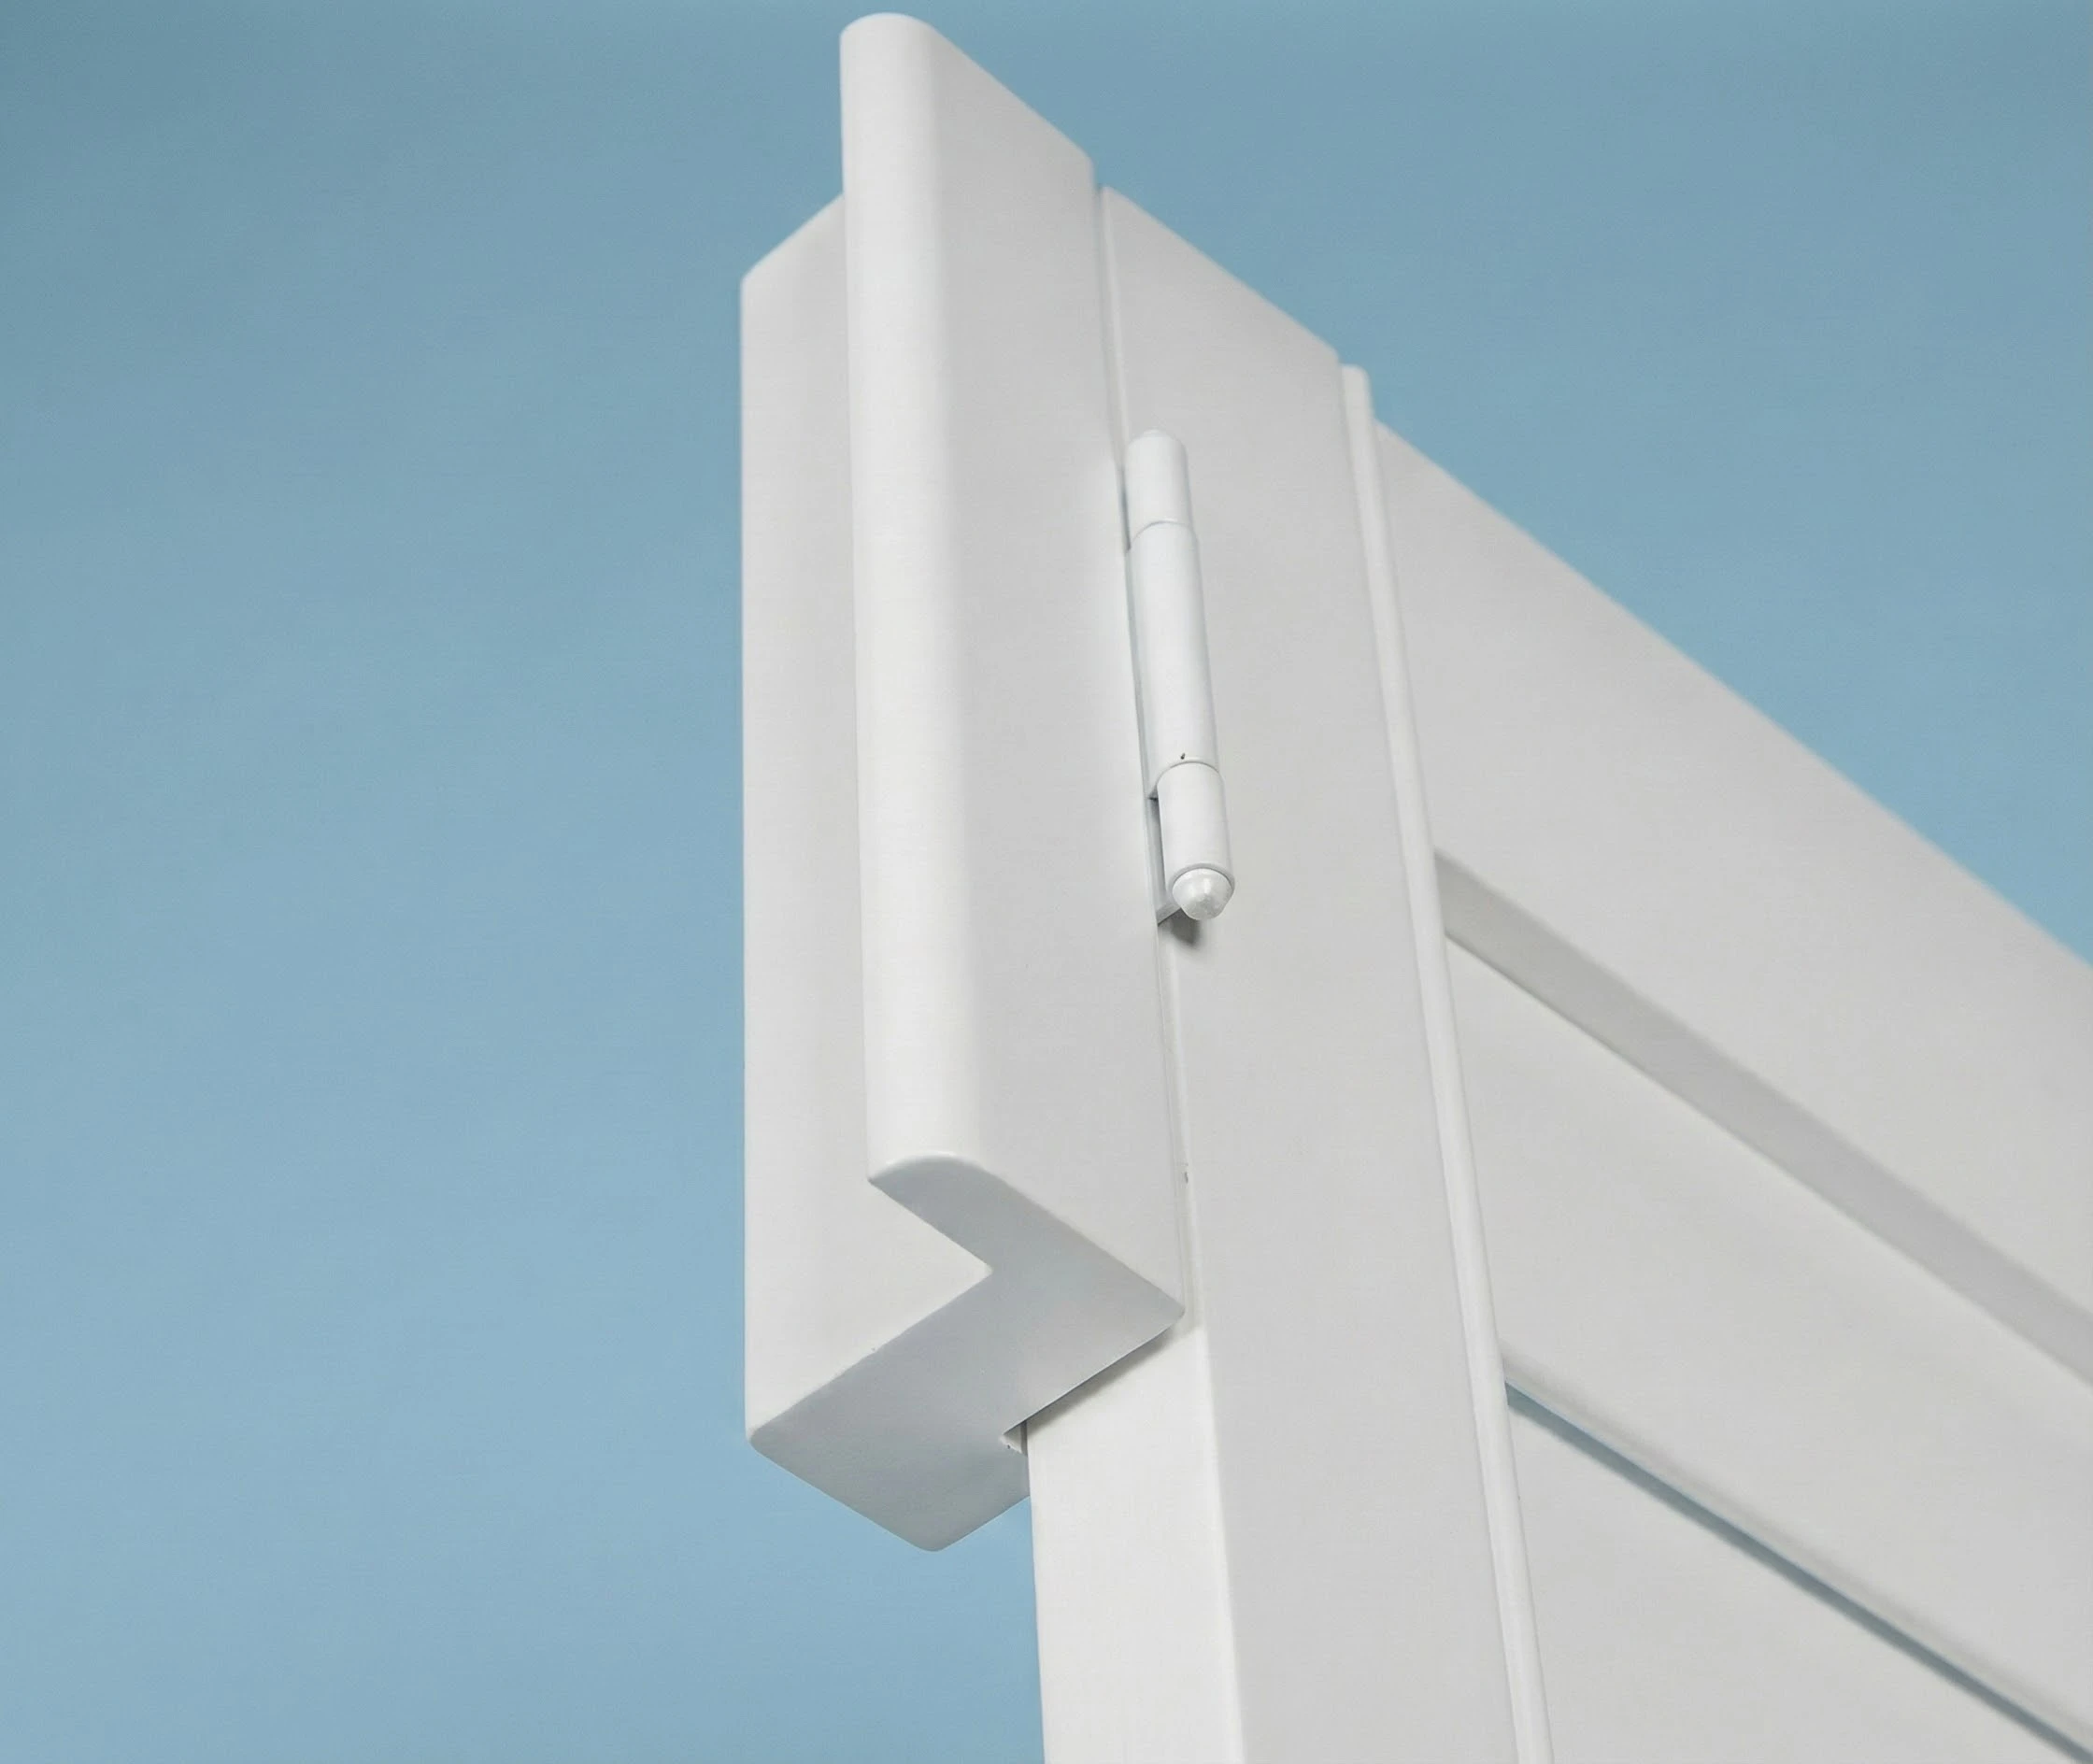
Great for windows that aren’t perfectly square or don’t have an architrave. The Z frame is installed inside the recess and has a bull-nose edge that wraps slightly onto the wall or plaster. It helps hide gaps and create a clean finish.
L Frame (Inside Mount)
Our most popular choice for inside mounts. The L frame fits neatly into the recess and allows you to square the frame and panels. It also helps block light around the edges.
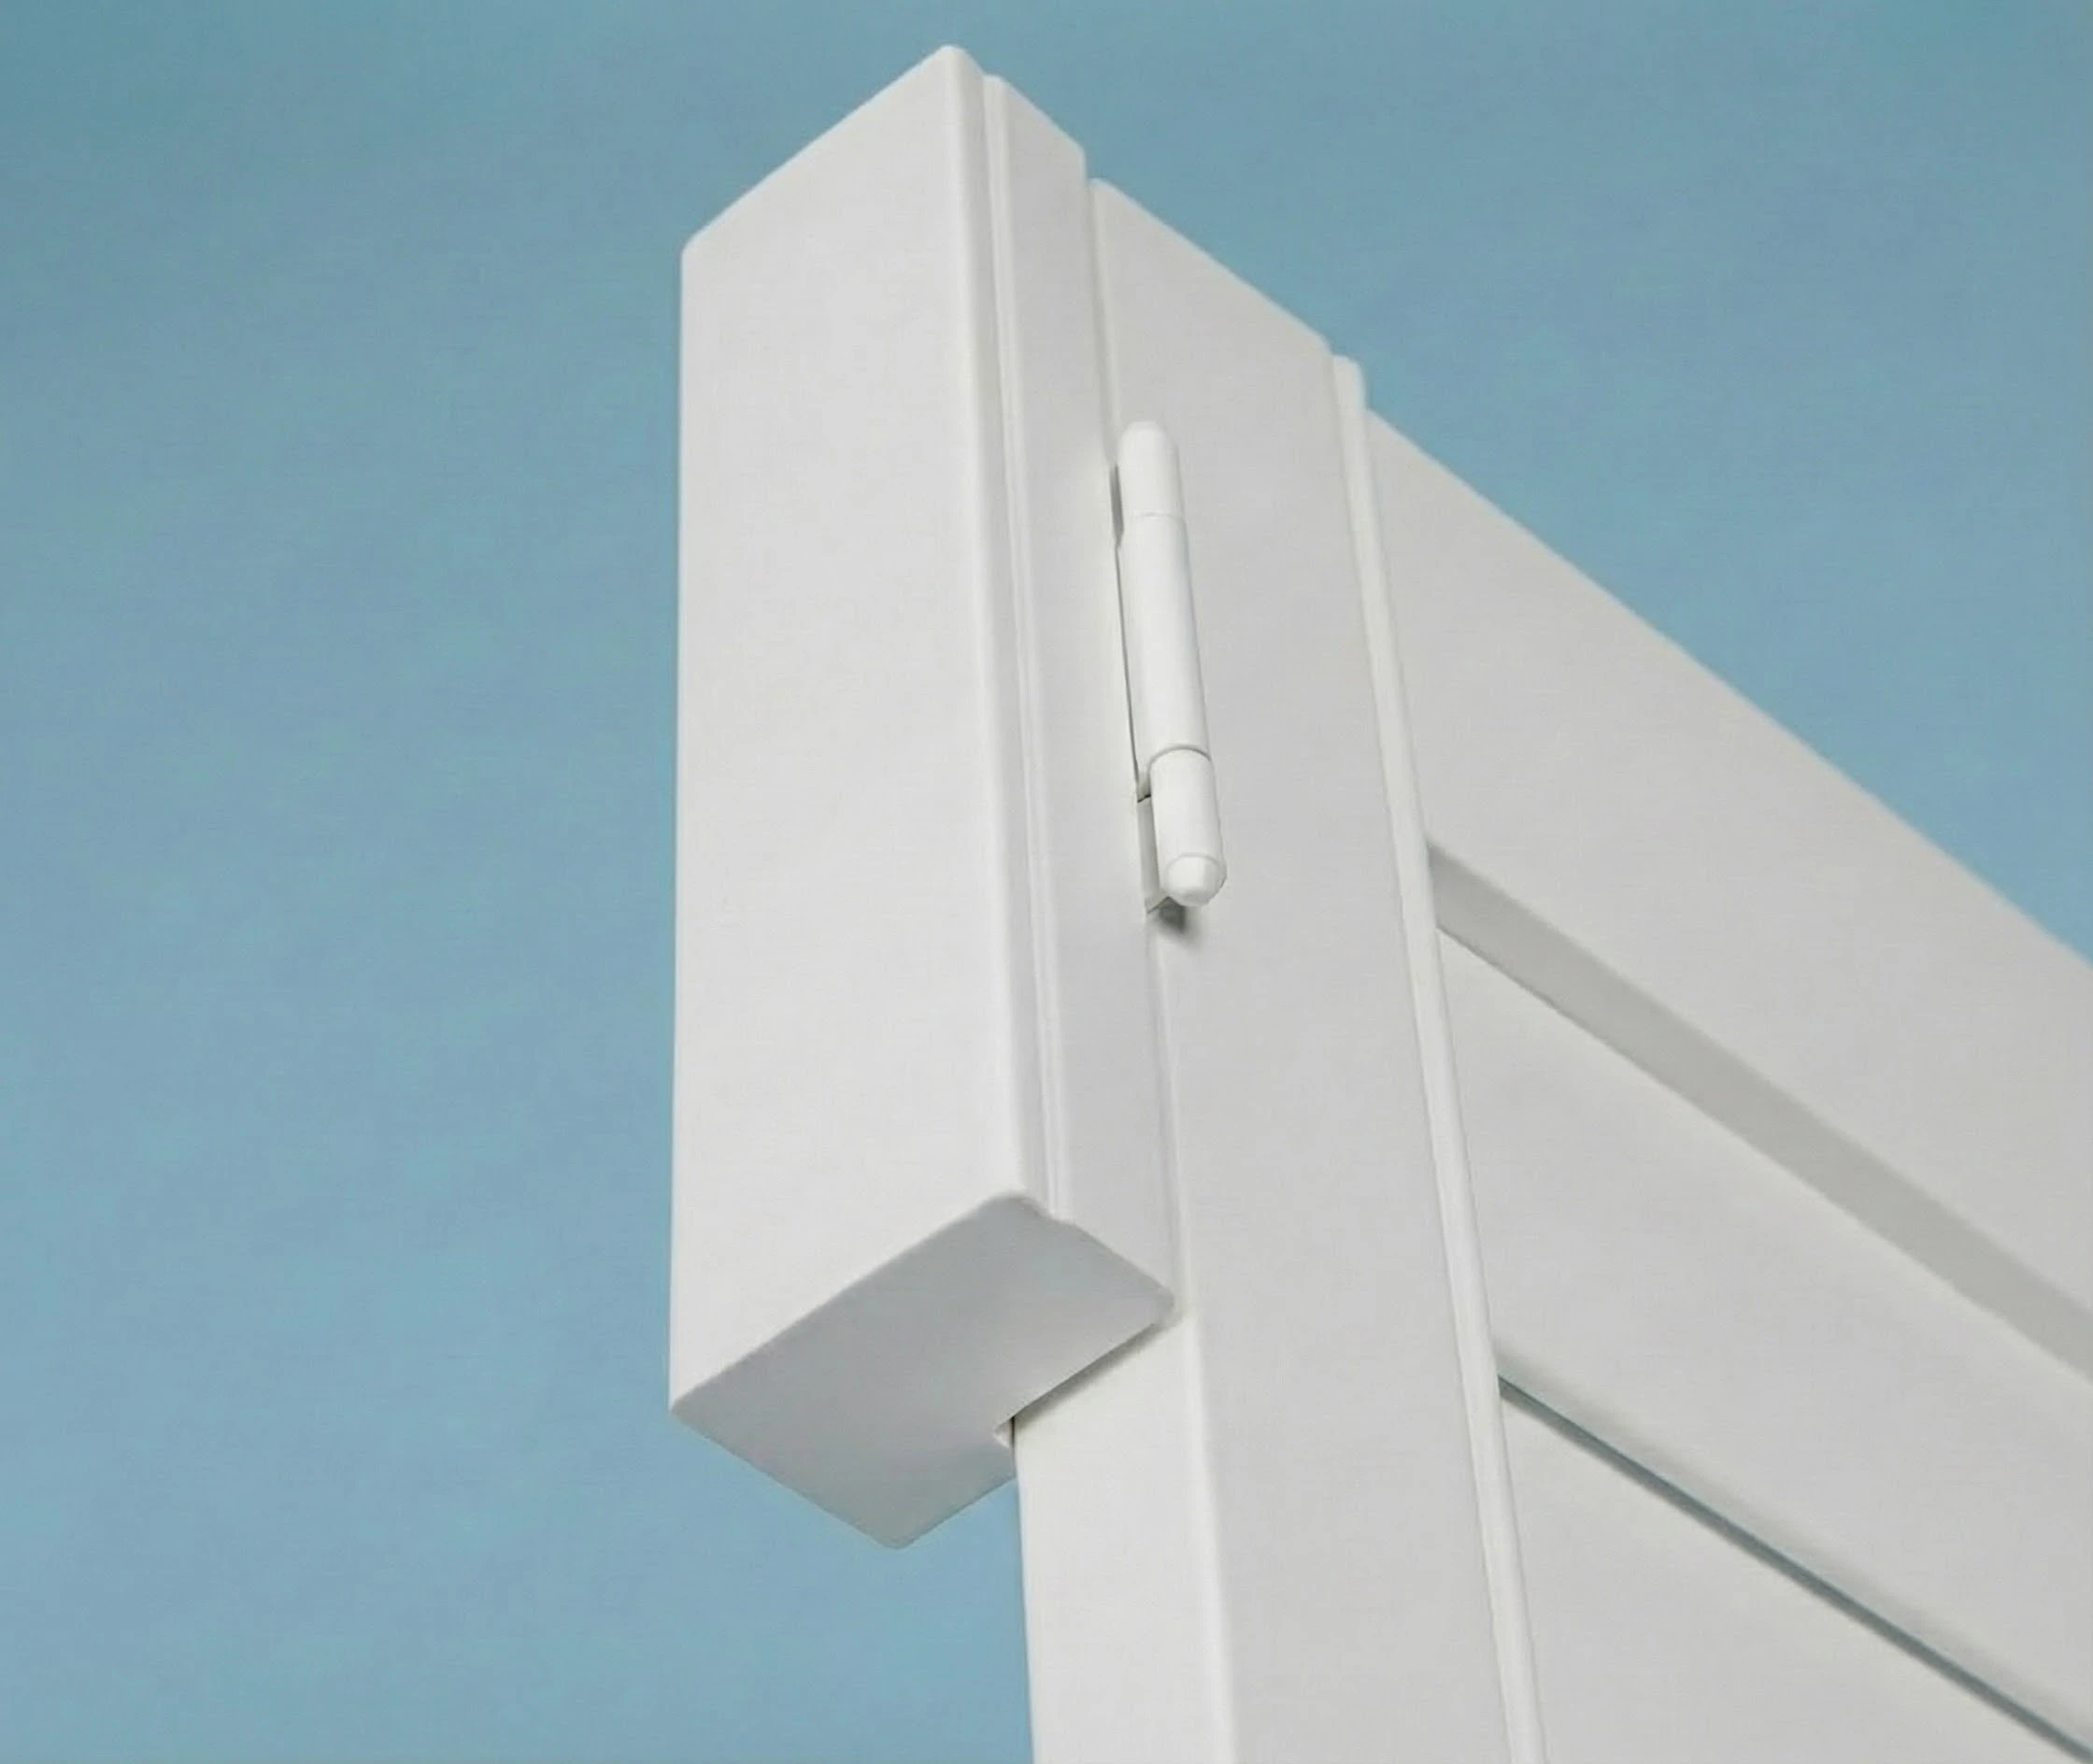
U Channel
Designed for internal openings like room dividers or wardrobe areas. Panels slot into U channels at the top and bottom. These shutters don’t have hinges and don’t open, making them ideal for fixed panel applications.
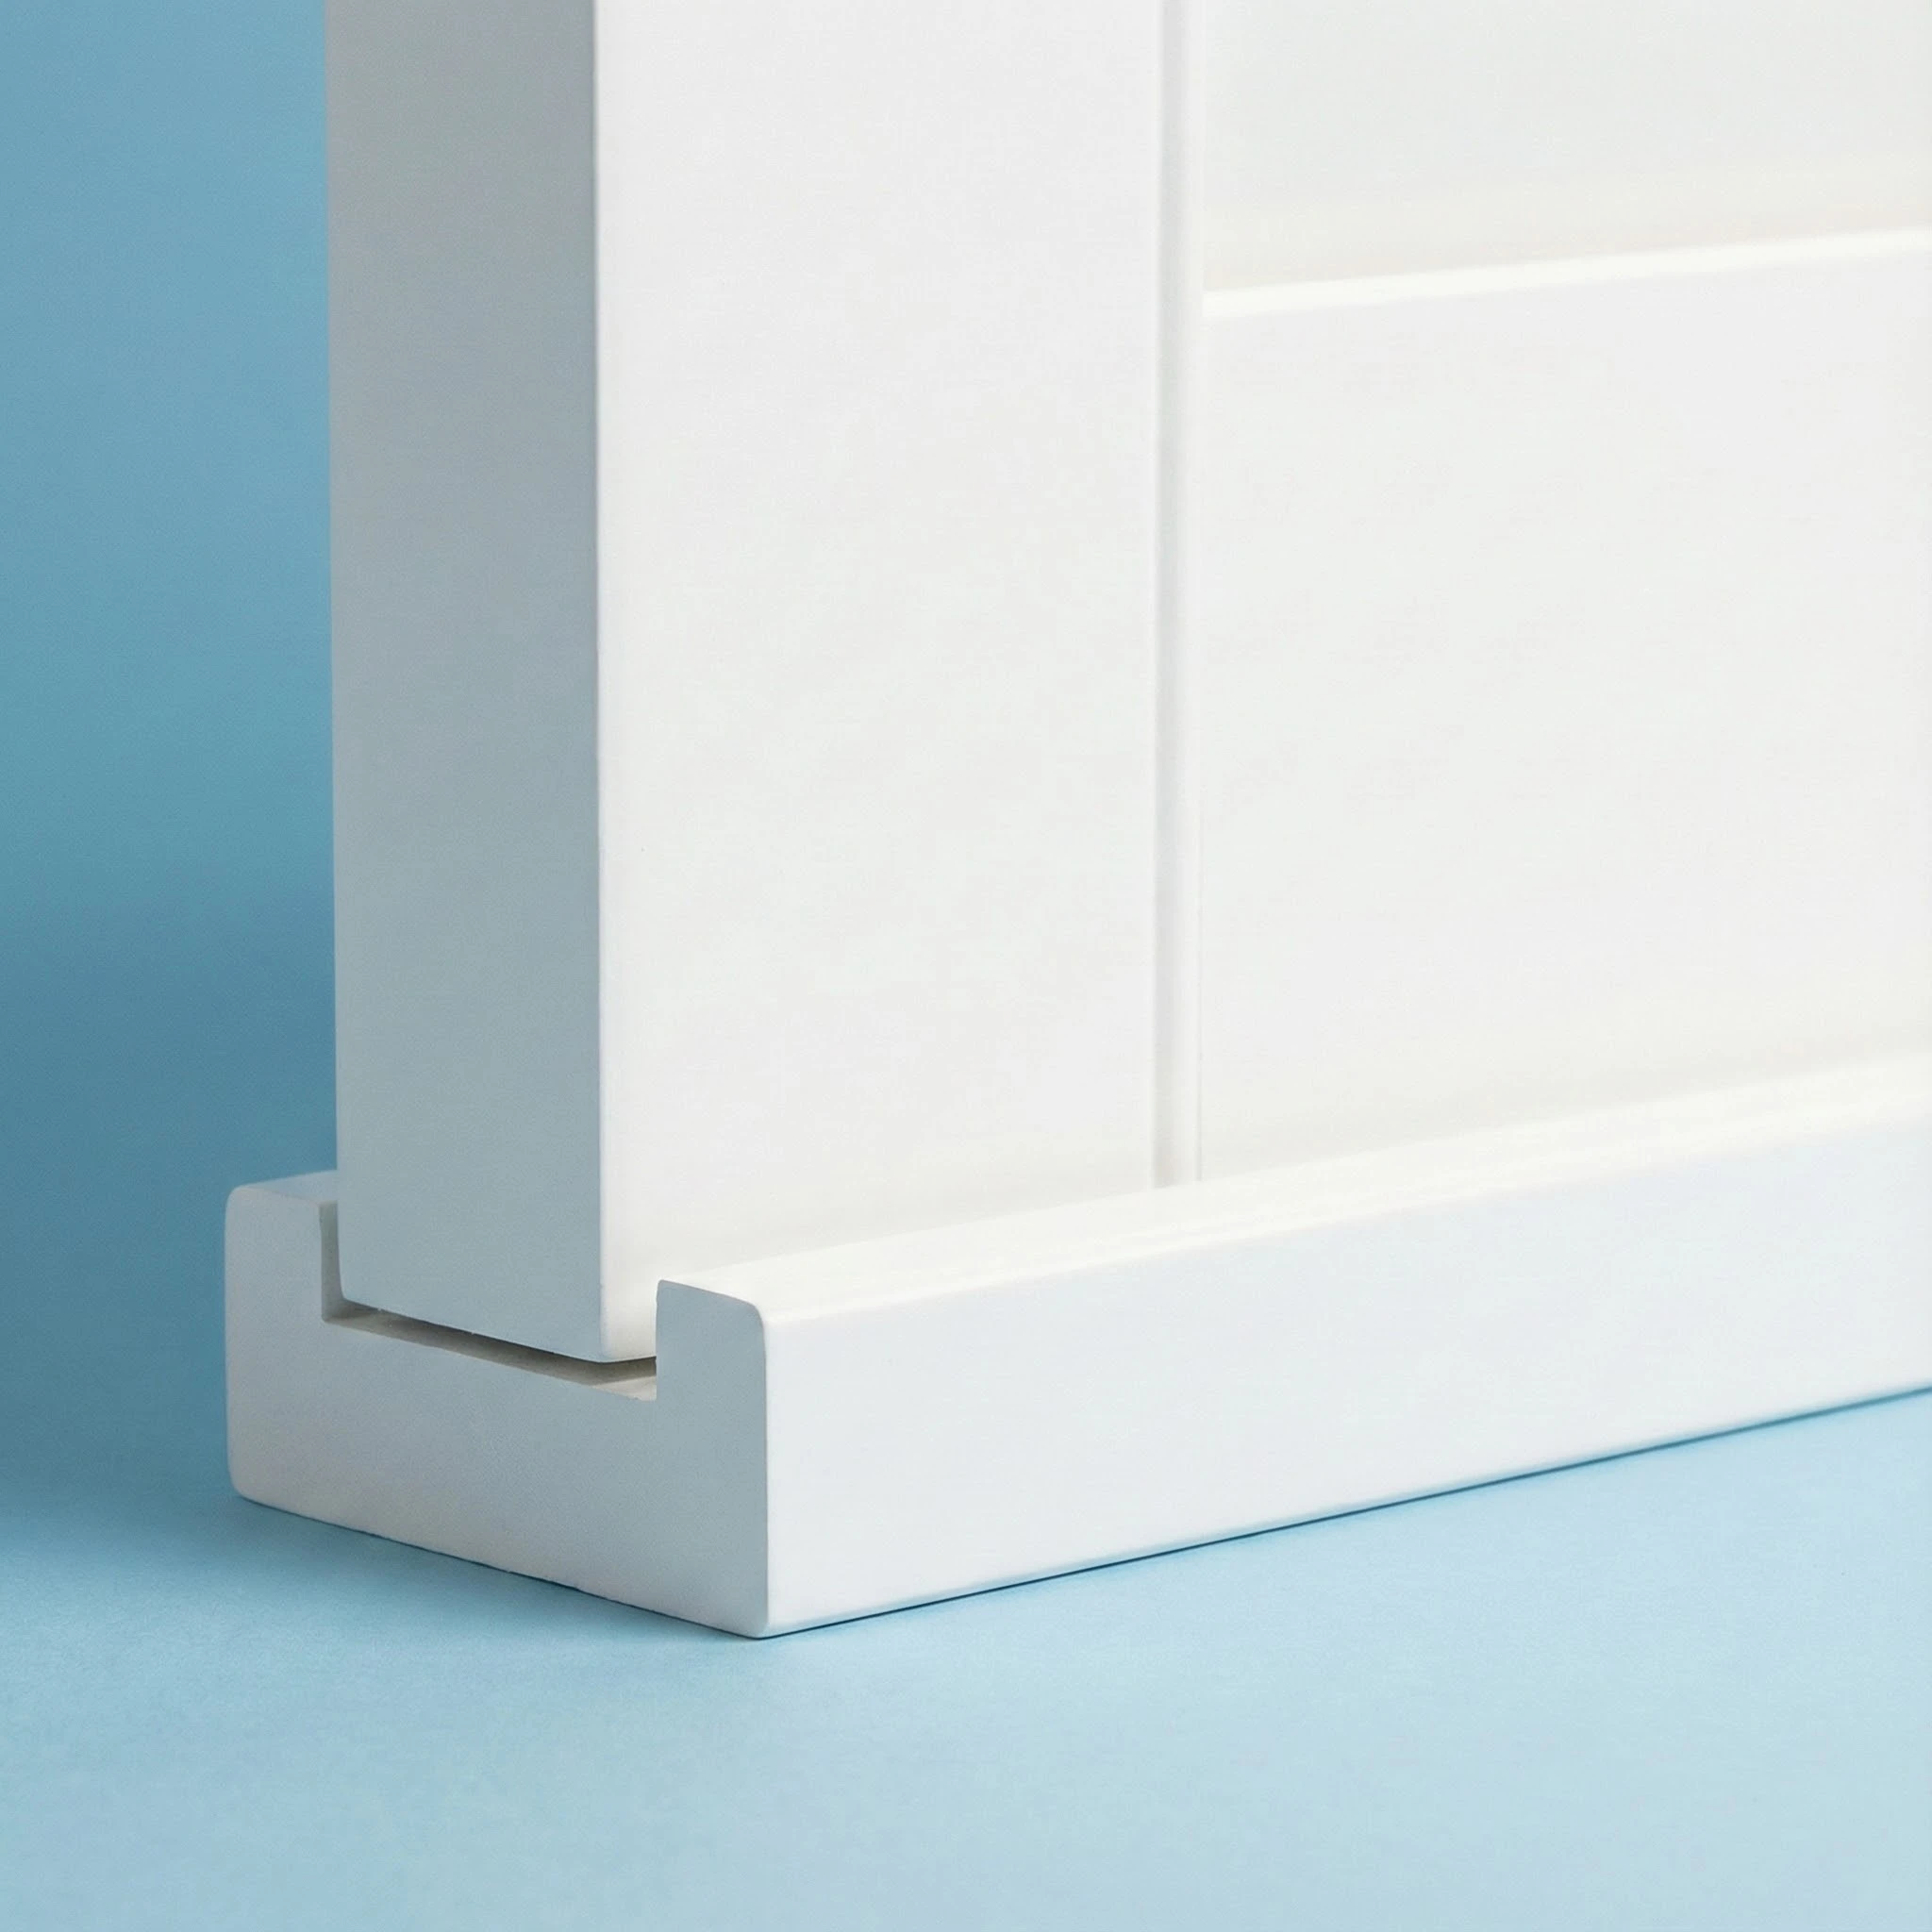
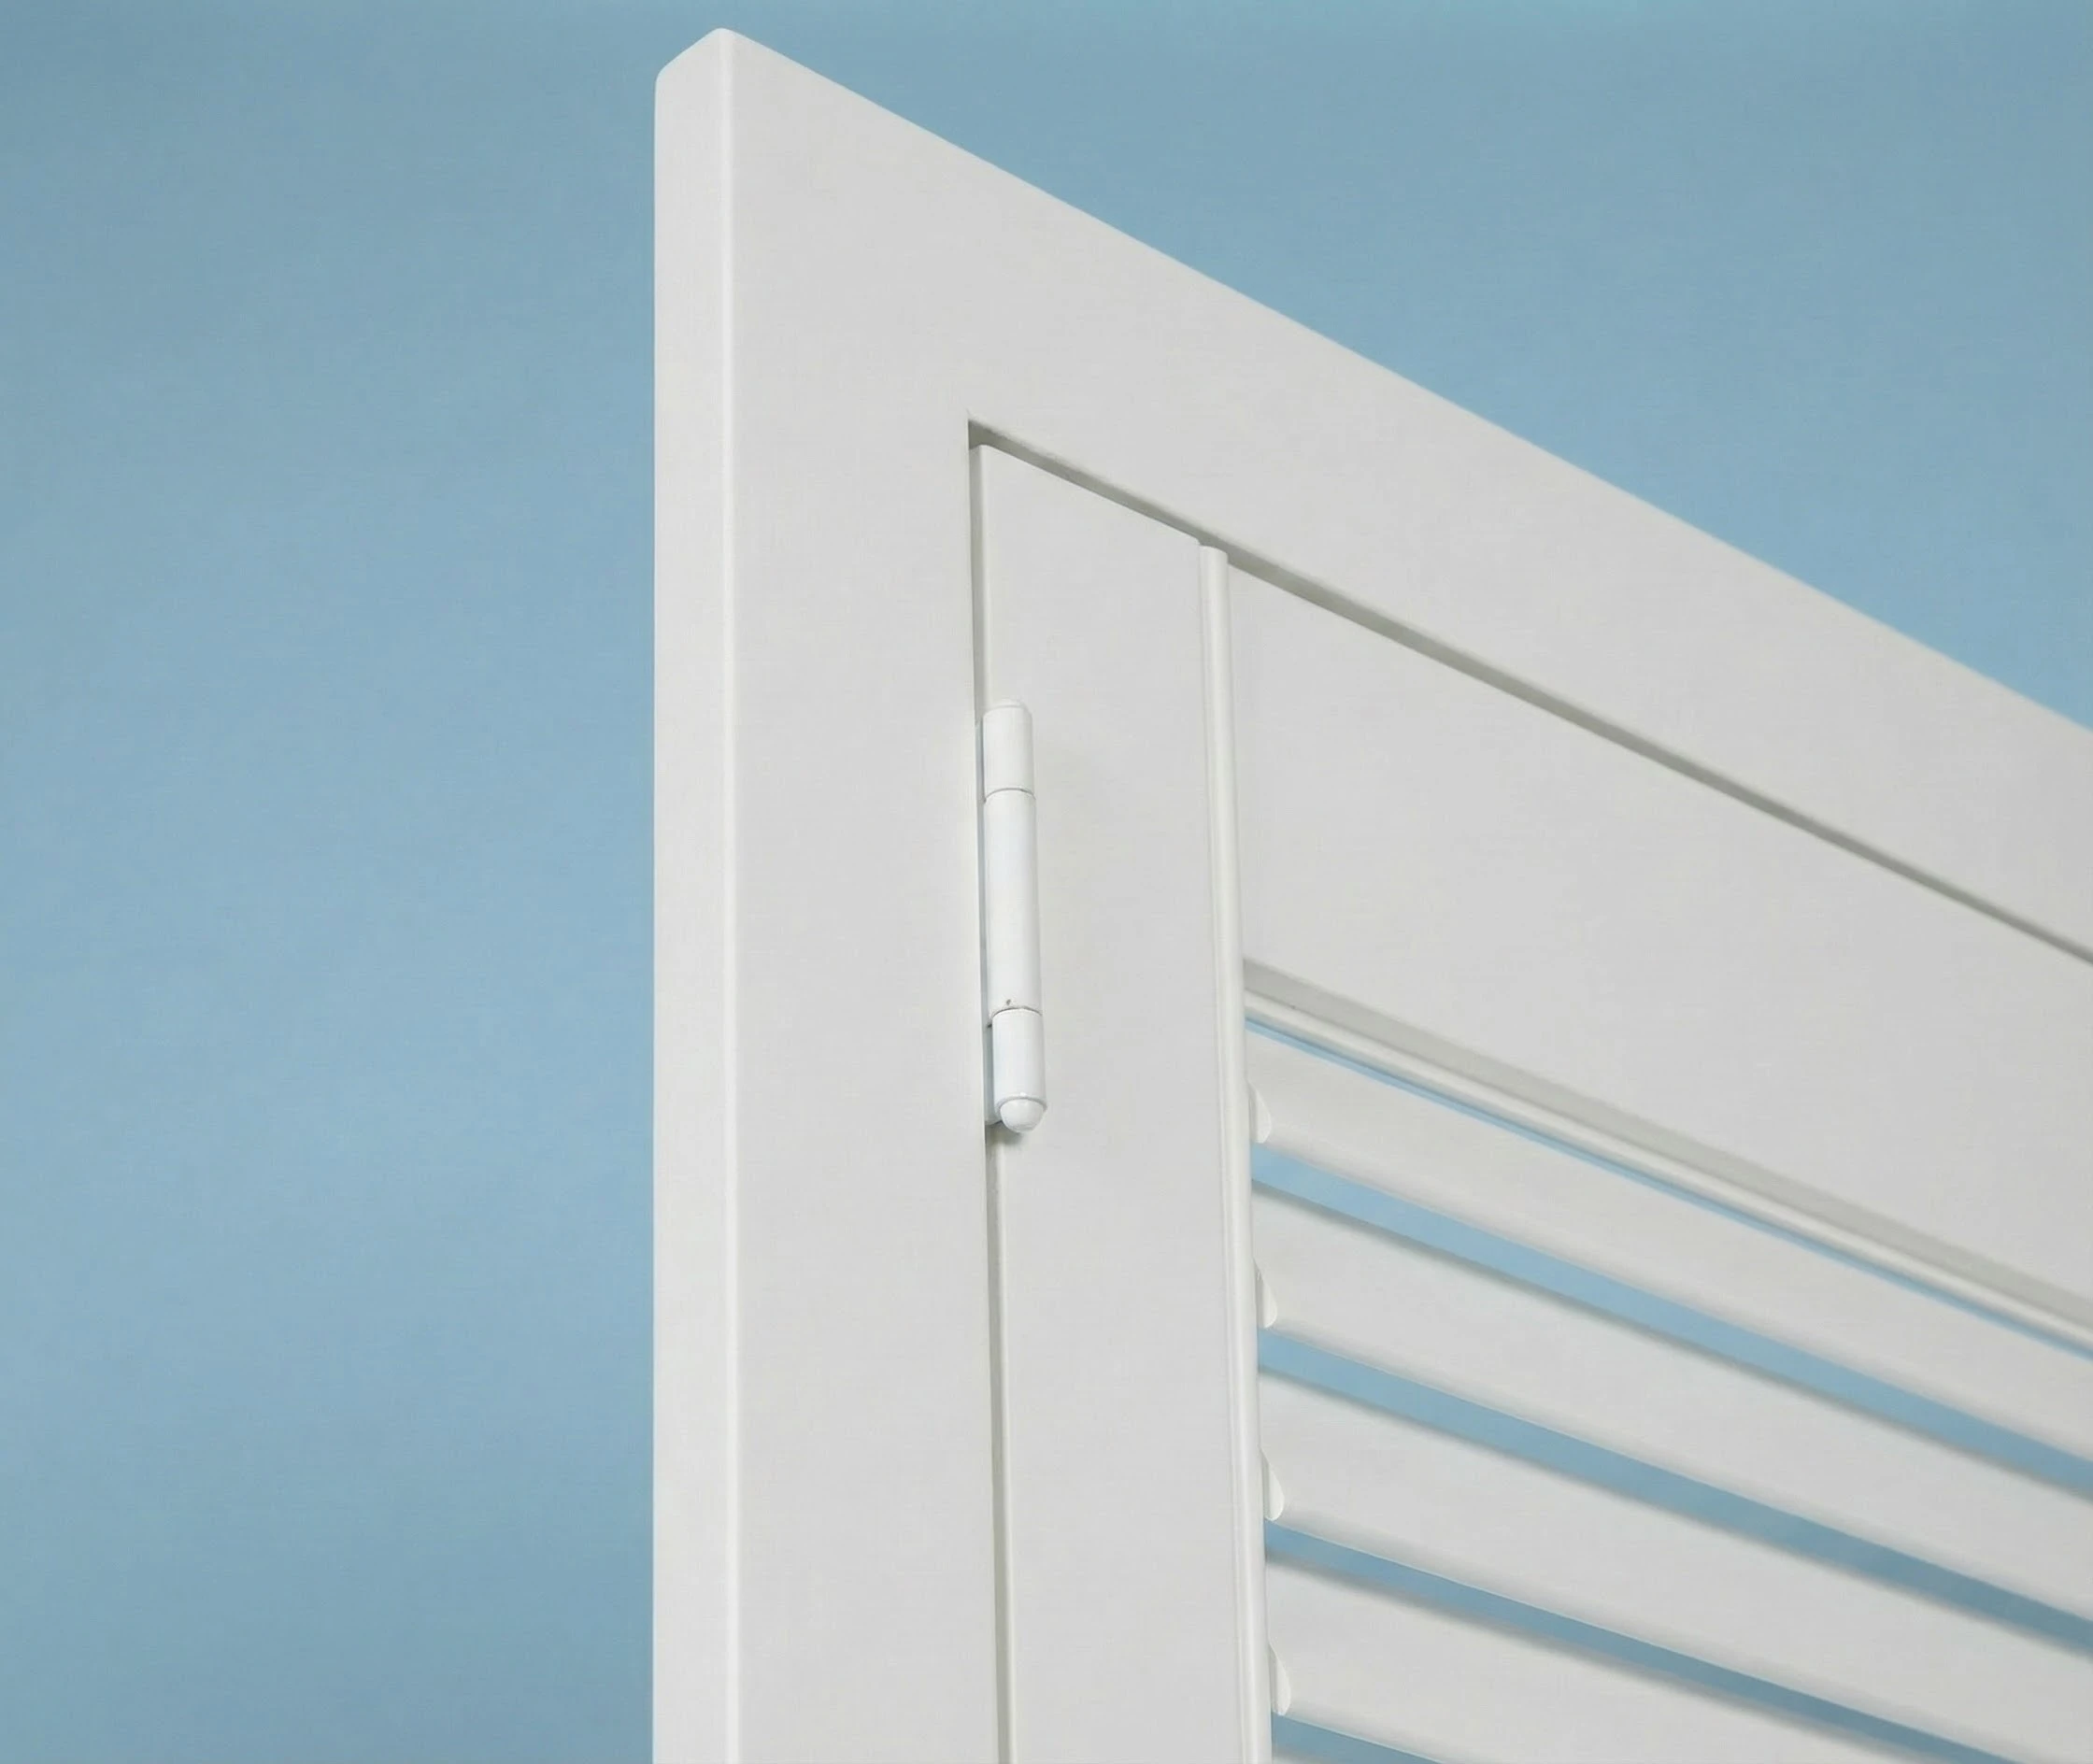
Direct Mount
Used when shutters are installed directly onto the window without a frame — similar to how a door is hung. Ideal for narrow openings like sidelights, where using a frame would reduce blade size and block too much light.
Need Help?
If you're not sure which frame is right for your windows or where to place your T-posts, we're here to help.
Book a free video consultation, explore our how-to guides, or reach out to our expert team. We’ll make sure you have everything you need for a successful DIY install.
Outside Mount Shutters
Outside mount shutters are installed on the wall or architrave surrounding your window, rather than inside the window recess. This option is ideal for shallow recesses, uneven frames, or when you want a bold, framed look that covers the entire window opening.
2
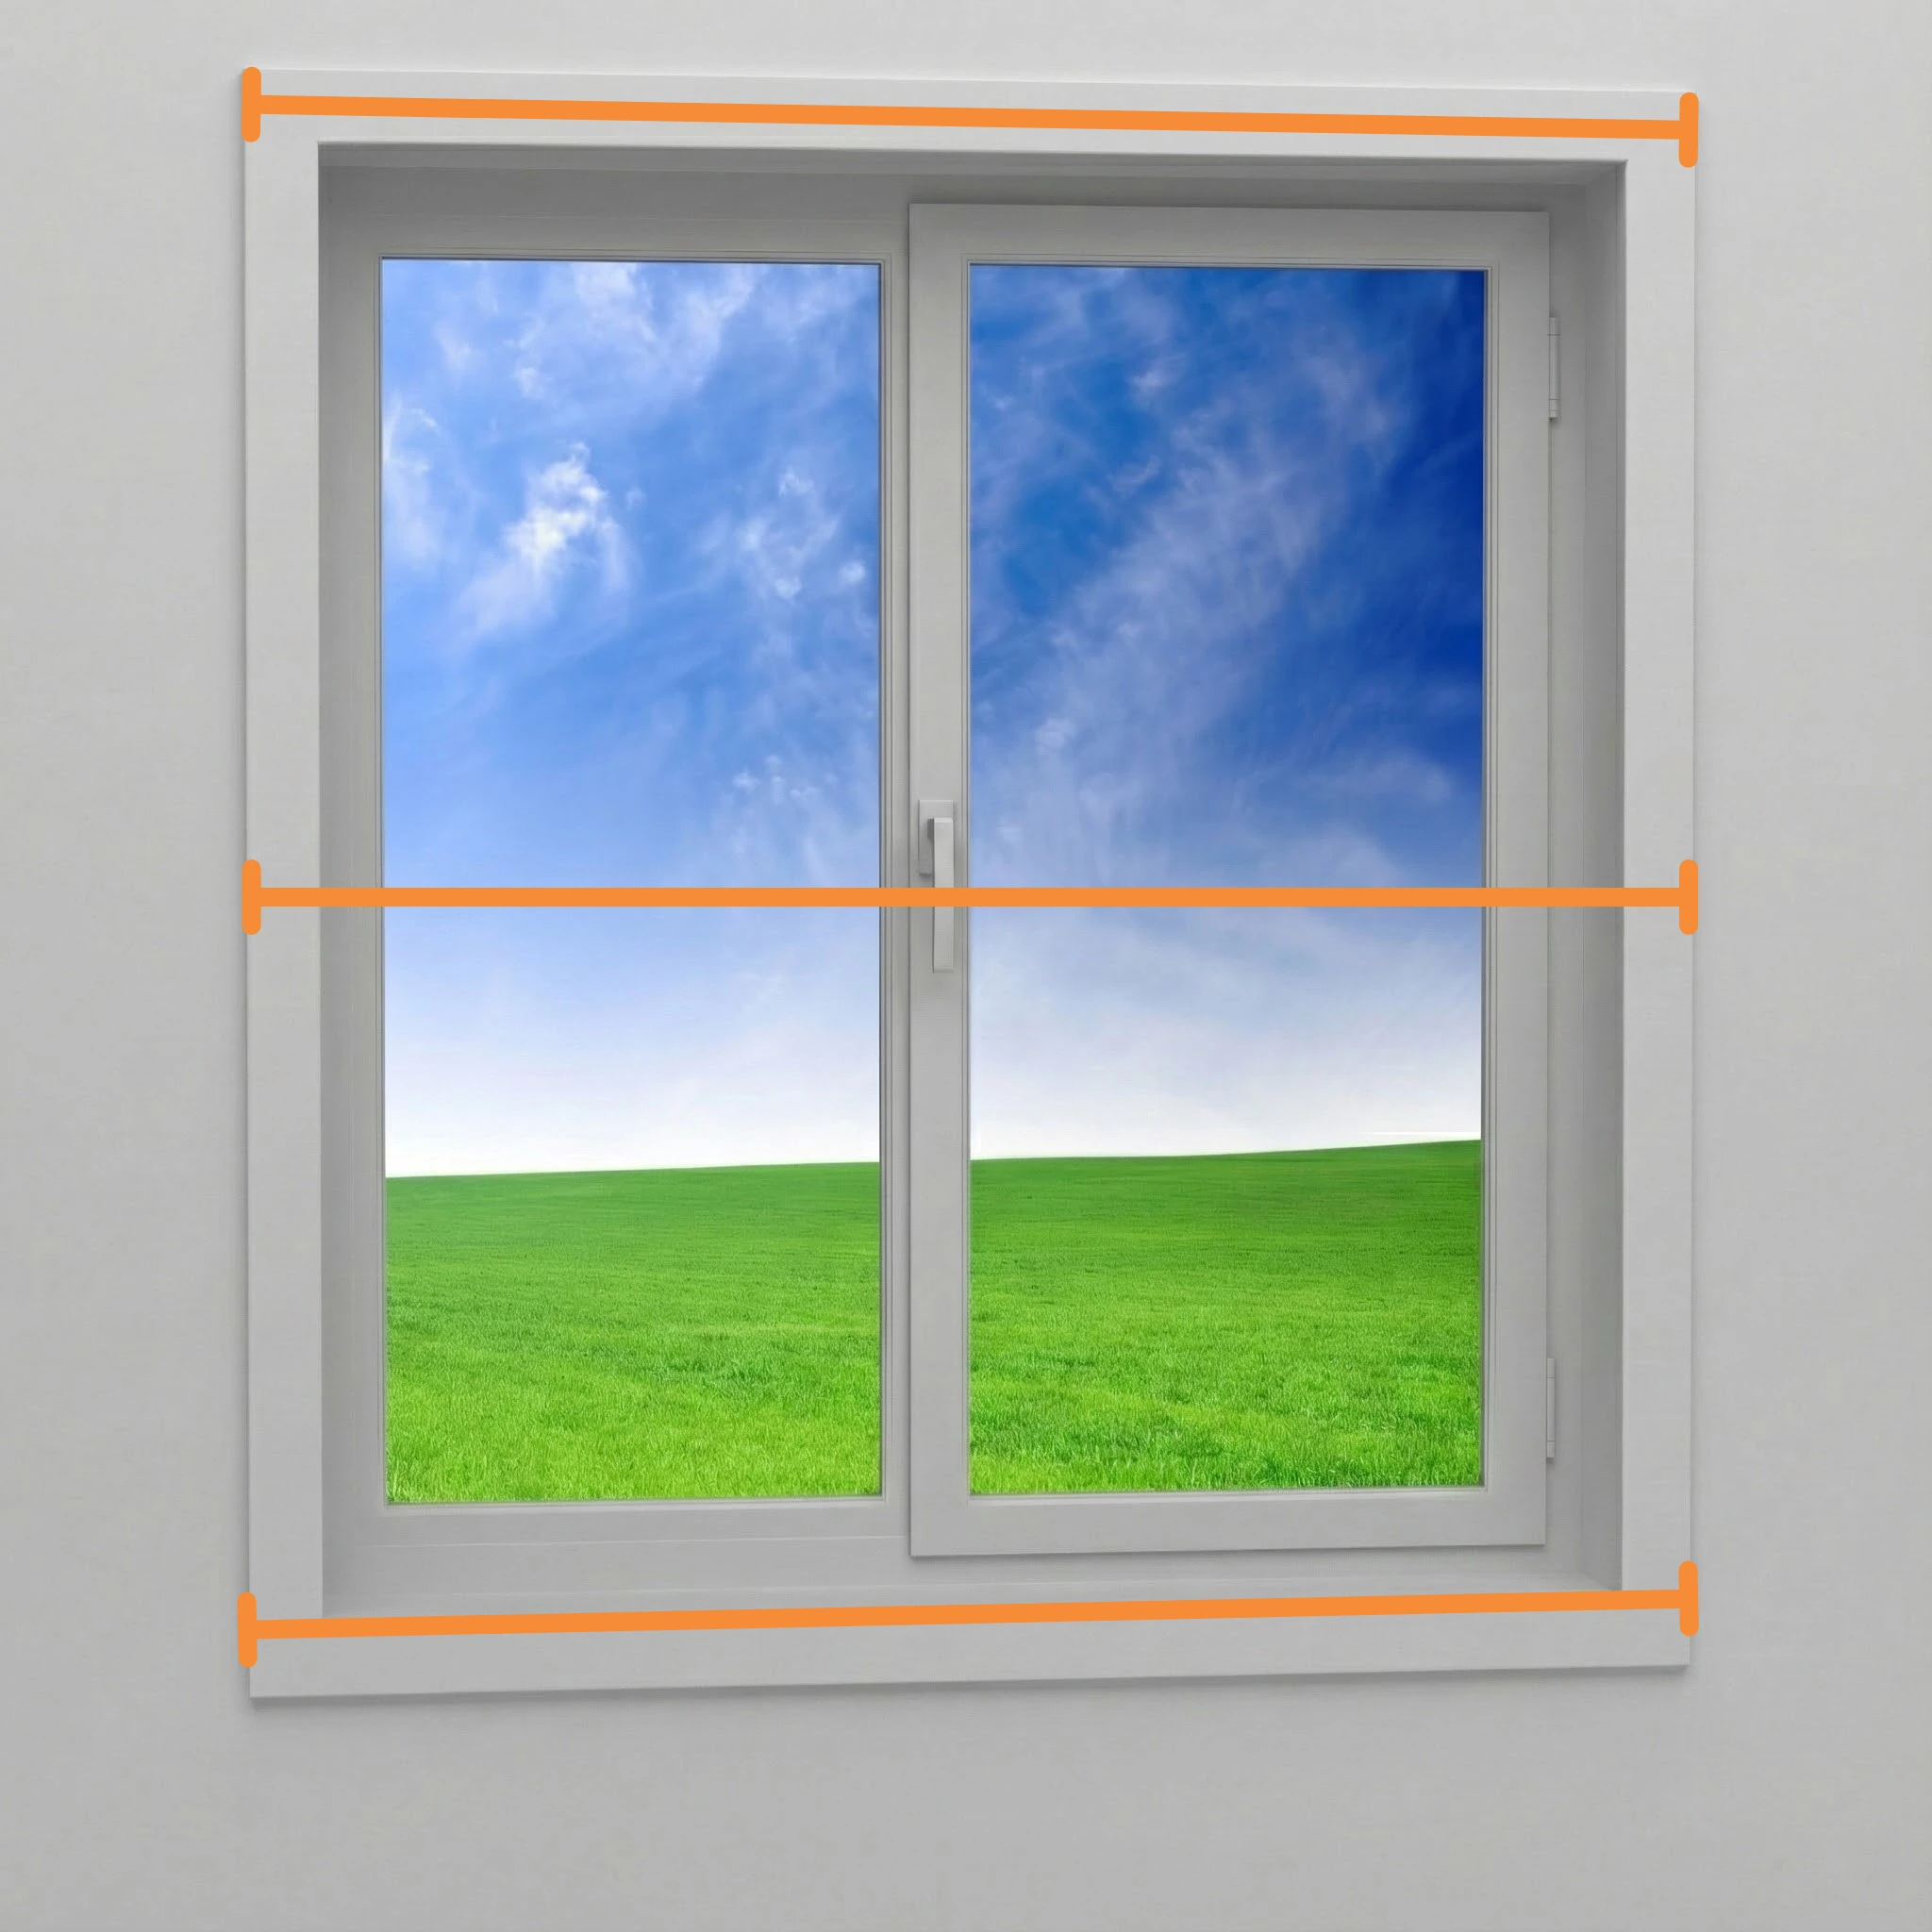
Measure the Width
Outside Mount:
Measure the outside width of your window across the top, middle, and bottom. These measurements should be taken from one outer edge of the window trim or architrave to the other. Use the smallest of the three measurements when placing your order to ensure the best fit.
3
Measure the Drop
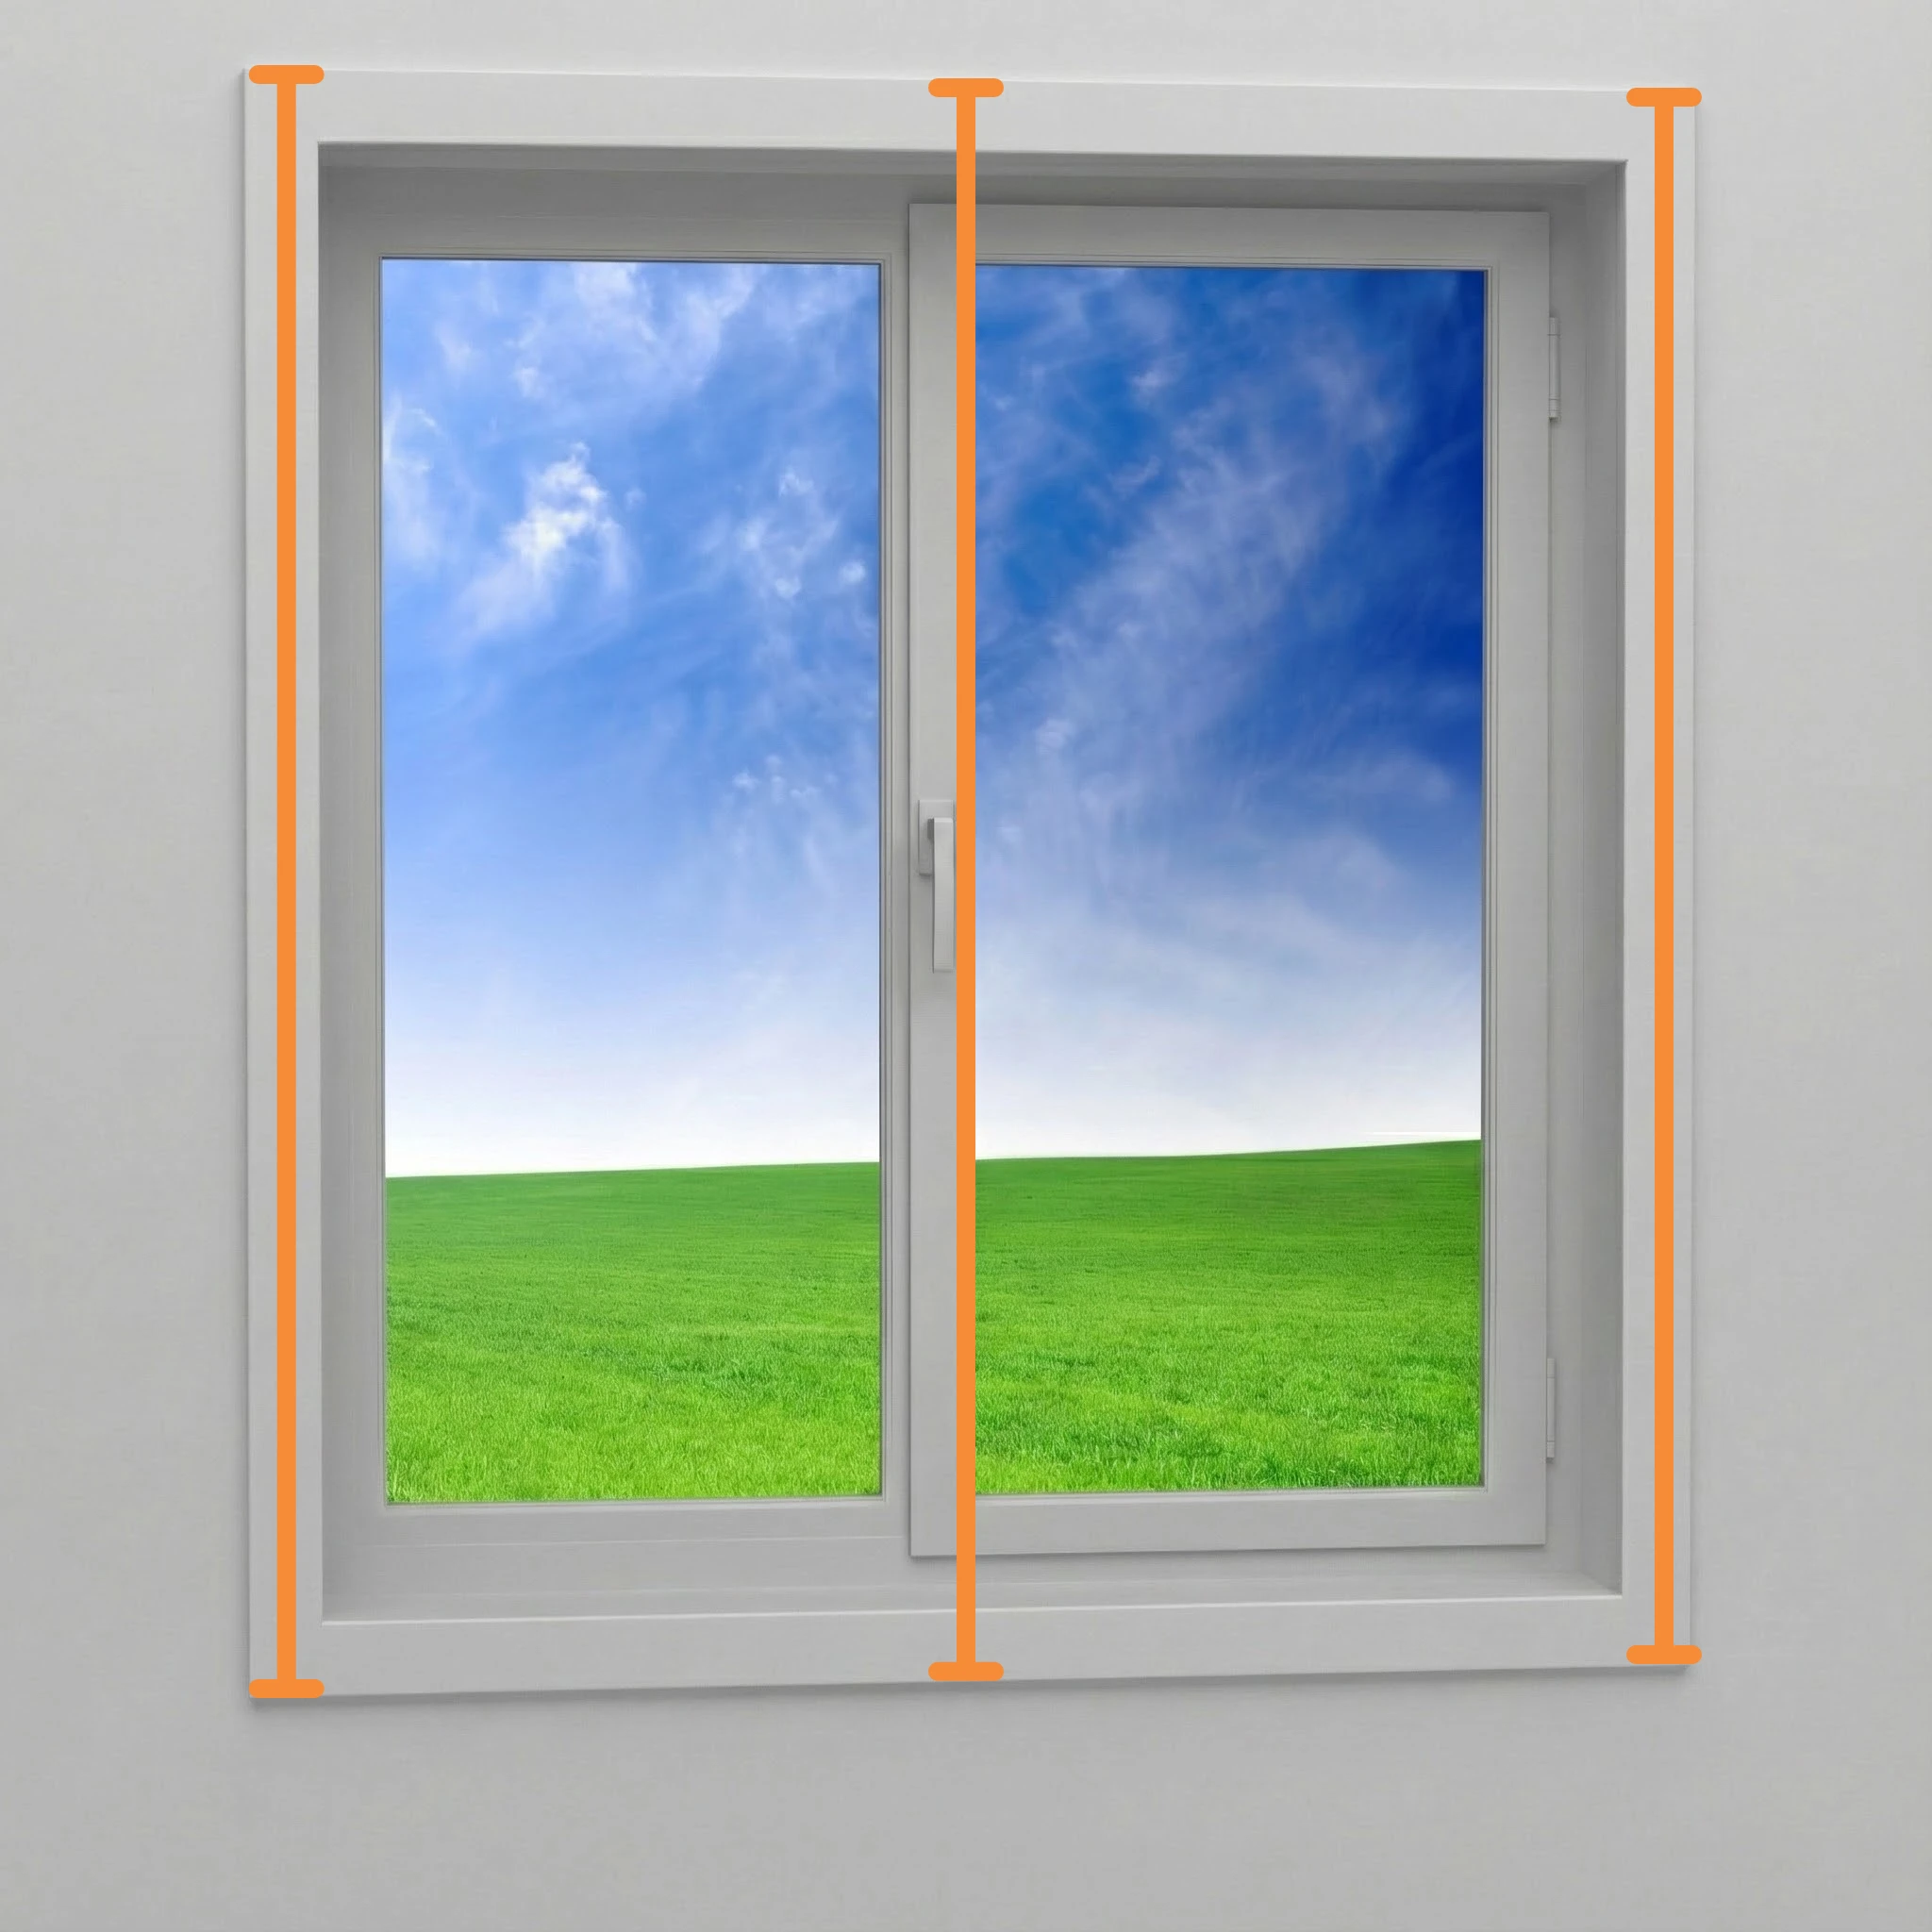
Outside Mount:
Measure the outside height of your window. Start from the point where you want the top of your shutter frame to sit (usually just above the architrave) and measure down to where you want the shutter to finish, typically at the bottom of the frame or slightly below.
Take three measurements – left, centre, and right – and use the smallest.
4
Mid Rail (if required)
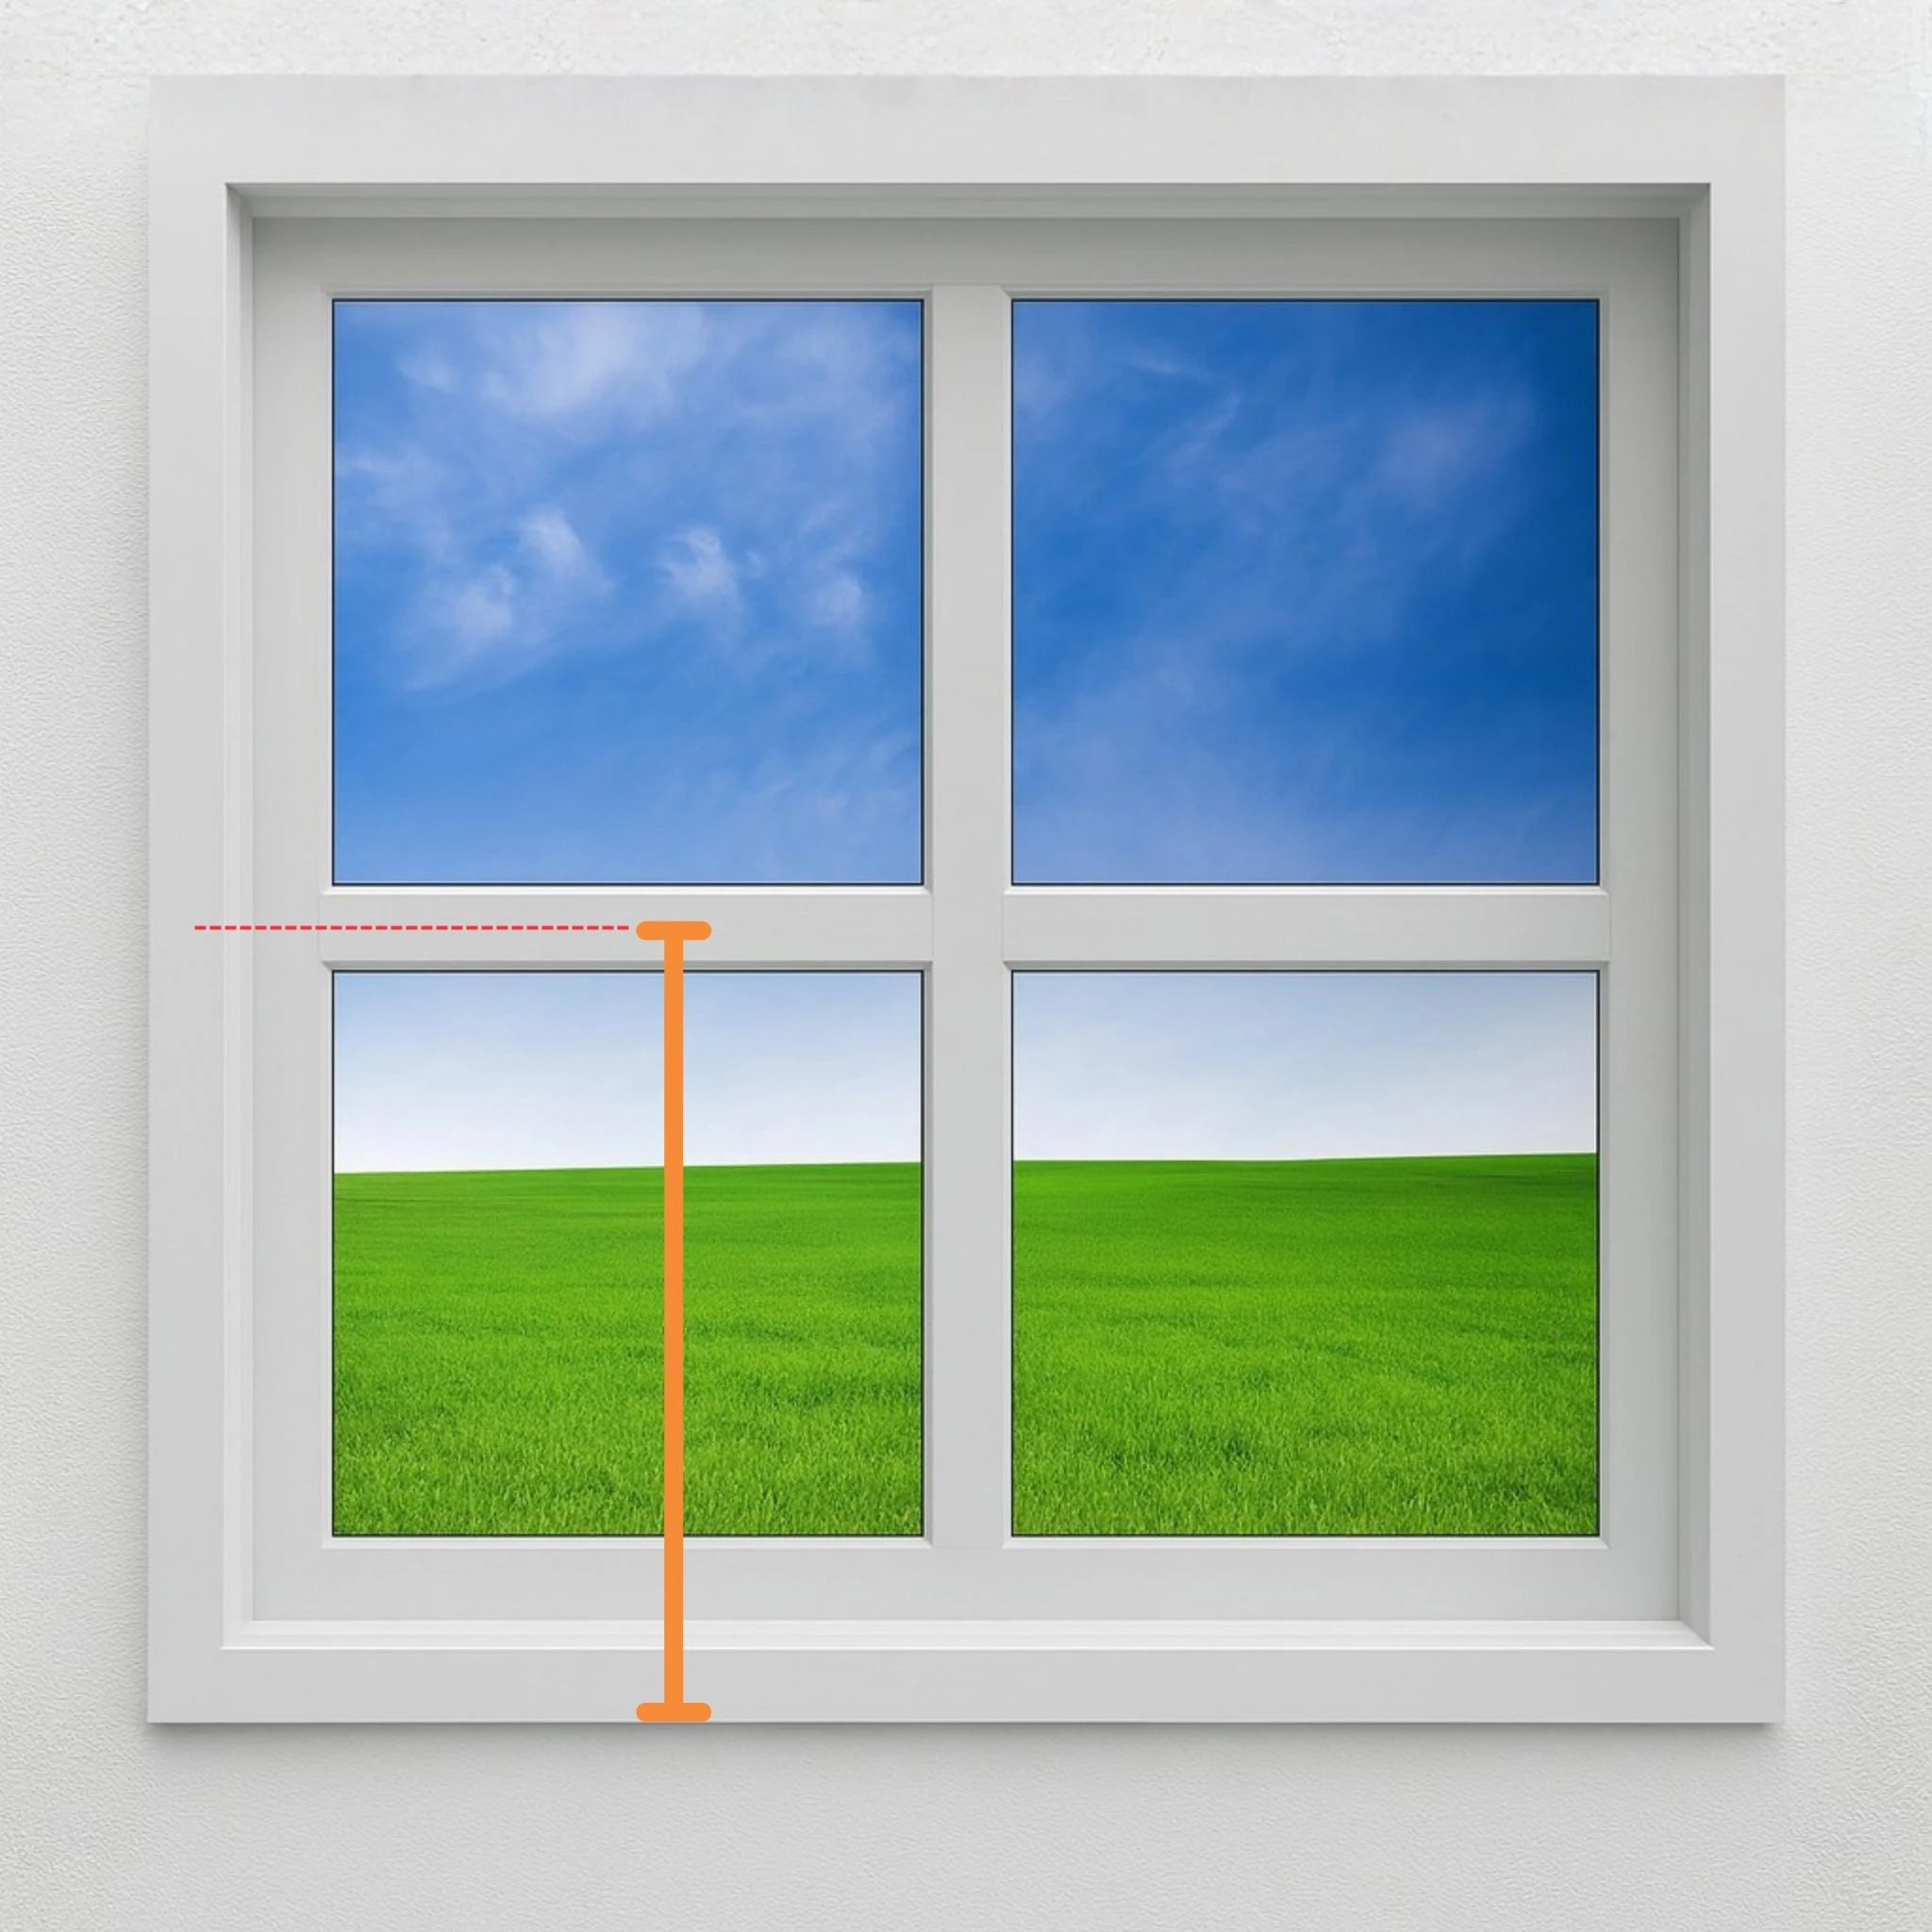
A mid rail is a horizontal bar that adds strength and allows you to control light between the upper and lower sections of your shutter.
Mid rails are approximately 76mm in height. They are required for shutter drops over 1600mm. For drops under 1600mm, they are optional but can still be included for added stability or light control.
To position your mid rail, measure from the bottom of the window to the centre of the point where you would like the mid rail to be placed. Use this measurement when placing your order.
5
T-Posts
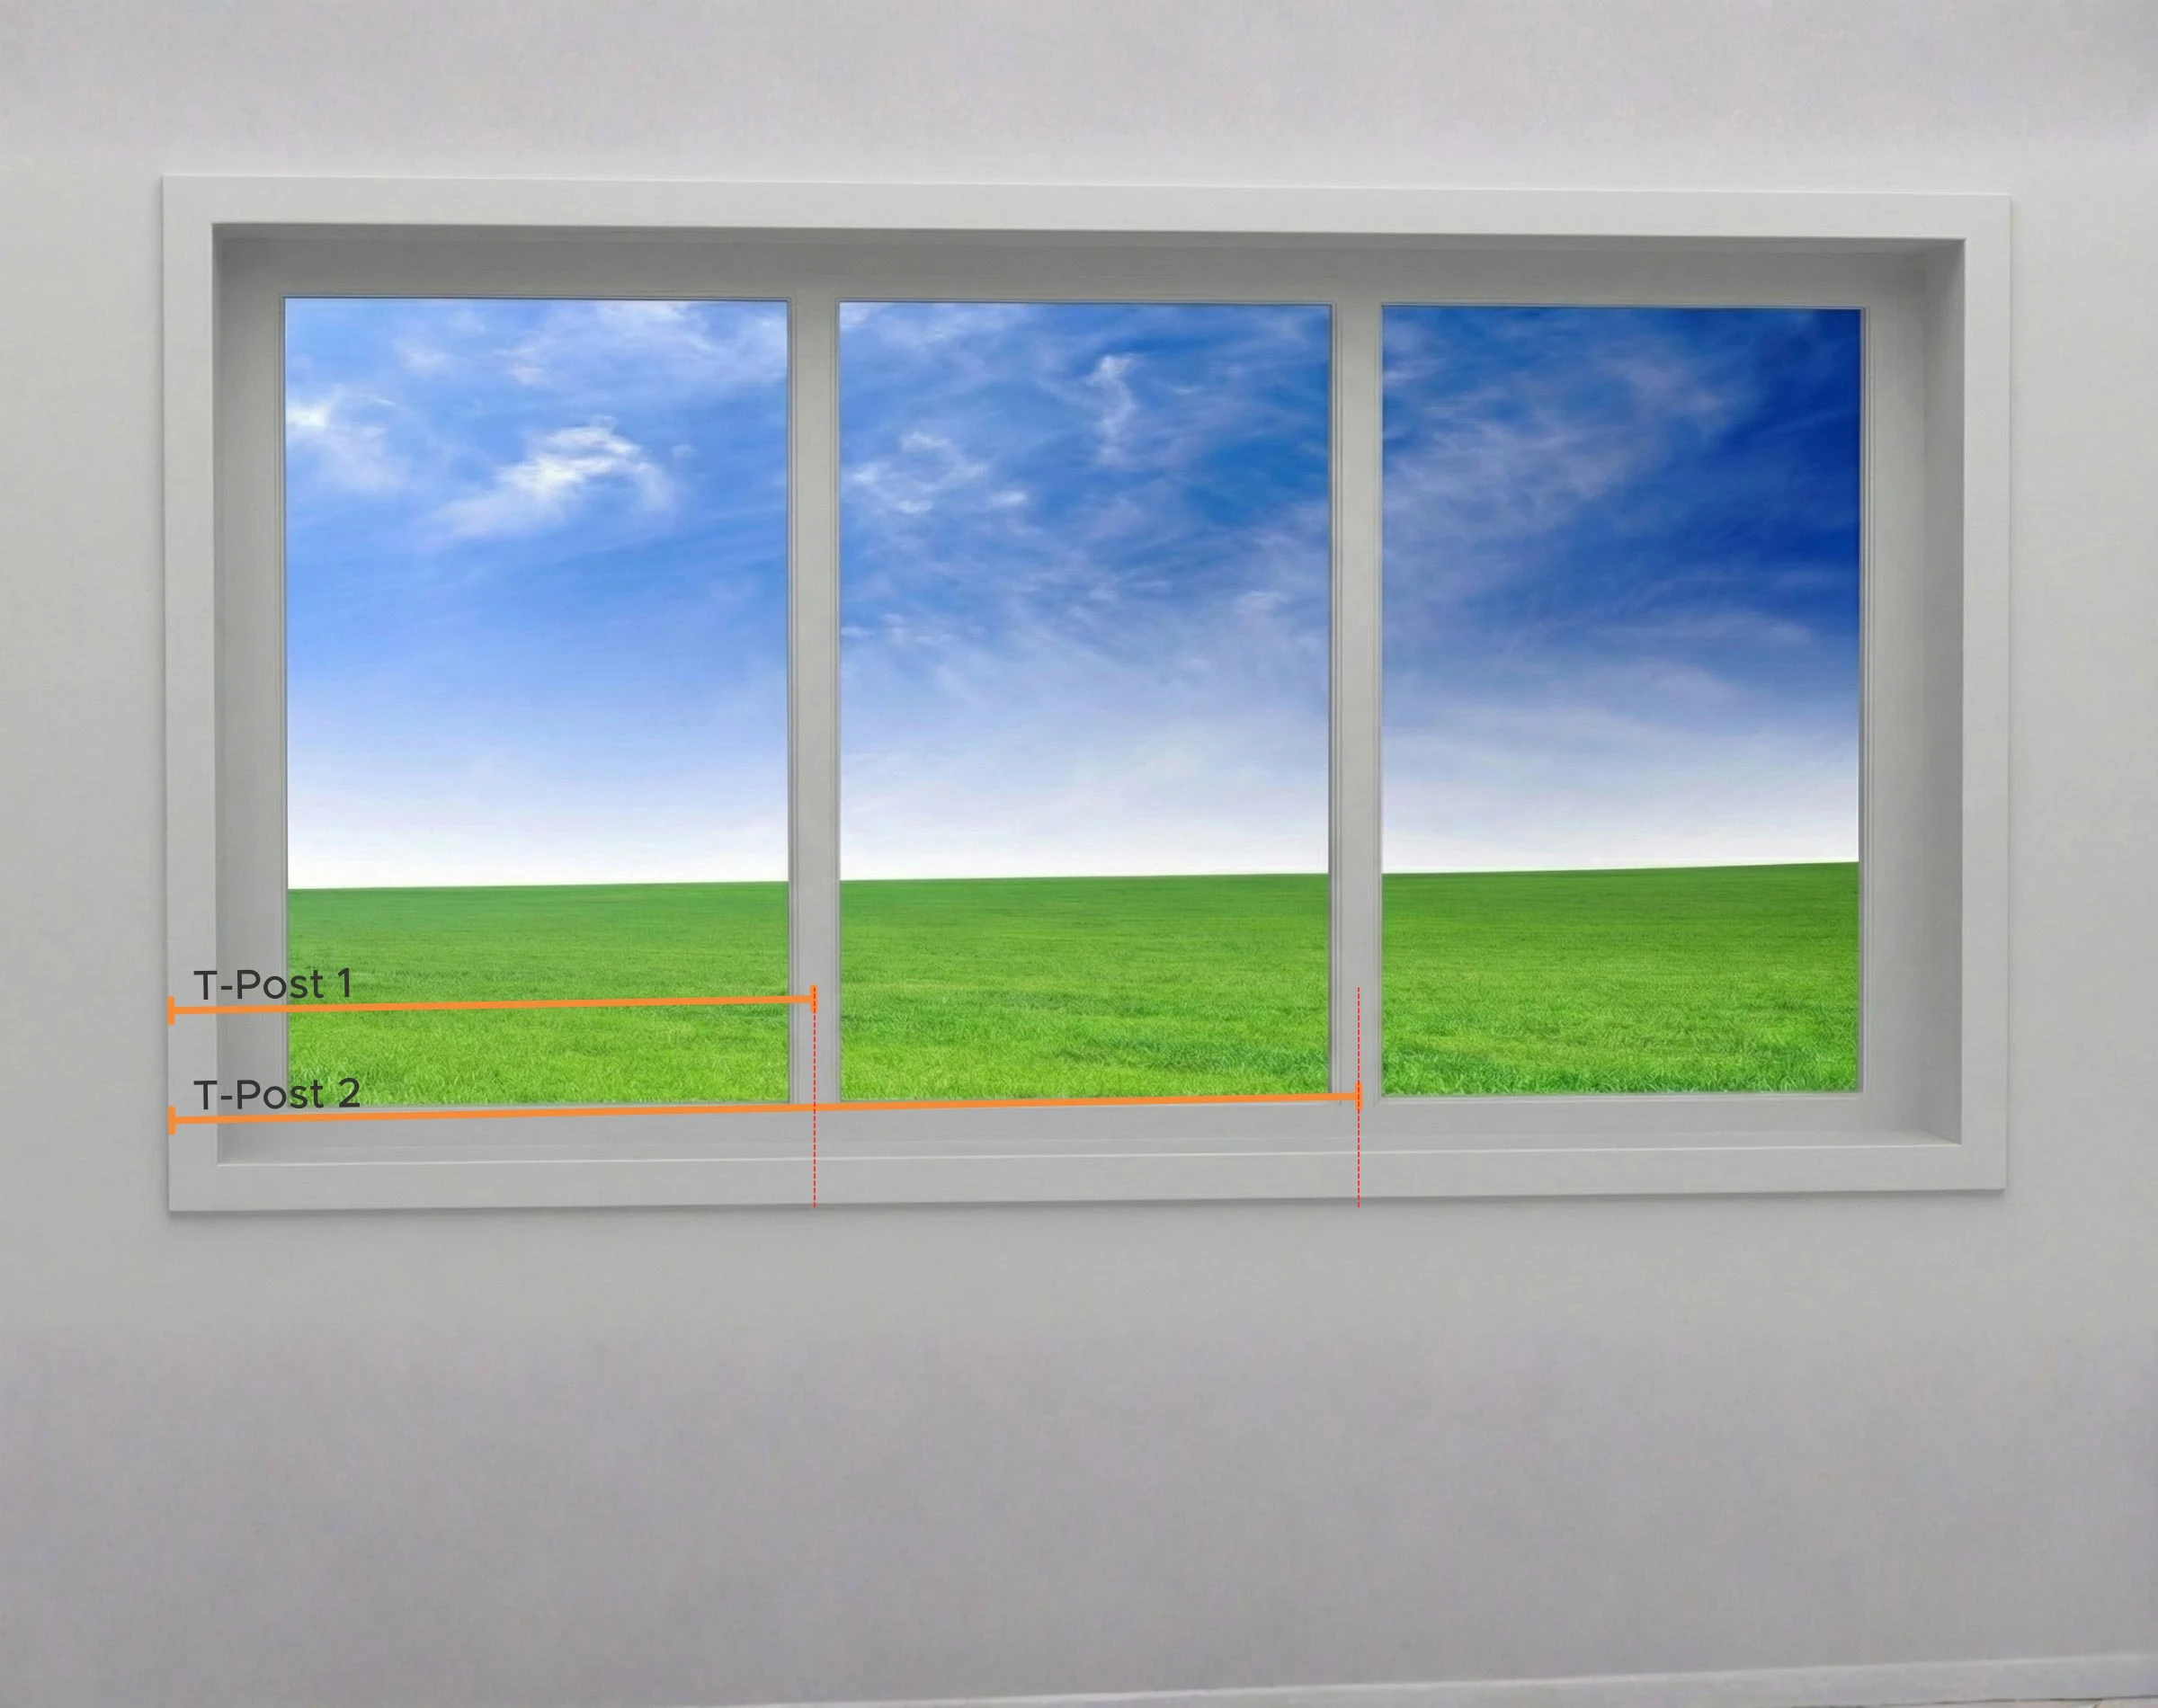
T-posts are vertical dividers that split your shutter into multiple hinged panels. They provide support for hinges and improve panel alignment.
To measure for T-posts, start at the outside left edge of the window frame and measure to the centre of the first T-post location. If more than one T-post is needed, repeat the process for each one, always measuring from the same starting point on the left edge.
Example:
Left edge to centre of T-post 1
Left edge to centre of T-post 2
6
Split Tilt Rod
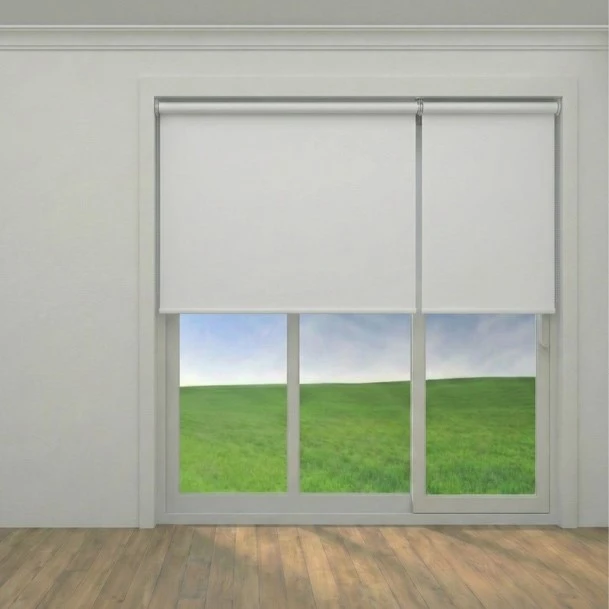
A tilt rod is used to open and close the shutter blades. A split tilt rod allows you to control sections of the shutter blades independently, giving you flexibility with light and privacy.
Each tilt rod can control up to 12 blades.
Options include:
With a mid rail: Blades above and below the mid rail operate independently.
Split half above mid rail: The panel above the mid rail is split in two sections, plus the section below. Select 'split half above mid rail' when ordering.
Without a mid rail: The panel is split in the centre, dividing it into top and bottom sections. Select 'split half' during ordering. Required for drops over 1200mm.
7
3 or 4-Sided Frame
When using an outside mount L frame, you can choose between a 3-sided or 4-sided frame depending on any obstructions at the bottom of your window.
3-sided frame: Ideal if you have obstructions at the base of the window, such as winders or security locks. The frame runs along the top, left, and right sides.
3 Sided Frame: Best when the window has an obstruction like a latch or winder
4-sided frame: The most common choice where there are no obstructions. The frame runs along all four sides of the window for a complete, enclosed look.
You will choose your frame option during the design and order process.
4-sided frame: Best for windows with no bottom obstructions
Frame Type – Outside Mount L Frame
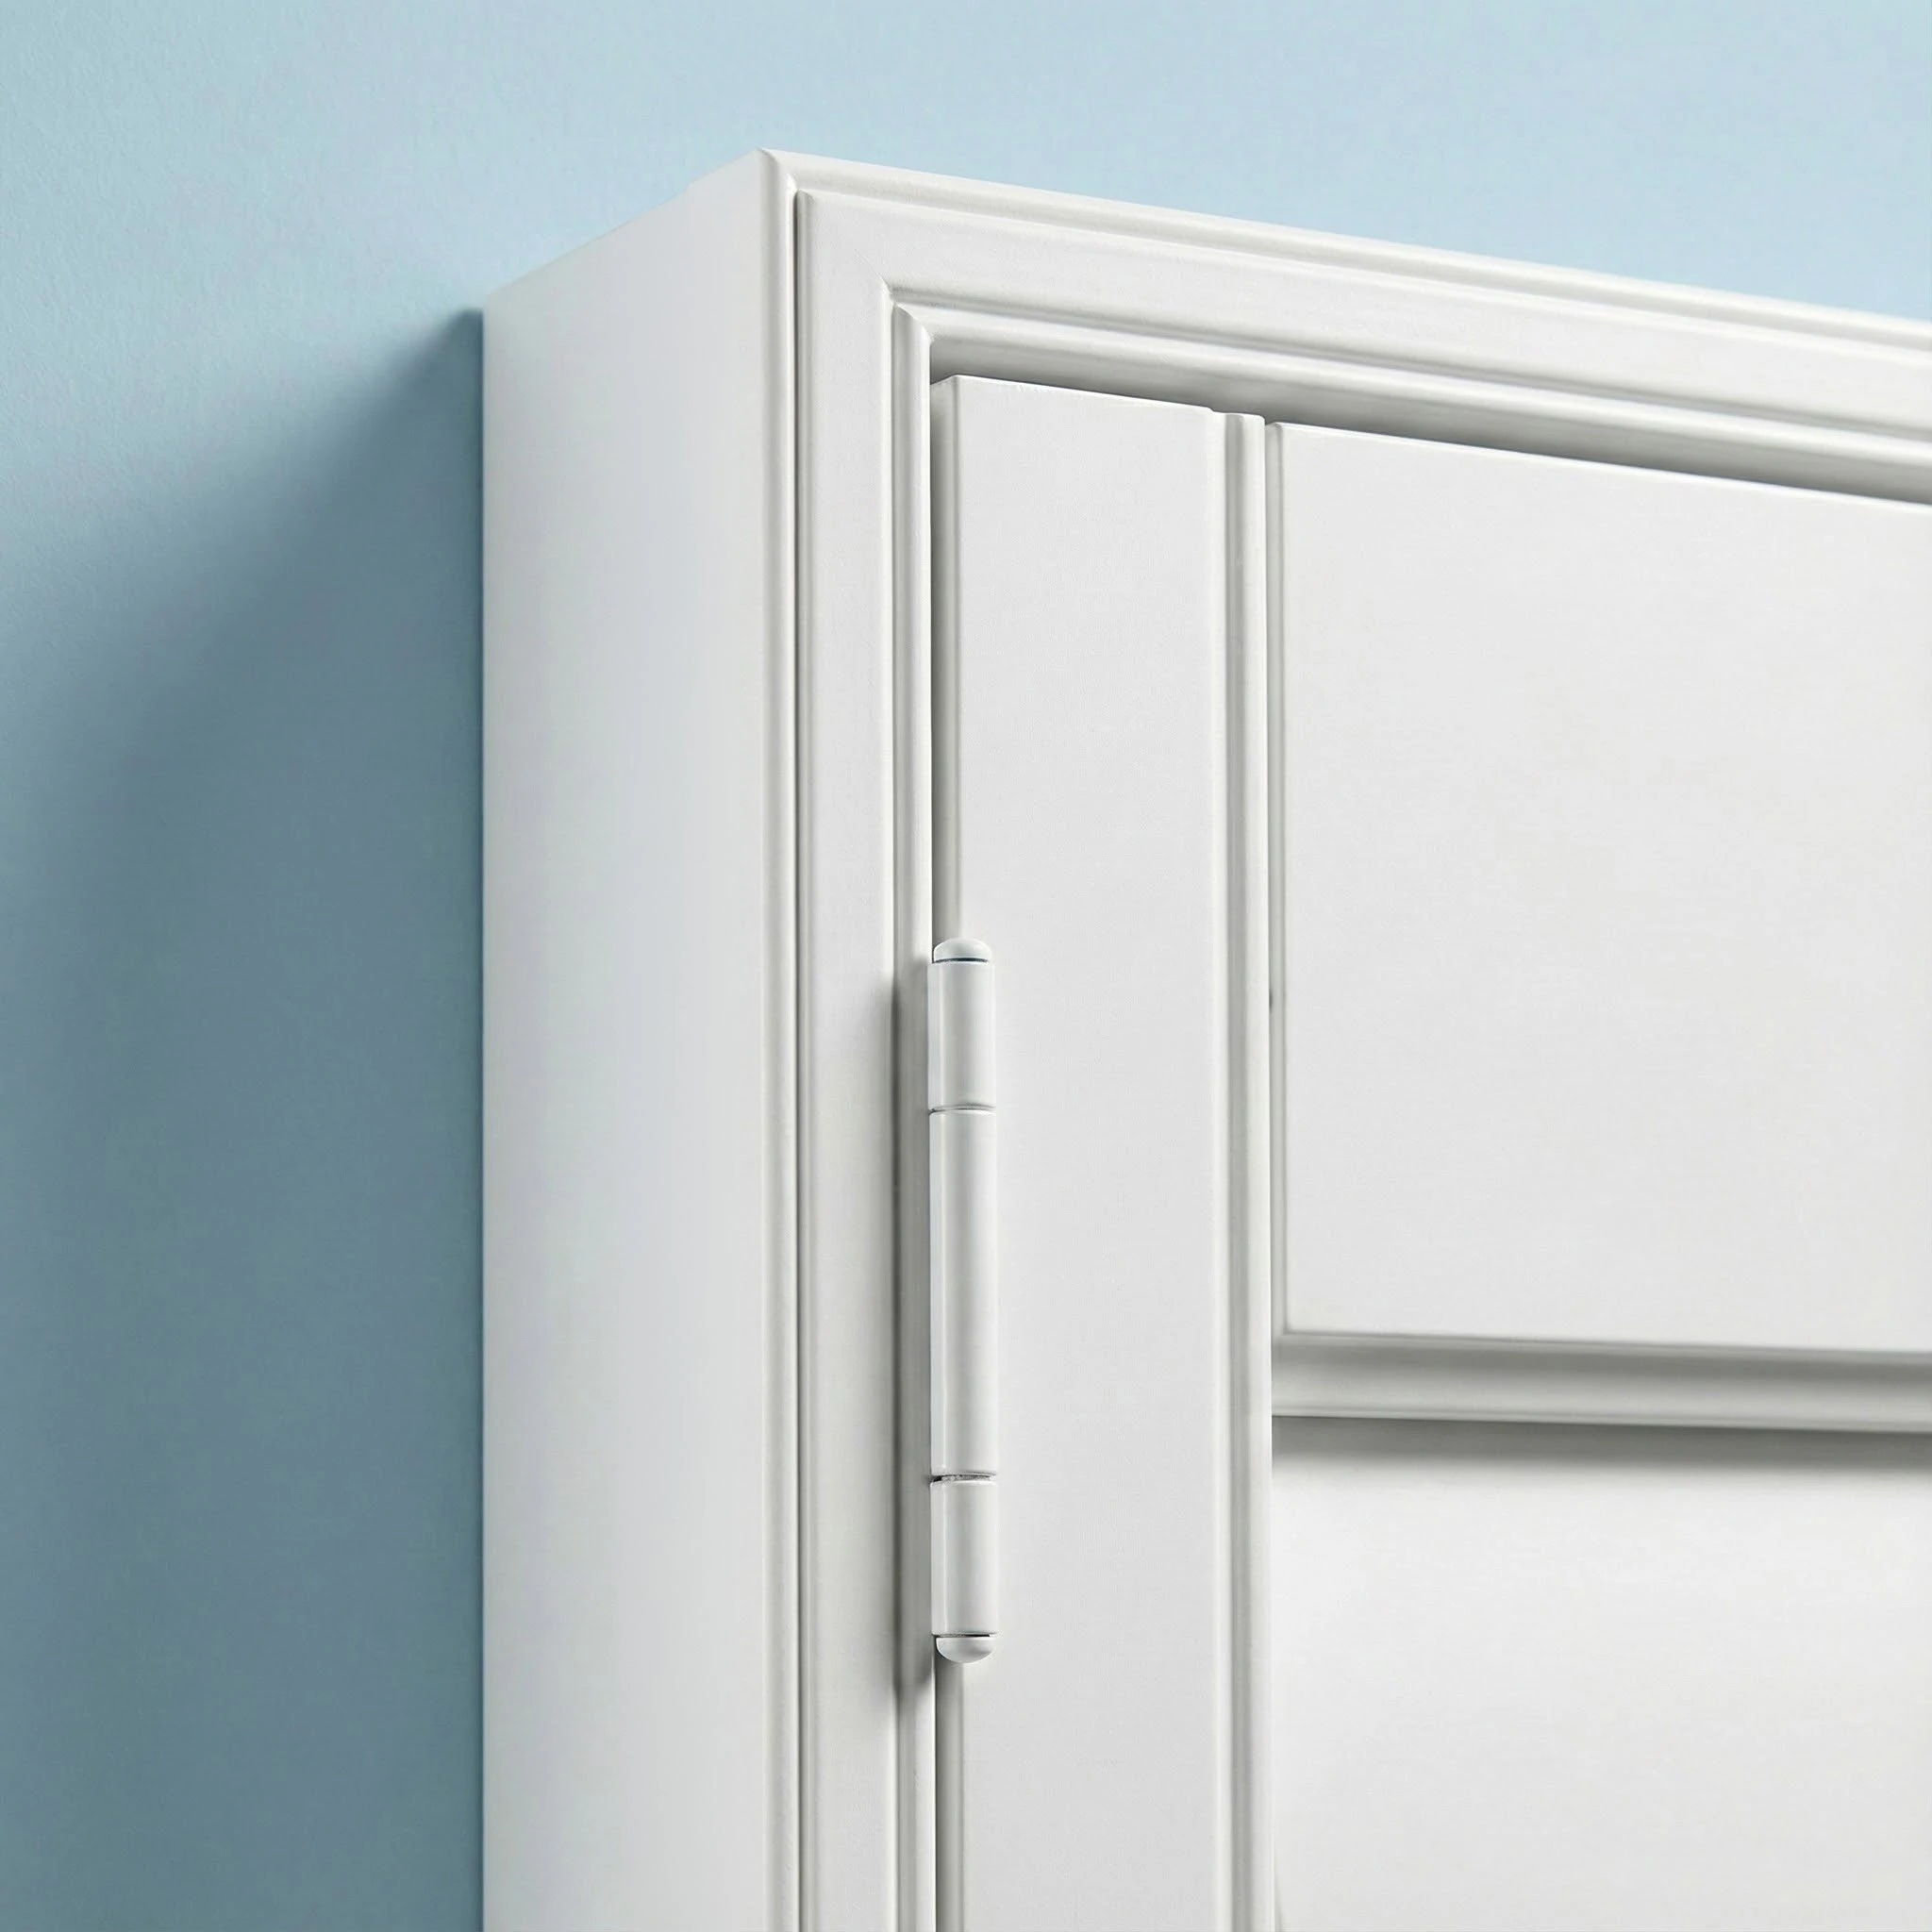
The Outside Mount L Frame is the standard and only frame option for outside mounted plantation shutters.
It is ideal for:
Windows with less than 65mm of recess depth
Double-hung windows
Installations where inside mounting is not suitable
With a projection of 78mm, this frame ensures that the blades stay within the frame and do not extend past the back. It is suitable for a wide range of applications and offers a neat, professional finish when mounted to the face of the wall or window architrave.
Need Help?
If you’re unsure about which frame option to choose or how to measure for your shutters, our team is here to help. Book a free video consultation or contact us directly for expert support throughout your DIY project.
Essential Things You Need to Know About Plantation Shutters
New Fully Assembled Shutters Explained
Which Plantation Shutter Frame Do I Need? (Frame Types Explained)
What’s Included in Your Plantation Shutter Package?
What Tools Do You Need for Plantation Shutters?
What are Plantation Shutters
How to Store Your Plantation Shutters
How to Measure Plantation Shutters
Introduction to Plantation Shutters
Good to Know
Yes—this can be completely normal. Our PVC shutters include an aluminium core for added strength, which makes them solid and durable. Because of this weight, larger sized panels can drop slightly when opened. When closing, the bottom of the panel may lightly touch the frame, so you may need to lift it a little to guide it back into place. This happens even with professional installations and isn’t considered a fault.
Shutter blades are connected by a hidden tilt rod, so they move together. On taller panels, closing the blades by adjusting just one blade may not fully close every blade. A quick adjustment of another blade will usually close the final millimetre or so. This is a normal operating characteristic of shutters.
If a window isn’t perfectly square (and most aren’t), shutters may gently swing closed when left open. Even professional installers can’t always prevent this. In reality, shutters are rarely left open for long periods, except during cleaning. This behaviour is normal and nothing to worry about.
Every shutter we make is custom-built to suit your exact window dimensions, so no two shutters are ever the same. The top, mid and bottom rails are essential to the strength, stability and overall look of your shutters, and their sizes and positions are carefully designed to suit the width and drop of each panel.
While shutter blades are a fixed size (89mm) and must be evenly spaced for smooth operation and a balanced finish, rail sizes can vary slightly to ensure your shutters perform beautifully and look just right.
Top & Bottom Rails – strength and proportion
Top and bottom rails sit at the top and base of each shutter panel and provide structural strength and stability. Their height may vary so they remain proportionate to the overall size of your panels.
When installing shutters across multiple windows in the same room , top and bottom rails can be manufactured to the same height as long as they fall within the rail specifications below. This helps achieve a clean, uniform look both inside and outside your home.
Top & Bottom Rail Size Guide
Panel Height (Drop)
Rail Height
300mm – 900mm
82mm – 120mm
901mm – 1,400mm
92mm – 130mm
1,401mm – 1,800mm
112mm – 150mm
1,801mm – 2,420mm
132mm – 170mm
Midrails – support, control and flexibility
Midrails run horizontally across the full width of your shutter panels and are approximately 76mm high . They add strength and stability and also allow you to control light and privacy more effectively.
For shutters with a drop greater than 1,600mm , a midrail is required.
For drops under 1,600mm , a midrail is optional, however you may still choose one to split the opening of your shutters in half for better light and privacy control (refer to split tilt options).
When designing your shutters, you can choose to position the midrail centrally , or customise its position to align with horizontal joins in your windows for a seamless look.
Midrails are manufactured with a tolerance, meaning custom positions can vary by ±37mm , depending on the overall drop of the finished shutter
Mike’s Tip
If your midrail needs to sit in an exact position, make sure you select a “critical” midrail when designing and ordering your shutters.
And if you’re ordering shutters for multiple windows, don’t forget to add a note telling our team to “match top and bottom rail” and which shutters need to match (for example, the room name) to achieve a consistent, polished finish throughout your home.
As always, our team is here to support you and help you design shutters that look great, work beautifully and suit your space perfectly.
Cover strips are used on outside-mounted shutters to neatly hide installation screws. They’re held in place by friction, so from time to time they may simply need to be pushed back into position.
If they come loose more often, just get in touch with our team—we’re happy to help and can send you double-sided tape we recommend for a more secure fit.
'%3e%3cline%20id='Line_28'%20data-name='Line%2028'%20y2='200'%20transform='translate(1580.5%205493.46)'%20fill='none'%20stroke='%23f7941d'%20stroke-width='5'/%3e%3cg%20id='Ellipse_50'%20data-name='Ellipse%2050'%20transform='translate(1559%205665.46)'%20fill='%23171717'%20stroke='%23f7941d'%20stroke-width='5'%3e%3ccircle%20cx='21.5'%20cy='21.5'%20r='21.5'%20stroke='none'/%3e%3ccircle%20cx='21.5'%20cy='21.5'%20r='19'%20fill='none'/%3e%3c/g%3e%3c/g%3e%3c/svg%3e)